background image


In

s

ru

c

ti

o

n

 m

a

n

u

a

l D

u

k

k

i


Summary of Contents for Dukki

Page 1: ...Insruction manual Dukki ...

Page 2: ......

Page 3: ...Introduction Pg 1 Product description Pg 2 3 Assembly and disassembly Pg 4 Installation and adjustment Pg 5 12 Maintenance Pg 13 Parts Pg 14 17 ...

Page 4: ...Footrest 6 4 2 1 Adjusting 6 4 3 Armrest 6 4 3 1 Installation 6 4 4 Abduction block 7 4 4 1 Installation 7 4 5 Hygienic bowl po 7 4 6 Pelvis and chest straps 8 4 6 1 Installation 8 4 6 2 Adjusting strap length 9 4 7 Foot straps 10 4 7 1 Installation 10 4 7 2 Adjusting strap length 10 4 8 Headrest 11 4 8 1 Installation of the head rest 11 4 8 2 Adjusting height depth and angle 12 5 Maintenance 13 5...

Page 5: ...y Huka N B This guarantee does not apply to components susceptible to wear CC The Dukki is fully certificated and wears the CE mark Huka BV Huka BV is a Dutch firm which produce several products for disabled people Please contact the distributor or Huka BV if you have any questions left Huka BV Tel 31 0 541 572 472 Fax 31 0 541 520 415 e mail sales huka nl Changes Huka BV reserves the right to mak...

Page 6: ...ishing of the frame and the mounted components are of high quality Therefore you are assured of an excellent product a careless shower pleasure When supplying your new Huka Dukki in principle all described components are adjusted well and or are turned to you wishes But no matter how modern even a Huka Dukki is not completely free of maintenance There are some things that require attention from ti...

Page 7: ...uding all possible accessories fig 1 1 carrier frame 2 liding tube with fork 3 seat shell 4 footrest 5 locking pin with special key 6 abduction block 7 armrest 8 hygienic bowl 9 headrest flat model 10 headrest wit neck and sidesupport 11 chest strap 12 pelvis strap 13 foot straps 2 ...

Page 8: ...0 till plus 60 Celsius 2 2 Technical details Dukki 1 Dukki 2 Dukki 3 Dukki 4 Seat width 24 cm 27 cm 30 cm 32 cm Seat depth 23 cm 27 cm 32 cm 38 cm Seat height 49 61 cm 48 60 cm 46 59 cm 46 59 cm Back width 25 cm 27 cm 29 cm 31 cm Back height 38 cm 42 cm 45 cm 48 cm Angle adjustment 5 60 5 60 5 60 5 60 Maximum width 53 cm 55 cm 58 cm 60 cm Length carrier 64 cm 64 cm 80 cm 80 cm Weight 9 kg 10 kg 12...

Page 9: ...ks 3 Adjust the seat shell in the right position 4 Fixate this position by fastening the red knobs firmly 3 2 Assembling the seat figure 3 1 Check that the red turning knobs on the seat are fully loosened 2 Place the seat in the fork of the frame 3 Tilt the seat to the correct position 4 Turn the turning knobs until tight turn according to diagram To disassemble follow these steps in the opposite ...

Page 10: ... forks and give a slight tick on these bolts 5 Slide the sliding tube until the correct height is reached and then tighten the bolts well 6 Using the demarcations on the back of the sliding tube check that both forks are exactly the same height 7 Place the seat in the forks of the frame 8 Tighten the red knobs on the seat well 5 When setting the height of the seat ensure that the red section of th...

Page 11: ...t until the thigh is almost lifted from the seat 3 In this position put the locking pin through both holes at the back of the foot support 4 Twist the locking plate so that the locking pin can no longer be released 4 3 Armrest 4 3 1 Installation 1 Hook the armrest int the seat 2 Small modell pull the red knob from the abduction block backwards the armrest is to remove now figure 5a Wide modell pul...

Page 12: ...le lifting the red locking pin in the block 2 Fix the abduction block by letting the locking pin drop 4 5 Hygienic bowl Po 1 Place the opening of the hygienic bowl in the seat from the back 2 Hook the hygienic bowl at the back into the notch in the seat 3 Twist the locking plate so the bowl can no longer be released 7 When using the hygienic bowl do not tilt the seat further back than 20 ...

Page 13: ...stallation figure 6 1 Pass the end of the strap from front to back through the hole in the seat 2 Pass the end of the strap through the winding block about 1 inch 3 Wind the strap tightly a number of times around the block 4 Place the winding bocks in the hole in the back of the seat 8 ...

Page 14: ...e excess strap can be stored in the seat by winding it around the blocks so no long piece of strap is left hanging The sliding clasp allows easy adjustment of strap length to accommodate extra clothes or use of the Dukki by different children 1 Place the child in the Dukki 2 Pass the strap through the clasp until approx 4 inches are showing 3 Adjust the length by winding around the blocks ensure t...

Page 15: ...trap centrally over the foot 4 Fix the strap by pulling on one of the two handles Figure 9 adjusting strap length 4 7 2 Adjusting strap length figure 9 1 Place the foot in the loop of the foot strap 2 Pull on the underside of the foot rest on the loose end of the foot strap 3 Fix the foot strap at the correct length by pulling the handle over 4 The foot can easily be removed by loosening one clip ...

Page 16: ...e clip from the upper part of the back of the seat 2 Remove the wrench from the locking pin in the footrest 3 Loosen the upper bolts in the back of the seat 4 Feed the profiles on the head rest as far as possible into the back of the seat 5 Retighten the bolt in the back of the seat see figure 10 11 ...

Page 17: ... the head rest can be moved 2 Decide on the correect position for the head rest 3 Fix the head rest using the handle If the head rest cannot be raised far enough the whole rest can be raised slightly more by fixing it further up in the seat 1 Remove the wrench from the locking pin for the foot rest 2 Loosen the upper bolts in the back of the seat 3 Draw the profiles a maximum of 5 cm upwards in th...

Page 18: ...eaning agents Stubborn marks can be removed using a clothe dipped in a chlorine based toilet cleaner When using the Dukki in the shower it is possible that some water will get into the seat Ensure that no water is left in the seat by occasionally tilting it forward The water will then run out through a hole in the bottom of the stem Water which has entered the arm rest abduction block or feet rest...

Page 19: ...the following descriptions Number Description 1 01 Side frame left 1 02 Front wheel with brake 1 03 Back wheel 1 05 Nut for wheel fixing 1 06 Bumper 1 07 Side frame right 1 08 Holding block 1 09 Bolt for cross bar connection 1 10 Nut for holding block 1 11 Frame cap 1 12 Clamping bolt for height adjustment 1 13 Washer 1 14 Cross bar 1 15 Sliding tube 1 16 Fork 1 17 Sticker sliding tube 1 18 Frame ...

Page 20: ...at profile for head rest 2 07 Capt for head rest mount 2 08 Cylinder head screw 2 09 Knob cap for seat hanging 2 10 Bolt for seat hanging 2 11 Knob for seat hanging 2 12 Helical spring for seat hanging 2 13 Hanging block left 2 14 Hanging block right not in drawing 2 15 Spring washer for seat hanging 2 16 Washer for seat hanging 2 17 Plug for seat hanging 2 18 Locking pin for foot rest 2 19 Guide ...

Page 21: ...Figuur 14 fixaties en hoofdsteun 16 ...

Page 22: ... strap pelvis strap and chest strap 4 01 winding block 4 02 pelvis and chest straps with clasp head rest 5 01 Top cap 5 02 Left wire nut 5 03 Side section 5 04 Cone 5 05 spring 5 06 holding bar handle 5 07 holding bar 5 08 cross piece 5 09 holding tube 5 10 cylinder head screw 5 11 sliding section 5 12 right wire nut 5 13 flat PUR section 5 14 PUR section with side and neck support 5 15 Head rest ...

Page 23: ......

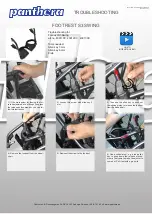
Page 24: ...Huka BV P O Box 194 7570 AD Oldenzaal Tel 31 541 572472 e mail sales huka nl Your dealer ...

Reviews: