Huawei EchoLife HG550, User Manual
The Huawei EchoLife HG550 user manual is available for free download on manualshive.com. This comprehensive manual provides step-by-step instructions for optimal setup and usage of the product. Get your hands on this manual to make the most of your Huawei EchoLife HG550 and enhance your user experience.
Share
Download


Reviews:
No comments
Related manuals for EchoLife HG550

1400 Series
Brand: Patton electronics Pages: 2

DVG-5004S
Brand: D-Link Pages: 10

DSA-3600
Brand: D-Link Pages: 17

HWg-SMS-GW3
Brand: HW Group Pages: 19

2100-GSM4
Brand: Rath Pages: 2

UST200-83H-FL
Brand: AXIOMTEK Pages: 57

1837
Brand: DoorKing Pages: 72
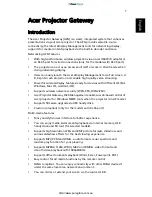
Projector Gateway
Brand: Acer Pages: 58

TAU-8.IP
Brand: ELTEX Pages: 102

TAU-4M.IP
Brand: ELTEX Pages: 126

IVR-100
Brand: Planet Networking & Communication Pages: 93

T3200M
Brand: ActionTec Pages: 71

Avocent
Brand: Vertiv Pages: 2

Avocent
Brand: Vertiv Pages: 117

VoiceBlue Next
Brand: 2N Pages: 9

460DFMSC-NNA1
Brand: RTA Pages: 66

TP-Link TD-W9970
Brand: iiNet Pages: 12

4940301
Brand: Theben Pages: 88


