R
em
ot
e
LE
D
LOOP+
LOOP-
A
dd
re
ss
ab
le
Fi
re
A
la
rm
C
on
tr
ol
P
an
el
LOOP+
LOOP-
R
em
ot
e
LE
D
INSTALLATION AND MAINTENANCE INSTRUCTIONS
HD203B
Addressable Photoelectric Smoke& Heat Detector
SPECIFICATIONS
Operating Voltage Range:
16 to 28 VDC
Standby Current:
380µA @ 28 VDC (one communication every 5 seconds with LED blink enabled)
Maximum Alarm Current (LED on: ) 5 mA @ 28 VDC
Operating Humidity Range:
10% to 93% Relative Humidity, Non-condensing
Operating Temperature Range:
14°F to 122°F (-10°C to50°C)
Smoke Sensitivity:
1.06±.26%FT.
Fixed Temperature Rating:
135°F (57°C)
Rate of Rise Detection:
Responds to greater than 15°F/min,A2R
Height:
2.2˝ (55 mm) installed in Base
Diameter:
4.0˝ (103 mm)
Weight:
5.5 oz. (155 g)
INSTALLATION
BEFORE INSTALLING
This sensor must be installed in compliance with the
control panel system installation manual. The installation
must meet the requirements of the Authority Having
Jurisdiction (AHJ). Sensors offer maximum performance
when installed in compliance with the National Fire
Protection Association (NFPA); see NFPA 72.
GENERAL DESCRIPTION
The detector is plug-in type photoelectronic smoke and
heat sensors with addressable analog communications.
The sensors transmit an analog representation of smoke
density or temperature over a communication line to a
control panel. Inside MCU’s EEPROM keep the sensor’s
address that can be set by a portable Address setting
device.
Two LEDs on the sensor are controlled by the panel to
indicate sensor status.
The
detector require
compatible
addressable
communications to function properly. Connect these
sensors to listed-compatible control panels only.
WIRING GUIDE
All wiring must be installed in compliance with the
National Electrical Code, applicable local codes, and any
special requirements of the Authority Having Jurisdiction.
Proper wire gauges should be used. The installation wires
should be color-coded to limit wiring mistakes and ease
system troubleshooting. Improper connections will
prevent a system from responding properly in the event of
a fire.
Remove power from the communication line before
installing sensors.
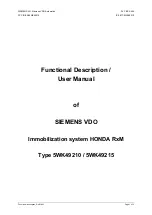
1. Wire the sensor base per the wiring diagram, Figure 1.
2. Set the desired address by portable address setting
device.
3. Install the sensor into the sensor base. Push the sensor
into the base while turning it clockwise to secure it in
place.
4. After all sensors have been installed, apply power to
the control unit and activate the communication line.
5. Test the sensor(s) as described in the TESTING section
of this manual.
Figure 1. Wiring diagram:
Dust covers provide limited protection against
airborne dust particles during shipping. Dust covers
must be removed before the sensors can sense smoke.
Remove sensors prior to heavy remodeling or
construction.
TAMPER-RESISTANCE
The detectors include a tamper-resistant capability that
prevents their removal from the bracket without the use
of a tool.
CAUTION
©
60mm