

HRDV 16/8
Duplex
Quick Installation
For Front Panel Operation, see over.
For more detailed information, refer to the HRDV
Duplex
Reference Guide and the HRDV RAS
Guide on your CD and at www.honeywellvideo.com.
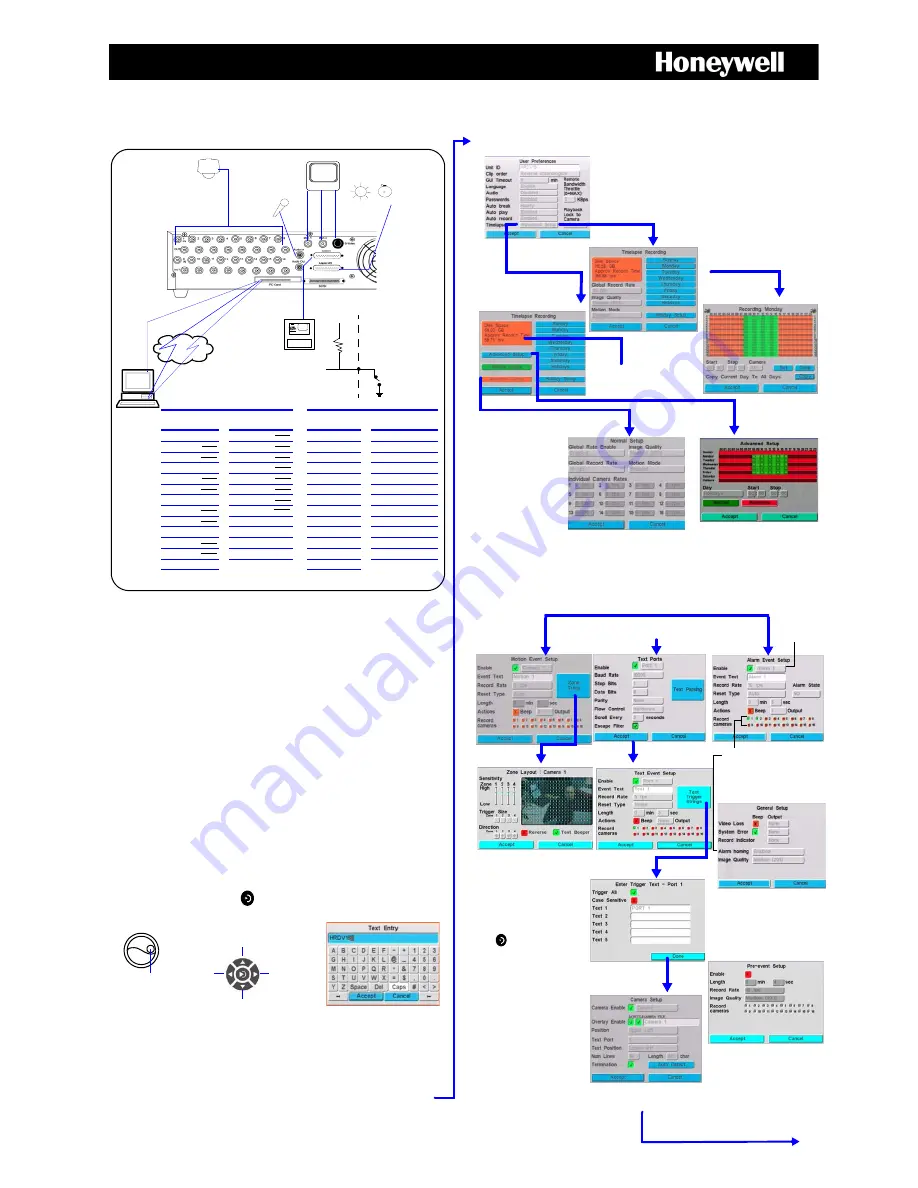
Step 1: Connect cameras, peripherals
Step 2: Configure the
Duplex
Mandatory settings
1.
Power up the unit and wait two minutes.
2.
Enter program mode. Press
MENU
on the front panel, then press
1
for
User 1
, followed by
1234
for the default password.
3.
Choose
Easy Configurator
or
Menu
.
a.
Use
Easy Configurator
to guide you through programming in 10
minutes or less, then proceed to
Step 3 - Daily Operation
.
b.
Or use
Menu
for more advanced functions as follows.
4.
Set to factory default settings (
MENU
➤
System Setup
➤
Default
Settings
). Wait ten seconds.
5.
Format all (
MENU
➤
Storage Setup
➤
Disk Setup
and select
Format All
).
6.
Enable user access for each user name (
MENU
➤
Change
Password
). At least one user must have Administrative access
enabled. Silent Witness recommends that you change the passwords
for each user.
7.
Set the clock (
MENU
➤
Clock Setup
). Enter time and select
Set
.
8.
Configure camera setup (
MENU
➤
System Setup
➤
Video Inputs
).
This assumes all live cameras are physically connected. Perform an
autodetect
. This enables the connected cameras and automatically
adds them to the switcher.
Edit text/screen titles and numerical values
9.
Set event drive partition to
___ %
, timelapse to
____ %
(
MENU
➤
Storage Setup
➤
Disk Setup
). If timelapse only, set event to 0%.
Event space is required to record motion, text, or alarm event clips.
10. Enable Autorecord (
MENU
➤
System Setup
➤
User Preferences
).
Connect up to 16
cameras, depending on
your model.
Alarm output
Microphone
with pre-amp
1 to 3 monitors
RAS
via
ser
ial d
irec
t co
nne
ct
RA
S
vi
a
Et
he
rn
et
RA
S
via
d
ial
-u
p
m
od
em
Alarm Inputs
To set NO/NC, see Alarms.
Normally Open (NO).
If closed, alarm is
detected.
Normally Closed (NC).
If open, alarm is
detected.
External to
Duplex
(Add this functionality
Internal to
Duplex
yourself)
75 W
Power supply (not shown)
110 VAC 60 Hz or
230 VAC 50 Hz
autosensing
Ma
in
Sp
ot
2nd Main
COMM
ALARM I/O
RAS (RS232)
Text Ports
(RS232)
Pin
Pin
1
GND
14
1
1
IN
1
14
IN
2
2
DTR
15
1
2
IN
3
15
IN
4
3
GND
16
2
3
GND
16
IN
5
4
GND
17
2
4
IN
6
17
IN
7
5
TX
18
3
5
IN
8
18
GND
6
DSR
19
3
6*
IN
9
19*
IN
10
7
GND
20
4
7*
IN
11
20*
IN
12
8
CTS
21
4
8
GND
21*
IN
13
9
DCD
22 RS485 RX+
9
IN
14
22
IN
15
10 GND
23 RS485 RX-
10
IN
16
23 +5 VDC
11
Ri
24 RS485 TX+
11
24
OUT
3
12
RX
25 RS485 TX-
12 OUT
1
25
OUT
4
13 GND
13 OUT
2
* Applies to HRDV16
Duplex
only.
+5 VDC = Alarm
GND = No Alarm
Enable in
Event
Recording
General Setup
.
Exception:
Record indicator
+5 VDC = Record
GND = Stopped
RG59
+5 VDC
10K
Detector
Press to move cursor up or to increase
numerical values by 1.
X
Select the line, then press Enter.
Y
If the field is numerical, use the cursor controls
Press to move
right.
Press to move cursor down or to
decrease numerical values by 1.
Press to
move left.
or inner jog wheel to adjust the value.
Y
If the field is a text line, use the
Text Entry screen to edit the text.
Select Accept to confirm edited text.
Use the inner jog
wheel to rapidly
increase or
decrease a
numerical value.
Set timelapse settings
Set event settings
Select
Advanced Setup
to
set Normal vs. Alternate
schedules.
Note
Select
Alternate
Setup
to set alternate
global rates.
Global Record Rate
Each camera RR = global RR.
÷ no. of cameras
Image Quality
(Global
compression setting.)
Higher quality = slower
transmission and faster use of
storage space.
Y
Green with numbers = recording
enabled.
Red = recording disabled.
Select
Advanced Setup
for normal (day) and
alternate (night) settings.
Y
X
MENU
➤
System Setup
➤
Timelapse Recording
Select
Simple Setup
for single 24/7
recording.
Normal (day) = Green with numbers
Alternate (night) = red
Note
Record times
are approximate.
Configure pre-event settings
(
MENU
➤
Event Recording
➤
Pre-event Setup
).
X
MENU
➤
Event Recording
➤
General/Motion/Text/Alarm/Pre-Event
.
Motion
Text
Alarm
First, set up text ports (
MENU
➤
System
Setup
➤
Text Ports
).
If Alarm homing is enabled
(V2.00 and later), when an
alarm is detected, the enabled
camera displays on the
monitor.
When motion is detected, squares turn red.
Adjust the sensitivity and trigger size as
required. Start with trigger size of one dot.
Z
Assign zones:
Camera 1-4 = zone 1-4
Set whole screen to one zone:
Camera 1-4 + FUNCTION 8
Clear all = 5 + FUNCTION 8
Clear one box = 5
Press
to exit screen.
Y
Z
[
Set the camera to display text
(
MENU
➤
System Setup
➤
Video Inputs
).
\
Set event calendars (
MENU
➤
Event Recording
➤
Motion / Text / Event Calendars
).
Inputs


