


PROWLTOUCH
Wireless Touchscreen / Écran tactile sans fil
Quick Installation Guide /
Guide d’installation rapide
GENERAL INFORMATION
The PROWLTOUCH is a wireless Touchscreen that is used in conjunction
with the PROH8PLUS and PROA7PLUS Control Panels.
Up to a total of eight (8) Touchscreens can be used on the system.
The Touchscreen must be enrolled in the Control Panel before it can be
used
.
OPERATING THE TOUCHSCREEN
For operating instructions, see the full User Guide for the Control Panel
used with this Touchscreen.
MOUNTING
See below for mounting options with Desk Stand, Desk Mount and Wall
Mount
RENSEIGNEMENTS GÉNÉRAUX
Le PROWLTOUCH est un écran tactile sans fil qui est utilisé en
conjonction avec le panneau de contrôle PROH8PLUS et PROA7PLUS.
Le système peut prendre en charge jusqu’à huit (8) écrans tactiles.
Avant toute utilisation, l'écran tactile doit être enregistré dans le
contrôleur. Il communique avec le contrôleur par Wi-Fi
MD
.
UTILISATION DE L'ÉCRAN TACTILE
Pour les
directives d’utilisation, consultez le guide de l'utilisateur du
panneau de commande utilisé avec cet écran tactile.
MONTAGE
Voir ci-dessous les options de montage avec socle de bureau, support
de bureau et support mural.
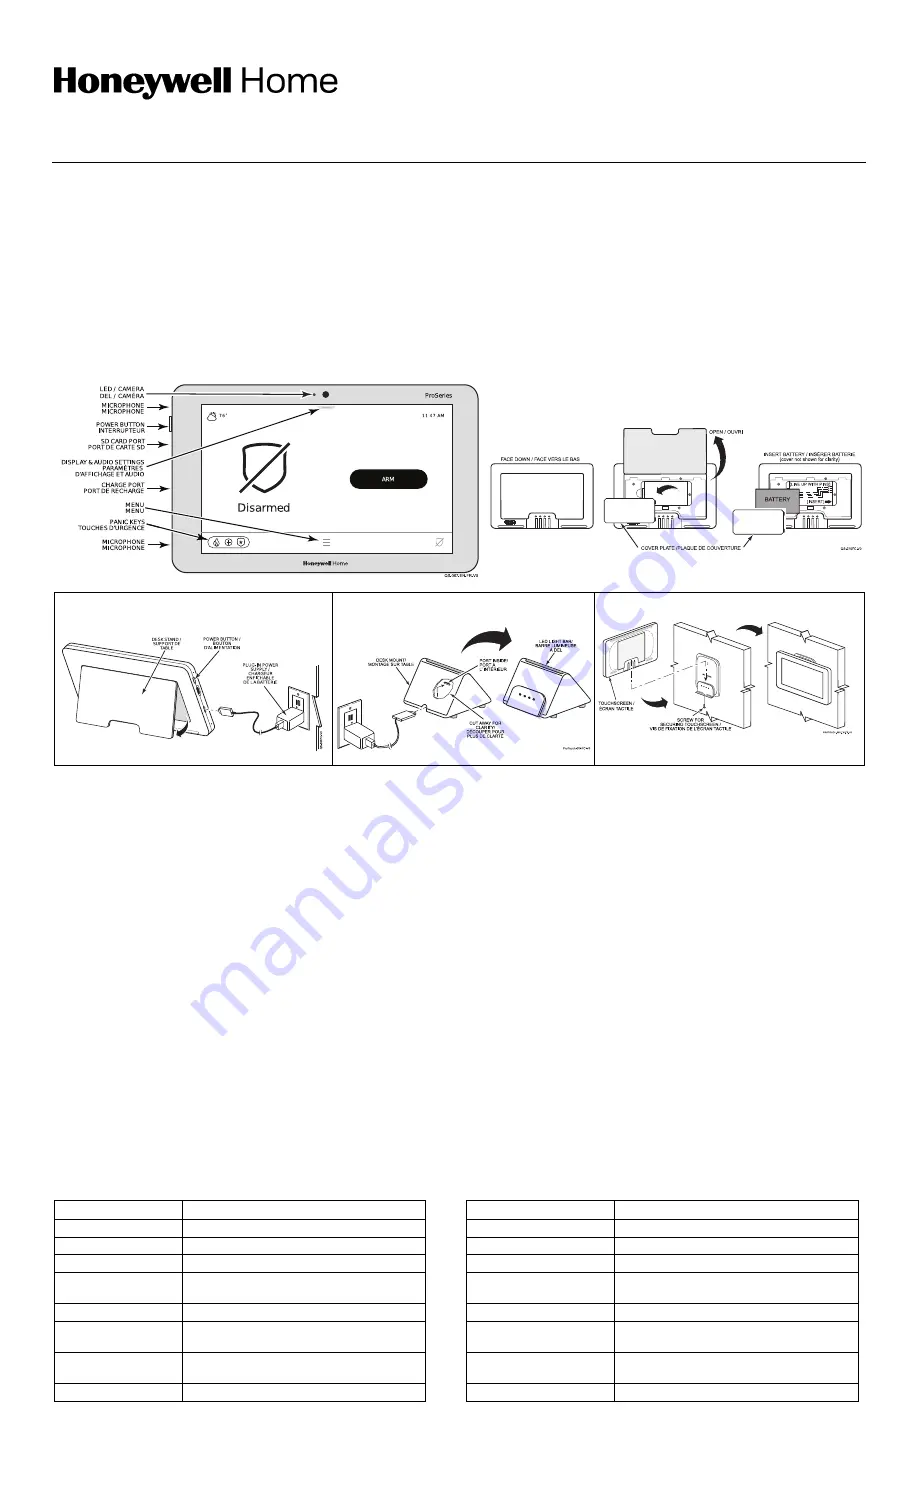
PROWLTOUCH
Battery Installation / Installation de la pile
Desk Stand / Socle de bureau
PROWLTOUCHDM
PROWLTOUCHWM
INSTALL BATTERY
Place the Touchscreen face down and pull open the desk stand.
Remove the battery cover plate. Align the contacts on the battery pack
over the pins on the Touchscreen and press down to secure. Align the
tabs on the battery cover plate and snap into place. Connect the power
supply to the touchscreen as shown and plug into a non-switchable
110VAC, 60Hz outlet for 24hrs to fully charge battery. Press and hold
the power button to turn on.
ENROLLING THE TOUCHSCREEN
1. Power up the touchscreen. After the touchscreen boots up, follow
the steps to connect it to a
Wi-Fi network.
•
Once connected to a network, press
“PAIR TO PANEL” on the
Touchscreen.
It will indicate that it is finding the Control Panel’s
IP address.
•
Once it finds the IP address, it will prompt for a code. Enter
4112.
•
If enrollment is not successful, make sure both the Control Panel
and Touchscreen are connected to the same router and are
within range of the router. Press any of the keys on the
Touchscreen to restart the pairing process or disconnect and
reconnect power.
2. After successful pairing, the touchscreen then displays system
status.
3.
After enrollment, program and save the Touchscreen’s
zone options (zone descriptor, Bedroom Keypad) in AlarmNet 360.
IMPORTANT
: Once enrolled, the Touchscreen cannot be used with
another Control Panel until it is un-enrolled (deleted) from the current
one. See the Control
Panel’s Installation Instructions for details on
removing devices.
INSTALLER LA BATTERIE
Placez l’écran tactile face vers le bas et ouvrez le socle de bureau. Retirez le
couvercle du compartiment à pile. Alignez les contacts de la pile sur les
broches de l’écran tactile et appuyez pour sécuriser. Alignez les languettes
du couvercle du compartiment à pile et enclenchez-les. Raccordez
l’alimentation électrique à l’écran tactile comme indiqué sur l’illustration et
branchez-le dans une prise non commutable 110 V CA, 60 Hz pendant
24 heures pour charger complètement la pile. Appuyez et maintenez le
bouton d’alimentation enfoncé pour activer.
ENREGISTRER L'ÉCRAN TACTILE
1.
Allumez l’écran tactile. Après le démarrage de l’écran tactile, suivez les
étapes suivantes pour le connecter à un réseau Wi-Fi.
•
Une fois connecté à un réseau, appuyez sur « PAIR TO PANEL »
(jumeler
au panneau) de l’écran tactile. Il indiquera qu’il est en train
de chercher l’adresse IP du panneau de commande.
•
Une fois l’adresse IP trouvée, il demandera un code. Entrez 4112.
•
Si l’inscription échoue, assurez-vous que le panneau de commande
et l’écran tactile sont connectés au même routeur et sont à portée du
routeur. Appuyez sur une des touches de l’écran tactile pour
redémarrer le processus de jumelage ou débranchez et rebranchez
l’alimentation.
2.
Une fois le jumelage réussi, l’écran tactile affiche l’état du système.
3.
Après l’inscription, programmez et sauvegardez les options de zone de
l’écran tactile (descripteur de zone, clavier de chambre à coucher) dans
AlarmNet 360.
IMPORTANT
: une fois enregistré, l’écran tactile ne peut pas être utilisé avec
un
autre panneau de commande tant qu’il n’est pas désinstallé (supprimé)
de l’écran actuel. Reportez-vous aux instructions d’installation du panneau
de commande pour plus de détails sur la suppression des périphériques.
Status LED
Meaning
DEL d’état
Signification
Red - Steady
System Armed
Rouge - continue
Système armé
Red - Flashing
Alarm/Alarm Memory
Rouge - clignotante
Alarme/mémoire d’alarme
Amber - Steady
System trouble
Ambre - continue
Anomalie de système
Amber - Flashing
Device trouble
– System cannot be armed
Orange - clignotante
Anomalie du dispositif
– le système ne
peut pas être armé
Green - Steady
Ready to Arm
Vert - continue
Prêt à armer
Green - Flashing
Device trouble - System can be armed
Vert - clignotante
Anomalie du dispositif
– le système peut
être armé
Green & Red
Alternately Flashing
System is in Programming Mode
Vert et rouge clignotant
en alternance
Le système est en mode Programmation
Off
Not ready to Arm
Arrêt
Pas prêt à armer
Ê800-
25191AJŠ
800-25191A 6/19 Rev A


