Honda NC700X, Owner'S Manual
The Honda NC700X Owner's Manual is an essential guide for owners of this versatile motorcycle. With detailed instructions and important safety information, this manual ensures a smooth and enjoyable riding experience. Download your free copy of the manual from manualshive.com and get ready to explore the open road.
Share
Download


Reviews:
No comments
Related manuals for NC700X

HORUS
Brand: Caberg Pages: 16

19701BD520
Brand: Yoshimura Pages: 7

FACTORY SP2
Brand: YCF Pages: 78

AC S II
Brand: AC Schnitzer Pages: 44

POCKET BIKE QG-40
Brand: Coolster Pages: 13

MS052.V2
Brand: Sealey Pages: 2

249R
Brand: Benelli Pages: 13

RR 125
Brand: Beta Pages: 260

CR 125R 2000
Brand: Honda Pages: 293

NAVI K74G-CBS 2019
Brand: Honda Pages: 79

MiniTrail Z50A
Brand: Honda Pages: 61

MSX125A 2017
Brand: Honda Pages: 111

FJS600 A SILVER WING
Brand: Honda Pages: 154

INTERCEPTOR ABS 2005
Brand: Honda Pages: 233

EGO
Brand: Caberg Pages: 23

YZF-R1
Brand: Yamaha Pages: 77

FOTON RTX
Brand: Macna Pages: 28
N20019
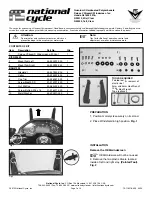
Brand: National Cycle Pages: 4


