MX-500™OperatingManual
Home Theater Master
LCD Screen
Preprogrammed and Learning
Remote Control
£—
Страница 1: ...MX 500 Operating Manual Home Theater Master LCD Screen Preprogrammed and Learning Remote Control Home Theater Master LCD Screen Preprogrammed and Learning Remote Control ...
Страница 2: ...r and System Off Buttons 2 Ten Device Buttons 7 Programming Punch Through Operations 8 Erasing Existing Programming A Erasing Learned Buttons B Erasing Favorite Channel Buttons C Erasing Macro Functions 1 M1 M3 Power and System Off Buttons 2 Ten Device Buttons D Erasing Punch Through Functions 9 LCD Button Editing A Create or Edit Text on Function Buttons B Create or Edit Text on Device Buttons C ...
Страница 3: ...r home entertainment system including the ability to create your own descriptions of the component buttons on the LCD the ability to learn 530 commands from your original remote controls various macro operations program 50 favorite channels buttons and punch through operations for volume control channel and transport buttons Setting up the MX 500 to operate your components is easy and simple Pleas...
Страница 4: ...fe Under normal operating conditions the batteries supplied with the remote control will last approximately six months If the batteries are running low you will notice reduced range from the remote control commands that are not sent properly or are not sent at all You may also notice the backlighting of the LCD screen and the button is diminished Should any of these occur replace the batteries imm...
Страница 5: ... LCD Button Editing on page 22 for additional details B Pre programmed Codes The MX 500 comes with preprogrammed codes for practically all the major audio and video equipment on the market You can set up and operate all of your components with the MX 500 simply by punching in the three digit code number assigned to your brand of component The code numbers for the various brands of components are l...
Страница 6: ...ere are ten device buttons and each of these device buttons can send out up to 20 programmed commands when pressed for more than two seconds It is typically used in sending out audio input codes so that the audio receiver will make an automatic input switch when you press the respective device button on the remote control but can be programmed with whatever macro you desire E Favorite Channel Butt...
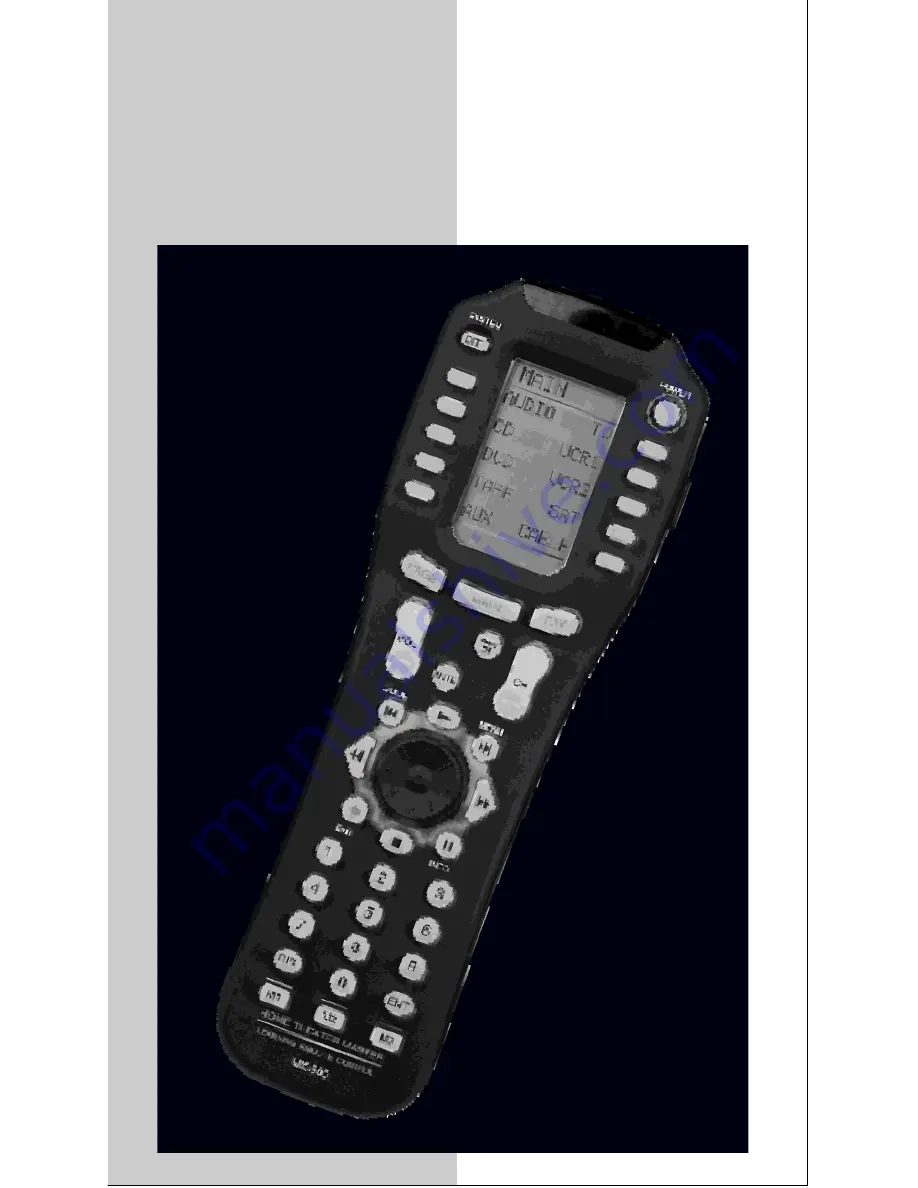
Страница 7: ...6 and 27 in the manual for details J LCD Screen and Button Layout  Displays the name of the device selected à System off Power off Ä Displays page number Å Displays the device and function names Æ LIGHT button Ç MACRO buttons È MAIN DEVICE menu button É LCD Page change button Ê POWER Ë MUTE Ì VOLUME Í CHANNEL Î Previous channel button Ï TRANSPORT functions PLAY STOP REWIND and FF for VCR CD and D...
Страница 8: ...ING mode in the remote control Press both the MAIN and ENTER buttons simultaneously for three seconds to enter the SYSTEM SETTING mode Press any of the ten buttons associated with the descriptions written on the LCD You can exit the Set Up mode by simply pressing the MAIN button ...
Страница 9: ...You can program the MX 500 to make it compatible with your components by using the pre programmed method 1 Three Digit Code Number 1 Turn on the component you wish to program 2 Go to the program setting mode by pressing both the MAIN and ENTER buttons simultaneously for three seconds 3 Select the P PRO button next to the LCD screen 4 Press the device you wish to program E g To program TV press the...
Страница 10: ...e right code number If you enter the right code number the component will turn off right after you have entered the correct number 7 Confirm that it is the right code by pressing Power button After you have confirmed that the right code is entered save the code by pressing the SAVE button on LCD 8 Exit from preprogramming mode by pressing the MAIN button and then exit from SET UP mode by pressing ...
Страница 11: ... P PRO button next to the LCD screen 4 Press the device you wish to program E g To program TV press the TV button 5 Select the device from which the scanned code table will be selected E g If it is the TV code table press the TV device button 6 Point the remote control toward the component and press either the UP or DOWN button on the LCD It will send out the series of Power Off codes when the but...
Страница 12: ...on the main screen menu 20 buttons on 2 pages of the LCD per device 31 rubber buttons and the joystick located in the middle of the remote control The MX 500 learns these commands by receiving infrared signals directly from your existing remote controls The MX 500 receives these signals through its learning eye located at the top of the unit Apart from the PAGE MAIN FAV buttons and M1 M3 buttons w...
Страница 13: ...hes apart on a flat surface as illustrated below 5 Press the button on your original remote control you wish to program into the MX 500 Once the MX 500 has received the signal the MX 500 will flash Good on the LCD screen indicating it learned the code correctly If it flashes Fail repeat from Step 4 until it learns successfully Please enter the code signal within 20 seconds of programming 6 Once yo...
Страница 14: ...0 about 2 inches apart on a flat surface 5 Press the button on your original remote control you wish to program into the MX 500 Once the MX 500 has received the signal the MX 500 will flash Good on the LCD screen indicating it learned the code correctly If it flashes Fail repeat from Step 4 until it learns successfully Please enter the code signal within 20 seconds of programming 6 Once you comple...
Страница 15: ...the favorite channel and enter the channel number you wish to store in the FAVORITE channel button You can store up to 10 commands TIP If you pressed a wrong channel number please move the cursor by using left or right button of the joystick and then prcss the correct channel number 5 Press the favorite channel button you selected in Step 4 again to store the channel you programmed 6 Once you comp...
Страница 16: ...seconds 2 Press the MACRO button in programming mode 3 Press one of the five macro buttons M1 M3 Power and System Off in the programming mode 4 Press the button you wish to program macro function You can store up to 20 commands 5 Store the commands you programmed into the macro button by pressing the Channel Up button 6 Repeat from Step 3 to program other macro buttons 7 Once you complete the prog...
Страница 17: ...you selected to the macro button by pressing the CH UP button 6 Repeat from Step 3 to program other device button Once you complete the programming and wish to exit from this mode press the MAIN button Exit from SET UP mode by pressing the MAIN button once again NOTE Pressing the PAUSE button during the macro programming will add a time delay of 0 2 seconds between the commands E g Pressing the PA...
Страница 18: ...g mode by pressing the MAIN and ENTER buttons simultaneously for three seconds 2 Press the PUNCH button in programming mode 3 Press the VOL button on the LCD for Volume Punch Through the PLAY for Transport Punch Through and the CH for Channel Punch Through 4 Select the device you wish to punch through to 1st device e g Satellite receiver 5 Select the device you wish to punch through from 2nd devic...
Страница 19: ...f press the PAGE button and then press the device button TV VCR Audio etc 5 Press the device button TV VCR Audio etc to erase the button s from the device 6 Press the ALL button if you wish to erase all the learned buttons in the device and press the SURE button at the next to the LCD screen 7 Press the KEY if you wish to erase individual buttons in that device one at a time This will show all the...
Страница 20: ...de Press the MAIN button once again to exit the SETUP mode C Erasing Macro Functions 1 Erase M1 M3 Power And System Off Buttons 1 Go to the program setting mode by pressing both the MAIN and ENTER buttons simultaneously for three seconds 2 Press the ERASE button 3 Press the MACRO button to erase MACRO button s 4 If you wish to erase all the Macro buttons in the MX 500 press the ALL button and then...
Страница 21: ...the MACRO button to erase MACRO button s 3 Press the KEY button 4 Press one of the ten device buttons you wish to erase macro function Repeat this step until you erase all the Macro buttons you wish to erase 5 Exit from Macro mode by pressing the MAIN button and then exit from SET UP mode by pressing the MAIN button once again D Erasing Punch Through Functions 1 Enter the programming mode by press...
Страница 22: ...EVICE button you wish to erase punch through 5 Press the same DEVICE button once again 6 Punch through is erased when the same device button is pressed the second time 7 Repeat from Step 3 to erase the Punch Through for other devices 8 Exit from Punch Through mode by pressing the MAIN button and then exit from SET UP mode by pressing the MAIN button once again 21 ...
Страница 23: ...anged will blink and you can select the character using the number pad on the remote control The characters assigned to each number pad button are shown below It will be rotated to a different character each time the same number pad is pressed Tip You can move the cursor left or right using the joystick You can also erase a current character by pressing cursor down of the joystick 6 Save the text ...
Страница 24: ...the character using the number pad button on the remote control The characters assigned to each number pad button are shown below and it will be rotated to different character each time the same number pad button is pressed again Tip You can move the cursor left or right using the joystick You can also erase a current character by pressing the cursor down of the joystick 5 Save the text you comple...
Страница 25: ...number assigned to the device for 10 seconds and then exit to main mode 1 Go to the programming mode by pressing the MAIN and ENTER button simultaneously for three seconds 2 Press the LIGHT button in programming mode 3 Using the number pad button enter the desired back light time in seconds It can go up to 99 seconds Enter the time by pressing the SAVE button on the LCD 4 Exit from the Set Up mode...
Страница 26: ... a time press the DEVICE button 5 If you pressed the DEVICE button it will show all the devices Press the device button you wish to clone 6 Set the MX 500 head to head with another MX 500 to be cloned from as shown below The both units should be in either cloning from or cloning to mode based on the selection in Step 3 7 Press the START button for the both units to execute It will take about 40 se...
Страница 27: ...ass Please exercise the following precautions when using the MX 500 U Do not tap the LCD screen to activate devices Use the rubber button U Keep the LCD screen dry Wipe off any spills immediately The MX 500 is not waterproof and never immerse it in water U Don t expose the MX 500 to extreme temperatures Keep it away from heat source U Avoid dropping the remote control U Clean the LCD screen with a...
Страница 28: ... The warranty does not cover the following items U Batteries U Damage from misuse neglect or acts of nature U Products which have been modified or incorporated into other products U Products purchased more than 16 months from manufactured date U Units purchased in AS IS condition or units purchased as Distressed Merchandise Range 40 ft 60 ft depending upon components Weight 8 Oz With batteries Siz...
Страница 29: ...REAR UP REAR DN CENTER DN CENTER UP MENU Surr GUIDE Center EXIT Delay INFO 1 2 3 4 5 6 7 8 9 0 DISPLAY SHIFT Button Name Functions SAT System OFF POWER VOL UP VOL DN CH UP CH DN MUTE PRE CH UP DN LEFT RIGHT SELECT PLAY STOP REW FF I MENU I GUIDE O EXIT II INFO 1 2 3 4 5 6 7 8 9 0 DISPLAY ENTER OFF ON OFF VOL UP VOL DN CH UP CH DN MUTE PREV CH UP DN LEFT RIGHT SELECT MENU GUIDE EXIT INFO 1 2 3 4 5 ...
Страница 30: ...DN MUTE PREV CH UP DN LEFT RIGHT SELECT MEMU GUIDE CANCEL INFO 1 2 3 4 5 6 7 8 9 0 DISPLAY ENTER Button Name Functions VCR System OFF POWER VOL UP VOL DN CH UP CH DN MUTE PRE CH UP DN LEFT RIGHT SELECT PLAY STOP REW FF I MENU I GUIDE O EXIT II INFO 1 2 3 4 5 6 7 8 9 0 DISPLAY ENTER OFF ON OFF VOL UP VOL DN CH UP CH DN MUTE PREV CH UP DN LEFT RIGHT SELECT PLAY STOP REW FF I I RECORD PAUSE 1 2 3 4 5...
Страница 31: ...CH DN MUTE PREV CH UP DN LEFT RIGHT SELECT PLAY STOP REW FF MENU GUIDE EXIT INFO 1 2 3 4 5 6 7 8 9 0 DISPLAY ENTER Button Name Functions DVD LPD System OFF POWER VOL UP VOL DN CH UP CH DN MUTE PRE CH UP DN LEFT RIGHT SELECT PLAY STOP REW FF I MENU I GUIDE O EXIT II INFO 1 2 3 4 5 6 7 8 9 0 DISPLAY ENTER OFF ON OFF SKIP SKIP SEARCH UP DN LEFT RIGHT SELECT PLAY STOP REW FF I I EJECT PAUSE 1 2 3 4 5 ...
Страница 32: ... DISPLAY ENTER OFF ON OFF PLAY A STOP A REW A FF A R PLAY A Rec MUTE A RECORD A PAUSE A 31 Button Name Functions CD System OFF POWER VOL UP VOL DN CH UP CH DN MUTE PRE CH UP DN LEFT RIGHT SELECT PLAY STOP REW FF I MENU I GUIDE O EXIT II INFO 1 2 3 4 5 6 7 8 9 0 DISPLAY ENTER OFF ON OFF TRACK TRACK RANDOM SKIP SKIP PLAY STOP REW FF I I EJECT PAUSE 1 2 3 4 5 6 7 8 9 0 DISC ...
Страница 33: ... INFO 1 2 3 4 5 6 7 8 9 0 DISPLAY ENTER OFF ON OFF VOL UP VOL DN CH UP CH DN MUTE PREV UP DN LEFT RIGHT SELECT MENU GUIDE EXIT INFO 1 2 3 4 5 6 7 8 9 0 DISPLAY ENTER U Note Because of the variety of function names for different components in this mode we list them in A B C D on the LCD Please write the appropriate names that apply to your components ...
Страница 34: ... 007 120 235 236 237 124 137 139 052 165 115 004 009 076 056 086 164 152 208 006 028 031 040 063 185 186 251 265 238 076 100 012 013 242 243 204 157 158 042 043 081 112 276 186 113 283 Manufacturer Brand ADC ADCOM AIWA AKAI AMC AMEND AMX ANGSTROM ARCAM AUDIO ACCESS AUDIO ALCHEMY AUDIO DESIGN AUDIO EASE AUDIO FILE AUDIO MATRIX AUDIO SOURCE AUDIO TECHNICA B K BOSE BRYSTON CARVER CASIO CHIRO CINEMA S...
Страница 35: ... 187 079 080 090 179 209 270 275 026 041 138 032 195 219 177 129 130 132 261 196 249 250 251 063 014 033 039 044 045 050 069 159 168 116 035 078 198 144 268 010 048 117 156 067 019 056 073 075 095 162 074 083 085 016 040 048 110 119 065 228 047 059 019 091 076 026 094 131 175 181 024 038 055 102 103 105 106 051 030 018 093 223 247 248 160 166 015 101 184 218 271 036 084 088 068 171 138 005 019 049...
Страница 36: ...WINEGARD ZENITH Set Up Code Number 123 050 129 113 051 126 053 053 013 014 015 018 036 055 008 009 012 077 054 050 005 006 007 010 011 112 116 141 052 024 046 056 076 038 040 057 058 093 094 095 096 097 098 099 100 122 089 114 017 021 022 027 133 134 151 106 150 003 004 016 029 031 059 101 148 139 140 080 044 029 033 037 039 104 057 051 068 154 053 149 023 060 147 108 057 132 144 062 010 059 063 0...
Страница 37: ... 088 201 197 002 003 004 058 043 197 002 003 004 043 101 103 143 043 004 043 050 051 143 043 054 043 143 197 101 004 143 043 004 016 043 044 076 103 114 125 127 143 004 143 177 043 062 187 024 076 143 196 197 004 005 028 043 047 048 050 051 076 096 143 151 153 154 155 007 057 198 028 043 043 004 102 106 112 113 116 119 127 143 004 004 009 010 011 012 023 075 143 158 163 166 072 164 164 197 004 008...
Страница 38: ...004 005 038 059 093 164 127 197 018 023 025 116 135 190 004 143 144 160 161 165 167 004 058 131 143 171 173 193 034 056 092 019 043 143 004 127 160 161 165 065 156 144 197 004 023 024 056 074 152 007 019 043 047 186 168 169 178 179 180 181 182 183 073 157 197 058 004 202 004 050 089 101 105 127 143 160 166 007 020 053 057 082 187 004 028 043 048 143 015 030 004 007 028 057 143 094 160 082 165 166 ...
Страница 39: ...117 119 108 012 023 039 043 034 053 059 003 008 009 010 034 031 063 072 107 109 144 147 132 136 155 040 115 012 013 020 101 106 114 123 012 045 004 018 026 034 043 063 137 150 160 013 031 031 012 013 015 040 066 101 043 012 031 043 048 050 055 060 130 150 152 014 048 034 047 034 003 009 017 034 106 040 031 034 041 067 068 156 164 012 031 067 069 101 027 030 031 003 010 014 031 034 053 072 101 102 ...
Страница 40: ...8 014 032 040 066 102 104 107 109 112 113 115 120 122 125 022 043 048 135 003 007 010 014 134 102 017 037 112 129 131 003 008 009 010 013 014 081 101 017 073 112 031 054 149 159 165 024 034 003 031 052 056 057 058 076 077 078 149 154 034 013 031 034 059 067 034 010 034 039 043 034 039 043 031 070 019 031 034 101 034 006 008 013 042 047 059 079 082 112 131 081 040 101 040 012 048 012 034 046 141 04...
Страница 41: ...ADIRAN TIME WARNER TOCOM TOSHIBA UNIKA UNITED CABLE UNIVERSAL VIEWSTAR ZENITH Set Up Code Number 103 003 004 039 042 046 053 099 014 005 007 014 099 092 007 007 080 081 074 030 101 020 030 040 057 066 106 032 008 054 072 103 074 104 099 030 049 050 055 103 055 103 002 003 004 008 009 010 069 074 010 012 064 079 095 094 107 052 102 037 028 032 092 015 028 038 071 031 037 053 044 047 052 006 012 013...
Страница 42: ...YO PANASONIC PHILIPS PIONEER PROCEED PROSCAN RCA SAMSUNG SHARP SONY THETA DIGITAL THOMPSON TOSHIBA YAMAHA ZENITH Set Up Code Number 087 007 080 026 027 084 012 091 057 074 066 083 017 088 076 035 021 042 066 023 092 086 026 027 026 027 056 070 094 033 032 026 027 035 034 042 089 057 074 091 41 DVD ...
Страница 43: ... Up Code Number 062 042 059 065 088 089 105 122 170 187 085 195 202 231 232 118 238 119 147 165 046 037 057 103 008 063 057 080 185 041 044 050 086 107 130 134 135 138 139 203 204 167 111 182 182 159 035 002 123 042 069 102 050 185 134 008 111 010 069 102 080 093 018 033 047 208 042 175 130 143 144 014 061 092 141 158 004 022 136 163 213 214 242 243 185 007 023 055 071 072 142 137 061 241 005 102 ...
Страница 44: ...S YAMAHA YORX Set Up Code Number 103 008 182 017 042 150 042 050 051 102 181 182 187 044 107 161 178 250 044 107 044 069 107 128 171 190 125 050 069 102 026 031 051 066 003 019 051 096 112 115 119 166 033 048 081 097 126 133 177 225 226 164 251 155 044 107 052 181 195 085 010 015 034 036 051 052 101 131 140 079 060 103 200 172 184 008 068 076 234 235 006 067 091 160 148 080 004 022 114 124 185 033...
Страница 45: ...PIONEER RADIO SHACK RCA REALISTIC RUNCO SANYO SHARP SONY TECHNICS THETA DIGITAL TOSHIBA YAMAHA Set Up Code Number 206 207 120 152 013 032 121 211 121 121 049 013 113 032 106 117 121 120 002 049 127 075 152 013 053 110 113 032 152 106 043 129 44 LD U Note These codes are stored in DVD device button ...
Страница 46: ...Up Code Number 015 071 100 114 006 008 027 024 036 105 227 229 064 011 233 106 116 239 240 005 013 023 026 064 145 146 181 190 124 035 137 139 027 014 027 056 065 087 238 242 243 029 048 244 245 025 002 012 016 017 018 019 115 026 054 055 007 010 032 088 195 027 087 003 039 047 050 066 098 222 007 088 027 113 119 224 026 057 131 175 181 038 004 028 030 033 034 020 022 052 084 089 009 059 212 007 0...
Страница 47: ...IPS POLKAUDIO REPLAY RUSSOUND SCIENTIFIC ATLANTA SIMA SOLO ELECTRONICS SOMFY SONY STARCOM TURBOSCAN VELODYNE X 10 XANTECH Set Up Code Number 152 164 155 191 156 204 080 206 151 184 209 153 185 185 208 077 158 159 186 201 205 160 187 161 085 090 162 075 081 156 163 082 207 078 079 104 164 165 166 153 167 203 093 183 168 169 170 171 172 188 189 46 AUX U AUX Light Switch Tivo etc ...
Страница 48: ...0EE 0042B Rev 1 0 ...