

Simple Manual for TM3030Plus Tabletop Microscope
【
Before observation, thoroughly read the safety precautions provided in the TM3030Plus instruction manual for proper use.
】
(1)
Turn on the earth leakage breaker on the back of the main unit.
(2)
Turn on the power switch on the right side of the main unit to start the device.
(3)
Evacuation will start automatically when EVAC LED blinks blue.
When AIR LED lights yellow, press the EVAC/AIR switch to start evacuation.
EVAC LED lights blue when the evacuation ends.
(4)
Turn on the PC. Start the TM3030Plus application.
Bulk specimen (Conductive/Non-conductive)
Water / Oil containing specimen
(5)
Put the conductive tape on the specimen stub and attach a
(5)
When observing water containing specimens such as biological
specimen on it.
and botanical specimens, food items and so on, use a paste to
stick a specimen on the stub.
(6) Attach the specimen stub to the specimen holder, and adjust its height using a height gauge
so that the gap width becomes about 1 mm.
(7)
Press the EVAC/AIR switch to introduce air into the specimen chamber.
AIR LED blinks yellow.
After the air introduction is completed, the lighting pattern of AIR LED (yellow) changes from
blinking to lighting. (About 1 minute)
(8)
Draw out the specimen stage slowly, and set the specimen holder.
(9)
When performing high-magnification observation or observing a heavy specimen, use
the provided ball wrench to secure the specimen holder.
(10) Turn the X,Y knobs to center the specimen stage. (In the case of the motor drive stage,
the stage is centered automatically after air introduction is completed.)
Make sure that the specimen does not contact the upper surface of the specimen chamber,
and insert the specimen stage.
(11) Push the EVAC/AIR switch to evacuate the specimen chamber while holding the specimen
stage lightly. EVAC LED blinks blue. When the evacuation is completed, the lighting pattern of
the EVAC LED (blue) changes from blinking to lighting. (About 3 minutes)
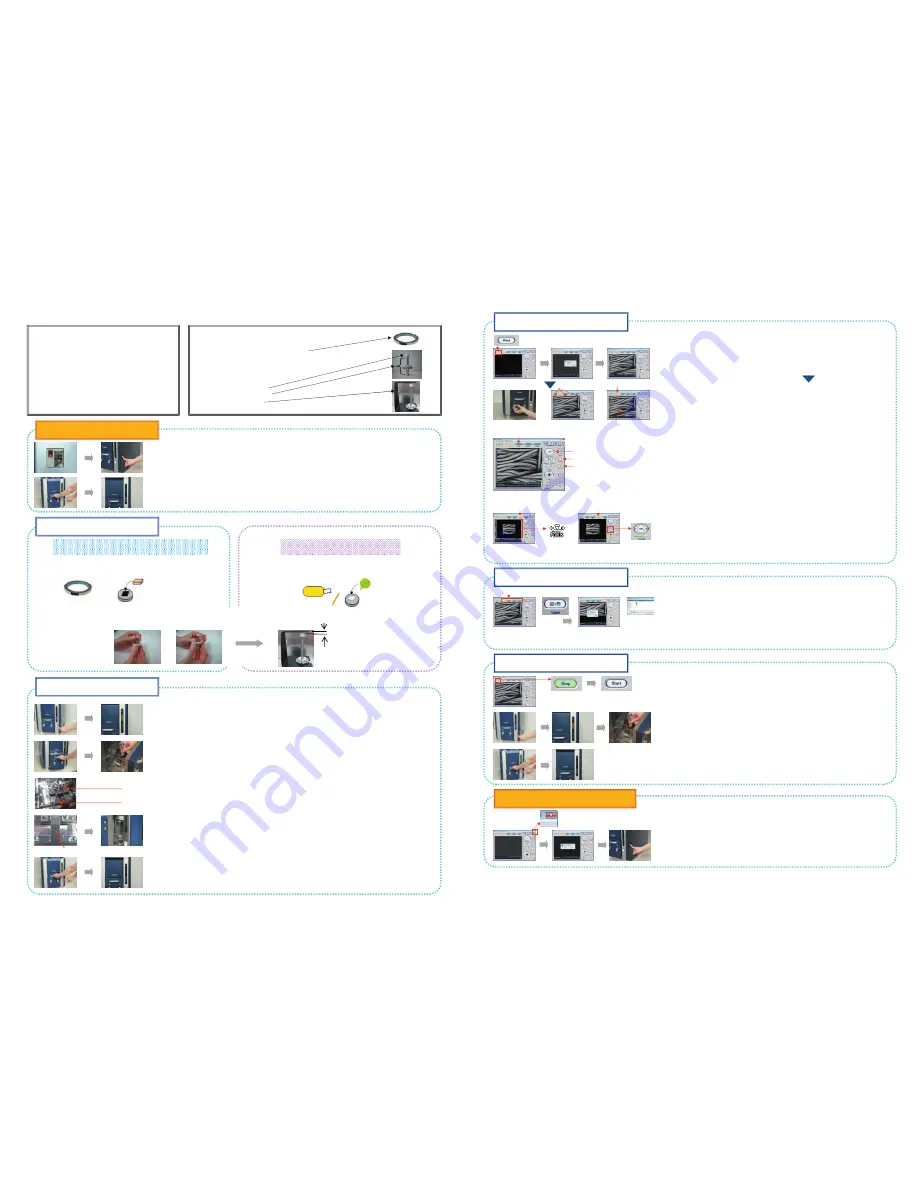
(12) Set the Observation condition. (Refer to the reverse side.)
(13) Click the [Start] button in the upper left part of the operation window.
The auto start function operates and an image is displayed.
At this time, the magnification is set at 100x.
(14)
Turn the X, Y knobs to move the stage, and set the observation field of view.
In the case of the motor drive stage, click the buttons or press them
continuously in the image observation area to move the stage.
When double-clicking any arbitrary point in the area, it will be centered.
The field of view settings will become easier in the [Fast] mode at a lower
magnification.
(15) Observation procedure by auto functions
1. Set the observation field of view and magnification.
2. Adjust Brightness and Contrast . (Click the [Auto B/C] button.)
3. Perform focusing. (Click the [Auto Focus] button.)
4. Confirm the image. (Click the [Slow] button.)
*
When the Auto focus function doesn't work well, adjust the focus by
manual operation. There are three ways as below.
Focus adjustment operation will become easier in the [Reduce] mode.
(a) Focus adjustment by mouse dragging (i)
Move the mouse cursor into the image observation area, where hold
down the left mouse button and move it from side to side.
(b) Focus adjustment by mouse dragging (ii)
Move the mouse cursor on the [Focus] button, where hold down the left
mouse button and move it from side to side.
(c) Focus adjustment by clicking the [Focus] button.
Adjust the focus by cl or - side of the [Focus] button. Focus
changes continuously while holding down the button.
(16)
Click the [Save] button to capture the image.
(Image saving size: 1280×960 pixels)
(17)
After the image capturing process is completed, the Save Image dialog will be
displayed. Input a file name and save the image.
(18) Click the [Stop] button in the upper left part of the operation window, and the
button indicates [Start]. The observation is finished.
(19)
Press the EVAC/AIR switch to introduce air into the specimen chamber. Wait
until the lighting pattern of AIR LED (yellow) changes from blinking to lighting.
(About 1 minute)
(20)
Draw out the specimen stage slowly, and remove the specimen holder.
(21) Close
the
specimen
stage.
(22)
Press the EVAC/AIR switch while holding the specimen stage lightly, and the
specimen chamber is evacuated. Wait until the lighting pattern of EVAC LED
(blue) changes from blinking to lighting. (About 3 minutes)
(23)
Click the [Close] button in the upper right part of the operation window to close
the TM3030Plus application, and shut down the PC.
(24) Turn off the power switch on the right side of the main unit, and shut down the
device. (After the device is left for a long time with the inside of the specimen
chamber exposed to air, the observation image might be badly influenced
because of a decrease of the vacuum degree and so on.
Be sure to execute the procedure 6. (22) before shutting down the device.)
Copyright © Hitachi High-Technologies Corporation 2014.
November/2014 1st Edition
All rights reserved. Printed in Japan.
Part No. 55E-8889 HS-TH (HMS)
Operation Procedure
1.
Starting
Instrument
2.
Preparing
Specimen
3.
Mounting
Specimen
4.
Starting
Observation
5. Saving Captured Image
6.
Stopping
Observation
7. Shutting Down Instrument
Items to be Prepared
Specimen
Conductive double-sided tape
(for
solid
specimens)
Paste
and
Toothpick
(for
water
containing
specimens)
Tweezers
Specimen
stub
Specimen
holder
Height
gauge
Tighten the hexagon socket head screw with the ball wrench to secure the specimen holder.
Be careful not to let the ball wrench contact the stage feeding screw.
Stage feeding screw
<Note>
When clicking the [Quick Save] button, the image currently being observed will be saved.
(The image size is 640×480 pixels.)
View mode settings area
Specimen Stub
Conductive
Double-sided Tape
Specimen
Set the gap width to about 1mm.
1. Starting Instrument
2. Preparing Specimen
3. Mounting Specimen
Align the cross mark with the positioning guide.
4. Starting Observation
5. Saving Captured Image
6. Stopping Observation
7. Shutting Down Instrument
Click
Click
Manual focusing operation (a)
Manual focusing operation (b) (c)
[Reduce] button
[Reduce] button
Click
4. [Slow] button
buttons
[Fast] button
Low magnification
1. [Magnification] button
2. [Auto B/C] button
3. [Auto Focus] button
Paste
Toothpick
Specimen Stub
Specimen


