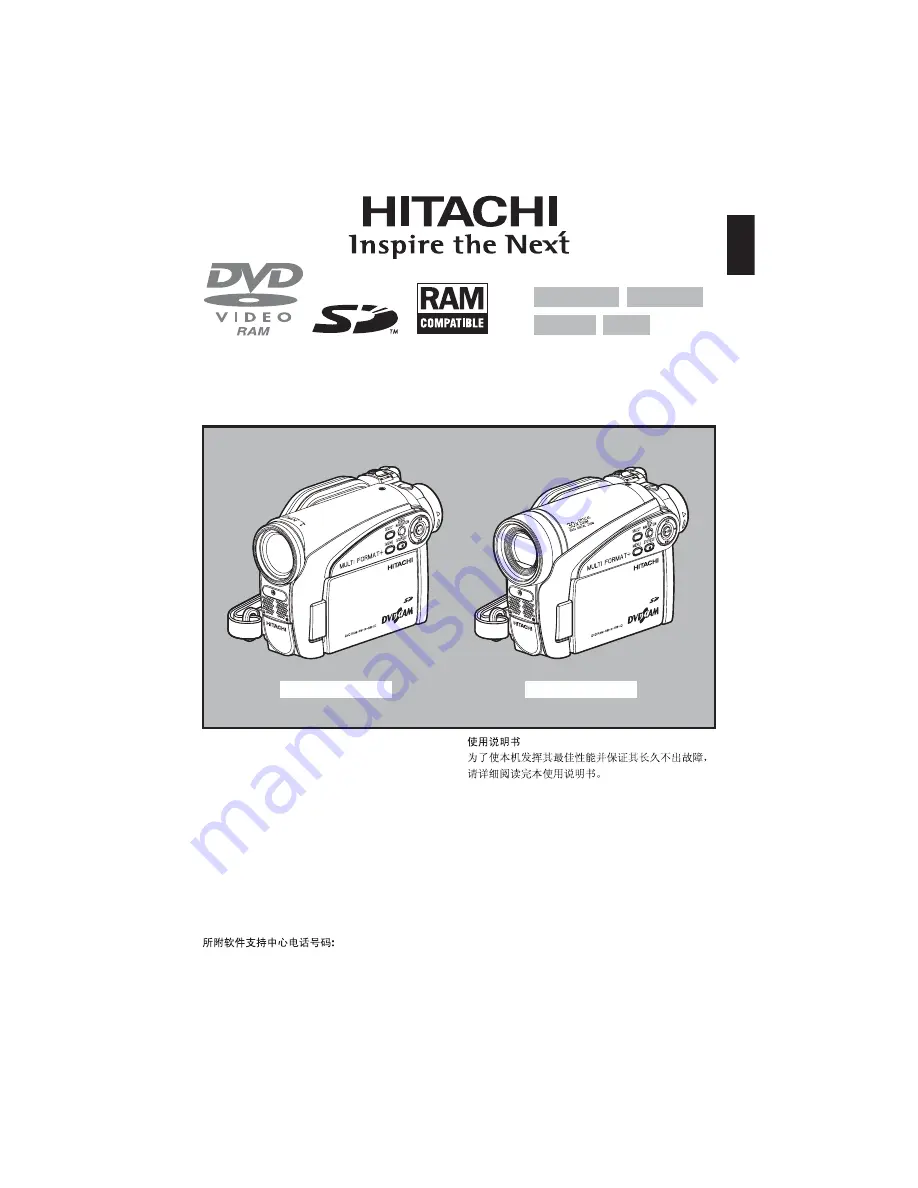
background image

English

Py

ccкий

DVD-RAM

DVD-RW

DVD-R

+RW

Instruction manual

Инструкция по эксплуатации

Если Вы хотите получить надежные  

результаты при воспроизведении и работать  

видеокамерой в следующие годы без  

возникновения каких-либо проблем, прежде  

всего прочтите полностью эту инструкцию по  

эксплуатации.

DVDCAM PC Software Support Centre

URL http://dvdcam-pc.support.hitachi.ca/

Support Center phone numbers for software provided:

Телефон центра программного обслуживания для прилагаемого программного обеспечения

:

PIXELA CORPORATION

+63-2-438-0090       URL: http://www.pixela.co.jp/oem/hitachi/e/index.html

DZ-GX5100SW/DZ-GX5060SW

DZ-GX5100SW

DZ-GX5060SW

To obtain the best performance and ensure years of 
trouble-free use, please read this entire instruction 
manual.

Summary of Contents for DZ-GX5060SW

Page 1: ...укцию по эксплуатации DVDCAM PC Software Support Centre URL http dvdcam pc support hitachi ca Support Center phone numbers for software provided Телефон центра программного обслуживания для прилагаемого программного обеспечения PIXELA CORPORATION 63 2 438 0090 URL http www pixela co jp oem hitachi e index html DZ GX5100SW DZ GX5060SW DZ GX5100SW DZ GX5060SW To obtain the best performance and ensur...

Page 2: ...OCK HAZARD DO NOT EXPOSE THIS UNIT TO RAIN OR MOISTURE WARNING TO PREVENT FIRE OR SHOCK HAZARD USE THE RECOMMENDED ACCESSORIES ONLY CAUTION RISK OF ELECTRIC SHOCK DO NOT OPEN This symbol warns the user that uninsulated voltage within the unit may have sufficient magnitude to cause electric shock Therefore it is dangerous to make any kind of contact with any inside part of this unit This symbol ale...

Page 3: ...d particularly at plugs convenience receptacles and the point where they exit from the apparatus 10 Only use attachments accessories specified by the manufacturer 11 Use only with the cart stand tripod bracket or table specified by the manufacturer or sold with the apparatus When a cart is used use caution when moving the cart apparatus combination to avoid injury from tip over 12 Unplug this appa...

Page 4: ...tor could detach and the DVD video camera recorder may fall Do not subject the DVD video camera recorder to impact This DVD video camera recorder is a precision machine Take great care that you do not strike it against a hard object or let it fall When using a tripod firmly secure the DVD video camera recorder on it Do not use the DVD video camera recorder with a tripod in a place where it is subj...

Page 5: ...h could cause it to operate abnormally Do not expose the DVD video camera recorder to insecticide Insecticide entering the DVD video camera recorder could dirty the lens in laser pickup block and in such a case the DVD video camera recorder might not operate normally Turn the DVD video camera recorder off and cover it with vinyl sheet etc before using insecticide Do not use a generally available 8...

Page 6: ...e disc or card loaded in it Repair of the disc or card will be executed automatically see page 131 Do not wipe the DVD video camera recorder case with benzene or thinner The coating of case could peel off or the case surface could deteriorate When using a chemical cleaning cloth follow the instructions Also read the instructions attached with optional accessories For optional accessories observe t...

Page 7: ...g Always make a trial recording before doing actual recording to make sure that recording is normal The data that have not been stored normally because of a defect in the DVD video camera recorder cannot be restored It is recommended that you use DVD RAM disc from which recorded contents can be deleted for trial recording Do not use the DVD video camera recorder for professional applications This ...

Page 8: ...rupted during playback or abnormal sound Blue thumbnail display Fig 1 Disc cannot correctly be recognised Disc cannot be initialised Delay between video and audio Even if disc is normal the above phenomena may occasionally occur While the ACCESS PC indicator is lit do not subject disc to vibrations or impact and avoid using DVD video camera recorder at extremely high or low temperatures or in envi...

Page 9: ...Connecting to PC explains the contents of provided CD ROM and how to install the software included Subsidiary Information includes an introduction to products sold separately and troubleshooting We want this manual to be as helpful as possible so it includes two easy ways to find the information you need A quick index for the information you use most often A detailed table of contents directing yo...

Page 10: ...e Illustrations in this manual Although the external appearances of DZ GX5100SW GX5060SW are different the method of operating these models is identical The illustrations of DZ GX5100SW are used for the explanation in this text Microsoft Windows Windows Me Windows 2000 Professional and Windows XP are registered trademarks of Microsoft Corporation Windows Vista is a trademark of Microsoft Corporati...

Page 11: ...VIEWING IMAGE ON LCD MONITOR SCREEN 31 VIEWING SUBJECT THROUGH VIEWFINDER 31 Setting Date and Time 32 CHANGING DISPLAY FORMAT OF DATE AND TIME 32 Initial Settings 33 SWITCHING OPERATING SOUND ON OR OFF BEEP 33 TURNING DVD VIDEO CAMERA RECORDER OFF AUTOMATICALLY POWER SAVE 33 CHANGING DISPLAY LANGUAGE LANGUAGE 33 RESETTING MENU SETTINGS TO DEFAULTS RESET 34 TURNING RECORD LED ON OR OFF RECORD LED 3...

Page 12: ...CENES EFFECT SKIP 82 CHANGING IMAGES FOR THUMBNAILS EFFECT THUMBNAIL 83 COPYING STILLS ON DVD RAM DISC TO CARD COPY 84 LOCKING SCENES ON CARD LOCK 85 SELECTING SCENES USING MENU SCREEN SELECT 86 DISPLAYING INFORMATION USING MENU SCREEN DETAIL 87 Programme 88 WHAT IS PROGRAMME 88 SWITCHING TO THUMBNAIL DISPLAY OF SPECIFIC DATE SELECT 88 PLAYING BACK PROGRAMME PLAY 89 CHANGING TITLE OF PROGRAMME TIT...

Page 13: ...19 Using ImageMixer 3 for Windows 120 VIEWING IMAGES RECORDED ON DISC USING PC 120 CREATING DVD VIDEO USING IMAGES RECORDED ON DISC 121 Using ImageMixer 3 Mac Edition for DVDCAM 124 VIEWING IMAGES RECORDED ON DISC USING MACINTOSH 124 IMPORTING IMAGES RECORDED ON DISC INTO MACINTOSH 125 CREATING DVD VIDEO USING IMAGES RECORDED ON DISC 126 Uninstalling Software 128 Contact The Following 128 Cautions...

Page 14: ...stance For DZ GX5100SW only Lithium battery model CR2032 To power the remote control For DZ GX5100SW only AV S input output cable Used when viewing the picture played back on the DVD video camera recorder on TV screen or input or output video from to another video device For DZ GX5100SW only AV S output cable Used when viewing the picture played back on the DVD video camera recorder on TV screen o...

Page 15: ...l 5 Optical 15 zoom lens for DZ GX5100SW only Optical 30 zoom lens for DZ GX5060SW only p 50 6 Zoom lever p 50 52 68 To adjust the zoom or volume 7 PC connection terminal TO PC p 116 8 AV input output jack for DZ GX5100SW only AV output jack for DZ GX5060SW only p 105 108 110 9 External microphone jack for DZ GX5100SW only p 65 10 Wide screen colour liquid crystal display inside p 31 10 8 4 5 6 In...

Page 16: ...eo camera recorder is connected to PC 15 PHOTO button p 41 16 DISC EJECT button p 37 Press down and release this button to open the cover of disc insertion block 17 Disc insertion block p 37 18 BATTERY EJECT button p 27 Press this button when removing the battery 19 Battery attachment platform p 27 20 Record button REC p 40 21 LOCK switch p 40 It is recommended that you set the LOCK switch to to t...

Page 17: ...splay button p 43 73 Press this button to display the details of image being played back or camera setting status or switch the display off 34 CARD ACCESS indicator p 6 41 35 QUICK MENU button p 48 To display only the functions that you frequently use simple menus 36 FINALIZE button p 101 Press this button to finalise the recorded DVD RW DVD R RW 37 Card insertion block p 39 38 BLC backlight compe...

Page 18: ...OM T button p 50 50 DIGITAL ZOOM button p 50 51 ZOOM W button p 50 52 Reverse skip button p 71 53 Forward search button p 70 54 Play pause button p 69 55 Stop button p 10 48 69 56 Forward skip button p 71 The buttons on remote control will function the same as those on DVD video camera recorder REC PHOTO DIGITAL ZOOM ZOOM MENU SELECT DELETE DISC NAVIGATION DISPLAY 41 42 43 44 45 46 47 50 48 49 52 ...

Page 19: ...RATION on page 34 if you wish to view the demonstration immediately or change the setting to Off Setting Up the DVD Video Camera Recorder HOLDING DVD VIDEO CAMERA RECORDER Insert your right hand from the bottom of DVD video camera recorder up to the base of your thumb Put your hand in a position where you can easily operate the REC button and the Zoom lever Adjust the length of hand strap so that ...

Page 20: ...e the cap onto strap for comfortable shooting INSERTING BATTERY INTO REMOTE CONTROL Insert the provided lithium battery into remote control 1 While inserting a fine rod into the hole marked PUSH pull the battery holder out forward 2 Insert the lithium battery with the positive terminal facing down 3 Slide the cover to close it Note The life of lithium battery is approximately one year If the batte...

Page 21: ...g remote Control Point the remote control to the infrared receiver on the DVD video camera recorder The remote controllable distance is up to 5 m Note When using the remote control make sure that the infrared receiver on DVD video camera recorder is not exposed to direct sunlight or any intense light If the infrared receiver is subject to light stronger than the infrared light from remote control ...

Page 22: ...e and reuse p 98 To additionally record on finalised disc 5 5 To edit copied video on PC 6 6 7 6 7 6 7 6 7 To playback video on PC 6 6 7 6 7 6 7 6 7 To create DVD video using PC 6 6 Functions available Not available 1 Playable on devices that conform to either 8 cm DVD RAM 8 cm DVD RW VR mode or 8cm RW 2 Must be finalised Cannot be played on some DVD players or DVD recorders 3 Some DVD devices con...

Page 23: ...W VF mode DVD R RW disc recorded on this DVD video camera recorder but not finalised Using any other device could damage the data recorded on the disc DVD RW DVD R RW discs edited and finalised on PC or those finalised on another DVD recorder may not be playable on this DVD video camera recorder depending on the editing software used or recorded status of DVD RW DVD R RW disc If you insert a DVD R...

Page 24: ...e data on disc or card may be damaged or lost Do not remove the disc or card or turn DVD video camera recorder off during reading or writing of data Do not use DVD video camera recorder in a place subject to static electricity or electrical noise Do not have printing done at a print lab or DPE service Do not leave a disc unused in the DVD video camera recorder for a long time Note This DVD video c...

Page 25: ...eo camera recorder Using other AC adapter chargers could cause electric shock or result in fire 1 Connect the mains lead to AC adapter charger 2 Plug the mains lead into AC outlet 3 Plug one end of DC power cord into the DC output jack on AC adapter charger 4 Attach the other end of DC power cord to the battery attachment platform on DVD video camera recorder Use the same procedure as that for bat...

Page 26: ...nplug it from the AC outlet wait a few moments and then plug it into the AC outlet again If the CHARGE indicator still does not light the AC adapter charger may be faulty Unplug it from the AC outlet and consult your dealer The AC adapter charger can be used around the world An AC plug adapter is required in some foreign countries If you need one purchase it from your local electronics distributor...

Page 27: ...is heard Note Make sure that the battery is in the correct orientation Make sure that the battery is securely attached Incomplete attachment could cause the battery to fall resulting in damage REMOVING BATTERY After using the DVD video camera recorder remove the battery from it 1 While holding down the BATTERY EJECT button slide the battery upward to remove it Note For safety be sure to turn the D...

Page 28: ...tc Note that the battery discharges faster in cold places Note See Troubleshooting on page 137 when charging is not possible The charge time will vary depending on the battery remaining level During and after charging and when the DVD video camera recorder is being used the battery will be warm but this does not indicate a fault A battery cannot be charged while the DC power cord is connected to t...

Page 29: ...ra recorder and use it up then remove the battery and store it in a cool place again Battery life The battery life varies greatly depending on the ambient environment and how often the DVD video camera recorder is used If the usable time of DVD video camera recorder with a fully charged battery is noticeably short the battery is probably dead Purchase a new one Power save and discharge of battery ...

Page 30: ...l take some time for the DVD video camera recorder to start because it must recognise the disc again see Troubleshooting on page 137 It will take some time for the DVD video camera recorder to display the Disc Navigation screen after power is turned on When the DVD video camera recorder is turned on the self diagnosis function will work and a message may appear In this case refer to Trouble Messag...

Page 31: ...leshooting on page 137 If LCD monitor lights white refer to page 57 Be sure to open the LCD monitor approximately 90º before changing its vertical angle Do not record for a prolonged time with the LCD monitor turned approximately 180º in close contact with the DVD video camera recorder body Doing this could cause the DVD video camera recorder and LCD monitor to become hot VIEWING SUBJECT THROUGH V...

Page 32: ... After setting the current date and time press the button The screen for verifying the set date will appear 5 If the displayed date and time are correct press the 0 button to choose YES and then press the button The date and time will be set and the DVD video camera recorder will enter the recording pause status Choosing NO will restore the menu screen CHANGING DISPLAY FORMAT OF DATE AND TIME You ...

Page 33: ... off activated by the power save function set the power switch to OFF and then set it to or The Power Save setting will not appear in the on screen information display If the sleep restart standby status continues for 30 minutes the DVD video camera recorder will automatically turn off regardless of the Power Save setting CHANGING DISPLAY LANGUAGE LANGUAGE You can change the language used to displ...

Page 34: ... The reflected light of the recording indicator will not be recorded Even if Record LED Off is specified the recording indicator will light while the self timer is counting down CHANGING SETTING OF DEMONSTRATION 1 Press the MENU button choose Initial Setup Demo Mode and then press the button 2 Press the 2 or 1 button to choose the desired option and then press the button 3 Press the MENU button ag...

Page 35: ...VF Brightness The brightness adjustment bar will appear on the screen 2 Use the 0 buttons for adjustment Press 0 The screen becomes dimmer Press The screen becomes brighter 3 Press the MENU button to end the setting Note The brightness setting will be stored in memory even after the DVD video camera recorder is turned off LCD Br i gh t n e s s EVF Br i gh t n e s s C o l o u r L ev e l ENTER ADJUS...

Page 36: ...e brightness or density of the recorded image itself will not change ALWAYS DISPLAYING IMAGE IN VIEWFINDER 1 Press the MENU button use the 2 1 0 buttons to choose EVF Display on the LCD EVF Setup menu screen 2 Choose On and decide it Auto If the LCD monitor is open no image will appear in the viewfinder On Images will always appear in the viewfinder regardless of whether the LCD monitor is open cl...

Page 37: ... face the inside of DVD video camera recorder When using a single sided disc the recording surface is the side without label Never touch the disc recording surface or pickup lens Touching the pickup lens could cause a fault Use the disc cleaning cloth provided to wipe off any dirt adhering to the disc recording surface Do not use a dirtied or scratched disc 4 Push the section marked PUSH CLOSE on ...

Page 38: ...ot be removed To remove the disc set the power switch to OFF or When using double sided disc Recording is possible on both sides of double sided disc However when recording or playback on one side is finished recording or playback will not move automatically to the other side Remove the disc once from the DVD video camera recorder turn over the disc and insert it again for continued use The record...

Page 39: ...serting Card Insert card with its terminal inward until it locks Removing Card Push the centre of card edge The card will come out so that it can be held by fingers 5 Close the cover of card insertion block Note Always close the cover of card insertion block Placing the DVD video camera recorder on a desk etc with cover open could damage the cover ...

Page 40: ...er does not operate See page 43 for on screen information display While the ACCESS PC indicator is lit or blinking do not turn the DVD video camera recorder off and take care not to subject it to any vibration Doing so could cause an error in the recorded data which could make it unplayable see page 6 The minimum recordable time of movie is approximately 3 seconds See page 34 for setting of Record...

Page 41: ...rding Note If you wish to record without locating a subject at the centre of screen first locate the subject at the centre of screen press the PHOTO button halfway down determine the composition to be recorded and then press the PHOTO button all the way down If you press the PHOTO button all the way down at one stroke without pressing it half way recording will be possible but the focus may be inc...

Page 42: ...the DVD video camera recorder to recording pause from the sleep restart standby status The following operation will release the sleep restart standby status Press down the DISC EJECT button Change over the power switch Note If you press the REC or PHOTO button while in the sleep restart standby status the sleep restart status will be released but recording of a video or photo will not start To rec...

Page 43: ... The above screen is an example for explanation It is different from the actual display 2 16 9 mode 8 3 Program AE 4 Backlight compensation A 5 EIS 6 White balance 1 Recording mode 11 Zoom 12 Exposure correction 13 Manual Focus 14 Disc Card type 15 Movie recording quality C 7 Microphone filter 8 Self timer 9 External Input 10 Recording status Movie recording time 16 Remaining space on disc card 17...

Page 44: ...ill Card 1 External input still field Card 1 External input still frame Card No display 16 9 mode OFF 16 9 mode ON No display Auto 5 Sports 6 Portrait 7 Spotlight 8 Sand Snow 9 Low Light No display Backlight compensation OFF Backlight compensation ON No display EIS OFF A EIS ON No display Auto Set Outdoor Indoor No display Microphone filter OFF C Microphone filter ON No display Self timer OFF D Se...

Page 45: ...rioritized REM XX MIN 8 Remaining recordable minutes during movie recording REM XX 9 Number of remaining recordable still images during still recording J full charge K L M low remaining charge The volume can be adjusted during external input and playback 1 Not displayed on DZ GX5060SW 2 EIS cannot be used when recording photos on DZ GX5100SW 3 When no disc or card is in the DVD video camera record...

Page 46: ...n be checked on Disc Navigation screen during playback see INFORMATION DISPLAY DURING RECORDING on page 43 Display when recording an image of yourself When recording with the LCD screen facing the same direction as the lens the operating status will appear The battery remaining level will appear only when the remaining level is very low and the display will blink No warning message see page 43 wil...

Page 47: ...e LCD monitor is opened and turned 180º with the Programme AE set to Low Light the monitor screen will light white see page 57 Screen display symbol Description A write protected disc is loaded A locked card is loaded An unusable card is loaded An attempt to record a still is being made with a DVD RW DVD R RW disc used An unusable disc is loaded 7 During recording lights in red The remaining capac...

Page 48: ...lay the menu The menu screen will disappear when it is left for approx one minute without any operation On Au t o P r og r am AE Wh i t e Ba l D i g Zoom M IC F i l t e r E I S ENTER RETURN 6 0 x O f f Au t o Came r a Fun c t i ons Se t up A A V I DEO Mode F I NE I npu t S o u r c e CAMERA OSD Ou t pu t On ENTER RETURN Rec o r d F u n c t i o n s Se t up 1 6 9 On On Au t o P r og r am AE Wh i t e ...

Page 49: ... 63 4 Not displayed in or status 5 Not displayed on DZ GX5060SW 6 Displayed with DVD RAM disc in status or and input selection is set to external signal 7 Displayed with DVD RAM disc in status or status 8 Displayed only when input selection is set to camera On Au t o P r og r am AE Wh i t e Ba l D i g Zoom M IC F i l t e r E I S ENTER RETURN 6 0 x O f f Au t o A A Came r a Fun c t i ons Se t up V ...

Page 50: ...g will switch the setting between Off 60 1 and 800 2 Pressing the button during photo recording will switch between Off and 60 1 If you set zoom to 800 2 when recording photo the digital zoom will be up to 60 1 When a subject is zoomed it may be momentarily out of focus When digital zoom is engaged the image quality will be rougher MACRO RECORDING Use the macro function when recording a small obje...

Page 51: ...f conversion lens and screw the lens into the thread of step up ring Note With DZ TL1 tele conversion lens the focusing range at T telephoto control side is between approx 5 m and infinite When a conversion lens is attached note that the four corners of screen will be slightly dim if you zoom in on a subject on the W control side wide angle side When replacing the lens take care not to drop the DV...

Page 52: ... during recording Manual Focus icon will appear on the screen 2 Press the zoom lever to T control side to zoom in on subject 3 Use the 0 buttons to adjust the focus while viewing the image in the viewfinder or on the LCD screen Note Pressing FOCUS will alternate between manual focus and auto focus With auto focus no indication will appear on the screen Be sure to zoom in on your subject before man...

Page 53: ...not in the centre of screen Objects that are far and near at the same time Objects with little variation in brightness such as white wall Objects moving rapidly Dark objects Objects lit by neon sign spotlight etc which glares or emits strong light Object behind glass with water droplets dirt on it Night view ...

Page 54: ...xposure no indication will appear on the screen The exposure setting will return to Auto when the DVD video camera recorder is turned off Compensating for Backlight When subject is lighted from rear this function will compensate for lighting so that the subject is not too dark 1 Press the BLC button during recording The backlight correction icon will appear Note Pressing the BLC button will altern...

Page 55: ...UTO button FULL AUTO will be displayed on the screen of DVD video camera recorder for several seconds The following settings will reset to defaults Function When setting full auto Reference page Focus Auto 52 Backlight compensation Off 54 Exposure Auto 54 Programme AE Auto 56 White balance Auto 57 EIS On 59 MIC Filter Off 59 ...

Page 56: ... When recording in a dark area an after image will appear when filming a moving subject or if camera shake occurs it is therefore recommended that you use a tripod in such cases If the Sports mode is used under a fluorescent light the image may flicker In this case use the Auto mode for recording Auto The camera recorder automatically judges the subject and surrounding environment for optimum reco...

Page 57: ...ecord a subject up to 1 m even in a dark place An after image will appear when filming a moving subject or if camera shake occurs it is recommended that you use a tripod If a subject cannot be focused properly manually adjust the focus see page 52 ADJUSTING COLOUR WHITE BALANCE This DVD video camera recorder automatically adjusts the colour of subject Change the white balance setting depending on ...

Page 58: ...t fills the screen manually focus the object referring to Manually Focusing Subject see page 52 2 Press the MENU button choose White Bal Set and then press the button 3 Hold pressed until the indicator changes from blinking to a steady light When the indicator lights the white balance setting will be complete 4 Press the button to end the setting Note The white balance set using the Set option wil...

Page 59: ...ideo camera recorder with both hands EIS may not operate correctly when the tele or wide conversion lens is used EIS cannot be used when recording photos on DZ GX5100SW RECORDING SUBJECT USING LARGE MAGNIFICATION DIGITAL ZOOM See page 50 for setting on digital zoom REDUCING WIND NOISE DURING RECORDING MIC FILTER When recording sound from the microphone built into this DVD video camera recorder you...

Page 60: ...ith the disc for recording When using a DVD RW VF mode DVD R RW You cannot specify the combination of VIDEO Mode STD and 16 9 On If you specify 16 9 On and try to switch the VIDEO Mode to STD from XTRA or FINE the screen will automatically switch to the 4 3 aspect ratio display The movie quality setting is effective only during movie recording The setting will not be displayed during recording of ...

Page 61: ...rd Functions Setup menu screen and then press the button 2 Choose On and then press the button 3 Press the MENU button to end the setting When viewing playback on an ordinary TV screen later specify 16 9 Off Recording with 16 9 On specified will be played back on an ordinary TV with longer vertical direction of image An image recorded with 16 9 On specified will appear as follows Images recorded w...

Page 62: ...e 16 9 setting then being used The 16 9 setting is not compatible with ID 1 ID 2 2 To view images recorded at 16 9 setting switch the aspect ratio of your TV See TV instruction manual for this switching When using a video selector the TV may not automatically be switched to 16 9 mode When the power switch is set to or the aspect ratio of screen in recording pause will be 4 3 regardless of the sett...

Page 63: ... video camera recorder you must first switch the setting on the DVD video camera recorder Refer to the explanation starting from page 108 on how to connect the DVD video camera recorder to other devices or record images input from them The DZ GX5060SW cannot receive any externally input signal 1 Press the MENU button use the 2 1 0 buttons to choose Input Source on the Record Functions Setup menu s...

Page 64: ...n record photos using the self timer function as with ordinary cameras 1 Press the MENU button use the 2 1 0 buttons to choose Self Timer on the Record Functions Setup menu screen and then press the button 2 Select On and then press the button The self timer will be set 3 Press the MENU button to end the setting 4 Press the PHOTO button The recording indicator at the front of DVD video camera reco...

Page 65: ...reen display output functions only when the input selection is set to camera It cannot be set during external input Using External Microphone Connect external microphone generally available to the external microphone jack of this DVD video camera recorder Clearer sound can be recorded Turn on the switch on external microphone and start recording For details on external microphone see Major Specifi...

Page 66: ...ppear when DVD RAM disc is used Some items will not appear when DVD RW DVD R RW disc or card is used but the operation is the same 1 Press the DISC NAVIGATION button The Disc Navigation screen shown on page 67 will appear 2 Press the DISC NAVIGATION button again Disc Navigation will be terminated and the DVD video camera recorder will enter the recording pause status You can also press the button ...

Page 67: ... Hitachi DVD video camera recorder model other than DZ GX5100SW GX5060SW Locked card Do not leave the disc navigation screen displayed on TV to which the DVD video camera recorder is connected Doing so could damage the TV screen possibly by burning 1 Scene Video movie One scene refers to images recorded from one press of REC button until recording is stopped by pressing the REC button again Photo ...

Page 68: ...order will enter the playback pause status at the last image of last scene Pressing the or DISC NAVIGATION button will restore the Disc Navigation screen When the playback pause status continues for as long as 5 minutes the Disc Navigation screen will automatically be restored Playing back photos A photo on DVD RAM disc will be displayed for approx 3 seconds When playing back photos on card playba...

Page 69: ...d may not play back depending on the type of image data Image data recorded on another DVD video camera recorder or DVD recorder may not be played on this DVD video camera recorder Depending on the amount of data to be played back it may take some time for the playback image to appear Do not operate the power switch or remove the card while the ACCESS PC or CARD ACCESS indicator is lit or blinking...

Page 70: ...n Scenes will be visually scanned forward Hold down 0 Scenes will be visually scanned backward Release the 0 or button when you find the desired image Normal playback will start from that point Note If the temperature inside the DVD video camera recorder rises normal skip or search playback may not be possible Turn the DVD video camera recorder off wait for a few moments and then turn it on again ...

Page 71: ...disc will set the DVD video camera recorder to the playback pause status at the last image If the temperature inside the DVD video camera recorder rises normal skip or search playback may not be possible Turn the DVD video camera recorder off wait for a few moments and then turn it on again PLAYING BACK STILLS Press the 2 or 1 button during playback to quickly play back stills in sequence Press 1 ...

Page 72: ...before going to the specified point Note If multiple scenes are selected using the Disc Navigation function or SELECT button choosing Top will jump to the beginning of selected scenes p 98 When multiple scenes are selected the total time of selected scenes will appear in the total recording time display With card the number of stills will appear at the TOP CURRENT END and GO TO indicators The curs...

Page 73: ...rding date time 006 06 0 00 16 Recording mode 1 Scene No Repeat play 5 Programme No or Play List No 3 Programme or Play List 2 Counter Disc type 4 Playback operation 6 003 100 0003 Recording mode 1 Scene No File name Lock 5 Playback operation 6 Slide Show 5 1 VIDEO or PHOTO with disc Only PHOTO with card 2 Programme or Play List 3 Number of programme or play list being played back not displayed wh...

Page 74: ...then selected Note You can know the status of scenes from the colours of cursor and bargraph Pressing the button after selecting scenes will play back only the selected scenes from the beginning of each To cancel a selected scene select the scene to be cancelled and then press the SELECT button To cancel all selected scenes press the button You can also select scenes in reverse from the last scene...

Page 75: ...cene so that it will not be deleted by mistake Essential scenes are thereby protected and recording another still is possible 85 Scene information display You can display information on one scene or multiple scenes such as image quality recording time etc 87 Changing title You can change the title of play list or programme 89 97 Creation of play list You can create an original movie by changing th...

Page 76: ... p 84 Combine p 80 Select p 86 Move 2 p 80 2 Will appear when a play list is displayed Detail p 87 1 DVD RAM only Fade p 81 Skip p 82 Thumbnail p 83 Start Current p 86 Current End p 86 All p 86 Play list Select p 92 Go To Top p 98 Play p 92 End p 98 Create p 91 Edit p 93 96 Disc Finalize Disc 4 p 101 Title p 97 Format Disc p 98 Delete p 97 Protect Disc p 99 Capacity p 99 Program Select p 88 Update...

Page 77: ... p 101 Play p 89 Unfinalize Disc 5 p 102 Format Disc 5 p 98 Capacity p 99 Go To Top p 98 5 DVD RW VF mode RW only End p 98 Others Repeat Play p 103 On p 103 Off p 103 TV type p 104 16 9 p 104 4 3 p 104 Scene Delete p 78 Lock p 85 Select p 86 Start Current p 86 Detail p 87 Current End p 86 All p 86 Go To Top p 98 Slide Show Start p 104 End p 98 Card Format Card p 98 Capacity p 99 ...

Page 78: ...n this screen 6 The screen for verifying deletion will appear Choose YES and then press the button Choose NO to cancel deletion After Yes or No setting the Delete Scene screen will be restored Repeat steps 5 and 6 to delete other scenes 7 Press the button to quit Note If you point the cursor at the scene to be deleted on DISC NAVIGATION screen and then press the DELETE button on remote control the...

Page 79: ...u will appear Search and frame advance are useful when designating division points Combining scenes that were divided will restore the original scene see page 80 If a special effect has been added to the original scene the IN effect will be added to the first half of scene and the OUT effect to the latter half The division point may drift before or after the designated point by approximately 0 5 s...

Page 80: ...scenes to be combined again 6 The screen for verifying combination will appear Choose YES and then press the button The two images appearing on the verification screen are those of the first and last scenes to be combined Choose NO to cancel combination After Yes or No setting the Combine Scenes screen will be restored The thumbnail of the first scene will appear in the combined scene Repeat steps...

Page 81: ... press to set the effect To cancel setting choose Cancel If you choose Enter and press the Fade screen will be restored after a message appears Repeat steps 5 and 6 to add fade to other scenes 7 Press the button to quit The 2 and or 3 icon s will appear in the scenes for which fade in and or fade out have been set Note If a disc on which fade has been set on scene with this DVD video camera record...

Page 82: ...Set Skip screen will be restored Repeat step 5 to set skipping of other scenes 6 Press the button to quit A skip icon will appear in the thumbnail of any scene for which skipping has been set Releasing Skip Perform the same procedure as setting skip The skip icon will disappear and skipping of the scene will be released Note Multiple scenes can be selected for skipping p 74 If you press the MENU b...

Page 83: ...e it on this screen 6 When the image you want to use as the thumbnail of the scene appears press the SELECT button 7 The screen for verifying switching of thumbnail will appear Choose YES and then press the button Choose NO to cancel switching of thumbnail After Yes or No setting the Change Thumbnail screen will be restored Repeat steps 5 7 to change the other scenes 8 Press the button to quit Not...

Page 84: ...O to cancel copy After Yes or No setting the Copy to card screen will be restored Repeat steps 6 and 7 to copy other stills to card 8 Press the button to quit Note No movie can be copied If you press the MENU button before pressing the button in step 6 the submenu screen will appear p 79 See Category p 103 to check the stills recorded on DVD RAM disc You can also select multiple scenes p 74 Even i...

Page 85: ...hange the scene to be locked you can change it on this screen After setting the Lock Set screen will be restored Repeat step 6 to lock another scene 7 Press the button to quit The lock icon will appear on any scene for which lock has been set To unlock the scene Select the locked scene and then use the same procedure as above to unlock the scene The lock icon will disappear and locking will be rel...

Page 86: ...ne menu screen 5 Choose Start Current Current End or All and then press the button Deselecting selected scenes Deselecting scenes one by one While you are displaying the All Programs screen on which scenes have been selected choose the scene to be deselected and then press the SELECT button Note Up to 999 scenes can be selected Deselecting all the selected scenes at once While you are displaying t...

Page 87: ... on another device 3 May not appear if the loaded card does not comply with DCF 4 Number of pixels on still in horizontal direction This may not appear with a JPEG file that does not conform to this DVD video camera recorder De t a i l Sc e n e N o 0 0 7 V IDEO F I NE 1m i n13 s e c Da t e 10 2 2007 8 00 00 S k i p O f f Fa d e IN None OUT None PREV NEXT RETURN De t a i l Sc e n e N o 7 1 00 0007 ...

Page 88: ...played and then press the button The Disc Navigation screen of the selected programme will appear Note Pressing the button on the Select Program screen will restore the Disc Navigation screen If a disc recorded on another device is loaded in this DVD video camera recorder the programme may not be a collection of recordings on the same date If you change the video quality or switch the wide mode wi...

Page 89: ...een for setting a title will appear 5 Use 2 1 0 to select a letter and then press the button The selected letter will be entered Repeat this procedure to create a title Up to 20 characters can be input 6 After entering the title choose Enter and then press the button 7 The screen for verifying the change in title will appear Choose YES and then press the button Choose NO to cancel changing of the ...

Page 90: ...for verifying change in title the title setting screen will be restored Double byte characters set on other devices may be displayed blank on this DVD video camera recorder Titles set on this DVD video camera recorder may not be visible on other devices Characters available for entering title You can use the SELECT button to select characters from the capital letter small letter and symbol input m...

Page 91: ...ton If you want to change any of scenes you are registering you can also use this screen see pages 74 and 86 6 When creation of a play list is complete the created play list will appear on the Disc Navigation screen Note You can also select multiple scenes p 74 Only the data on scenes is recorded on play list If you create or delete play lists the original scenes in programmes will not be erased E...

Page 92: ...ting skip adding fade etc use the same procedure for setting on programme or scenes Perform these settings referring to the following reference pages PLAYING BACK A PLAY LIST PLAY 1 Press the DISC NAVIGATION button 2 Press the MENU button 3 Use the 2 1 0 buttons to choose Play on the PlayList menu screen and then press the button 4 Use the Start Playlist screen to select the play list to be played...

Page 93: ...play list will appear Repeat steps 5 7 to add other scenes 8 Press the button The screen for verifying exit will appear Note The mark shows the position where the scene is to be added You can also select multiple scenes p 74 Pressing in the middle of adding scenes will display the screen for verifying an exit from Edit PlayList Choose YES to exit the edition of play list Choosing NO will restore t...

Page 94: ... scenes to a play list 1 Press the DISC NAVIGATION button 2 Display the editing screen of the play list to be edited Perform steps 2 4 on page 93 3 From the play list in lower row select the position where you wish to insert a scene 4 Select the scenes to be added from the upper row 5 Press the MENU button 6 Choose Add and then press the button Repeat steps 3 6 to add other scenes 7 Press the butt...

Page 95: ... can also select multiple scenes p 74 SELECTING SCENES USING SUBMENU FOR EDITING EDITING PLAY LIST You can specify the range of scenes when adding or deleting consecutive multiple scenes to from play list This Select menu item is useful when selecting consecutive multiple scenes in items for adding or deleting scenes using menu on page 86 1 Press the DISC NAVIGATION button 2 Display the editing sc...

Page 96: ...s the button If you want to change the scene selected in step 4 you can do it on this screen 8 Move the mark to the position where you wish to move the scene and then press the button 9 The screen for verifying move will appear Choose YES and then press the button Choose NO to cancel move After Yes or No setting the scene select screen will be restored Repeat steps 7 9 to move another scene 10Pres...

Page 97: ...ar Note The registered title can be changed at any time using the same procedure DELETING PLAY LIST DELETE 1 Press the DISC NAVIGATION button 2 Press the MENU button 3 Use the 2 1 0 buttons to choose Delete on the PlayList menu screen and then press the button 4 Use the Delete Playlist screen to select the play list you wish to delete and then press the button 5 The screen for verifying deletion w...

Page 98: ...ne delete function Initialisation will delete all the recorded contents on disc or card Be careful not to delete data by mistake It may not be possible to initialise a disc with many scratches or dirt Such a disc cannot be used p 8 This DVD video camera recorder may not recognise some discs or cards that have been initialised on PC or a device other than this DVD video camera recorder If you attem...

Page 99: ...her device it may not be releasable on this DVD video camera recorder Use the original device that protected the disc to release the protection VERIFYING REMAINING FREE SPACE ON DISC OR CARD CAPACITY You can find out how long you will be able to record on one side of disc or on card 1 Press the DISC NAVIGATION button 2 Press the MENU button 3 Use the 2 1 0 buttons to choose Capacity on the Disc or...

Page 100: ...verifying Update Control Info will appear 4 Choose YES and then press the button The message for proceeding will appear and then the Disc Navigation menu screen will be restored A black screen may appear while the message for updating is displayed Choose NO to cancel updating Note It may take time to update the control information if the disc has many recorded scenes Even if control information is...

Page 101: ...DVD video camera recorder has already been finalised you cannot choose Finalize Disc The time required to finalise disc that appears on the Finalize Disc screen is only for reference The shorter the recording time on disc the longer it will take to finalise it The second and later finalisation will be faster with a disc which has previously been finalised Using FINALIZE button to finalise a disc P...

Page 102: ...he DISC NAVIGATION button 2 Press the MENU button 3 Use the 2 1 0 buttons to choose Unfinalize Disc on the Disc menu screen and then press the button The screen for verifying unfinalisation will appear 4 Choose YES and then press the button The message showing that the disc is being unfinalised will appear and the disc will then be unfinalised Note A finalised DVD RW VR mode can be recorded as is ...

Page 103: ...y setting When Repeat Play is set If one scene has been specified When playback of the last scene is finished playback of all scenes will repeat from the first scene If the range for playback has been specified Playback of the scenes in that range will repeat To release Repeat Play Use one of the following 3 methods to release Choose Off in step 4 above Turn the DVD video camera recorder off once ...

Page 104: ...der will enter the playback pause status after each still is played back Setting Slide Show allows you to continuously play back stills 1 Press the DISC NAVIGATION button 2 Press the MENU button 3 Use the 2 1 0 buttons to choose Slide Show Start and then press the button When playback is finished the DVD video camera recorder will enter the playback pause status at the final still Pressing the but...

Page 105: ...ng this may cause howling from the TV speakers Insert the AV S input output cable plugs into jacks straight Obliquely inserting them could damage the jacks If your TV has an S VIDEO input jack you can connect the S VIDEO plug to it To AV input output jack AV S input output cable provided To video audio input jacks Red Yellow White To S VIDEO input jack S VIDEO VIDEO AUDIO L R VIDEO AUDIO L R VIDEO...

Page 106: ...ing an image on TV screen However if you use a Hitachi VCR the remote control may inadvertently operate the VCR if it is near the DVD video camera recorder To prevent this set the remote control code of the VCR to a position other than VCR2 Information that the DVD video camera recorder is recording will appear on the TV screen You can also display only part of information or switch off the displa...

Page 107: ...he DVD recorder player and play it back See the instruction manual for DVD recorder player Note Do not insert a DVD RW VF mode DVD R disc that has not been finalised into any DVD recorder The disc may be unusable Do not insert a DVD RW VF mode DVD R recorded on another DVD recorder and not finalised in this DVD video camera recorder Doing so will make the disc unusable A recorded RW is automatical...

Page 108: ...d 24 1 No photo can be recorded on DVD RW DVD R RW 2 Only photos can be recorded No video can be recorded If you operate the DVD video camera recorder connected to another device always power the camera recorder from AC outlet using the AC adapter charger If you use a Hitachi VCR it will be operated by the remote control provided with the DVD video camera recorder When recording an image from a Hi...

Page 109: ...g of most images is prohibited by the copy guard signal to protect the copyright except for images recorded on camcorders for personal enjoyment COPY PROTECTED appears in these images They cannot be recorded on this DVD video camera recorder Typical copyright protected images include those of DVD video LD recorded video tapes some parts of digital satellite broadcasts etc If a video signal that ca...

Page 110: ...cted device The DVD video camera recorder will start playback and the recorded device will record dub it Note Using S VIDEO will enable you to record clearer images Reduce the volume of external input sound heard from the built in speaker The loud volume may cause noise to enter the recorded image It is recommended that you use Disc Navigation to create a play list including the scenes to be dubbe...

Page 111: ...DVD video camera recorder into Macintosh as an MPEG file You can combine imported images cut edit them etc You can also create a DVD Video DVD RW DVD R by importing the images recorded on the DVD video camera recorder into Macintosh Note Finalise the DVD RW DVD R recorded on the DVD video camera recorder before using it on PC You cannot create a DVD VR DVD RAM DVD RW on the Macintosh software Sinc...

Page 112: ...e with DirectX 9 0c or higher Sound Sound Blaster or its equivalent Other Environment where DirectX 9 0c can operate normally When using Macintosh OS Mac OS X v10 3 9 v10 4 2 v10 4 8 The provided software cannot be used on Mac OS X Server CPU PowerPC G4 1 GHz or higher PowerPC G5 Intel Core Memory At least 256 MB 512 MB or more is recommended HDD Free space needed for installation Approx 30 MB To ...

Page 113: ... the setup exe icon in it Extension exe may not appear depending on the PC used 3 Choose the language to be installed Choose the language used with ImageMixer 3 and then click Next 4 The ImageMixer 3 installation screen will appear Click Next 5 Checking licence agreement Carefully read the licence agreement If you accept the contents choose I accept the terms of the licence agreement and then clic...

Page 114: ...s installed Easy CD Creator 5 may not operate normally The screen shown below will appear after you click Install If you are using Easy CD Creator 5 click Yes and do not install ImageMixer 3 9 After installation is finished the screen for prompting restart will appear Click Finish to restart the PC After restart remove the CD ROM from the PC Installing the software is now complete Note After insta...

Page 115: ... read the licence agreement If you agree with the contents choose Continue If you accept the licence agreement click I agree With the provided software for Macintosh the language used with OS will automatically be installed 5 Choose the installation destination and type of installation and click Continue Then click Install Follow the instructions on screen for operation Installation will start 6 A...

Page 116: ... indicator will light or blink red When this DVD video camera recorder is connected to PC nothing will appear on the LCD monitor or in the viewfinder When using Windows the DVD video camera recorder can be connected to a USB1 1 port of PC However since the data transfer speed is lower than when connecting to a USB2 0 port lost frames may occur or the process may take more time Read Cautions when c...

Page 117: ...nd on the software environment used If the DVD video camera recorder is connected to Macintosh USB port with the power switch set to it will be recognised as a removal drive and the icon shown on the right will appear Double click this icon The contents of card can be checked The shape of icon and drive name will depend on the software environment used Handling photos Photos are recorded on a DVD ...

Page 118: ...mera recorder will open Load another disc and close the cover The disc will be recognised When removing SD memory card When using Windows Make sure that the SD memory card is not being accessed by the PC software on PC and that the CARD ACCESS indicator on DVD video camera recorder see page 6 is not lit or blinking and then remove the SD memory card from DVD video camera recorder The CARD ACCESS i...

Page 119: ... OVER POWER SWITCH When using Windows 1 Before unplugging the PC connection cable from PC terminate the application and then click the Hardware Removal icon on task tray at the bottom right of Windows screen 2 Choose USB mass storage device The drive name E etc will depend on the PC used 3 A message showing that hardware removal is possible will appear Unplug the PC connection cable When using Mac...

Page 120: ... 101 1 Insert a disc whose recorded images you wish to play into the DVD video camera recorder and connect the DVD video camera recorder to the USB port of PC 2 Start ImageMixer 3 When ImageMixer 3 starts up the launcher shown below will appear Click Playback Import Movie 3 Choose the camcorder on the library screen The library screen shown below will appear Click the camcorder icon shown on the l...

Page 121: ...nect the DVD video camera recorder to a USB port of PC 2 Start ImageMixer 3 When ImageMixer 3 starts up the launcher shown below will appear Click Create DVD Video 3 Click Create New DVD 4 Setting up project Set up a project You can set up the designated save location of edited contents and image quality Be sure to choose PAL for the video system After setting up the project click the OK button 5 ...

Page 122: ...rform the same procedure to import the images When the images on DVD RW VF mode DVD R RW are imported the recording date time will not appear Note To import all chapters in the title at once click Select all in the editing menu at the top of screen and then click Import To import multiple chapters click the desired chapters while holding down the Ctrl key 7 Click Authoring and create a DVD Video m...

Page 123: ... content of disc will erase all data on the disc Carefully check the contents of disc Choosing Yes will display the screen for choosing the disc erasure method After checking it click the OK button Once the contents on disc have been deleted the cover of disc insertion block on DVD video camera recorder will open Close the cover following the message instruction If the disc contains a video file t...

Page 124: ...r see page 101 before it is played back on Macintosh 1 Load a disc with the images you wish to play back into the DVD video camera recorder and connect it to the USB port of Macintosh 2 Start ImageMixer 3 for DVDCAM 3 Choose Hitachi DVDCAM Click Hitachi DVDCAM displayed on the left of screen The images recorded on disc will appear 4 Select the scene you wish to play back and click Playback If you ...

Page 125: ...tom of screen Importing the scene will start Click Library at the top left of screen The video files imported into Macintosh using ImageMixer 3 will appear in a list as shown below Select a video file on this library screen and click the Playback button at the bottom of screen The video file can be played back Also clicking the video edit icon will allow you to cut edit the video Refer to the elec...

Page 126: ...ing Library will display a list of video files imported into Macintosh using ImageMixer 3 Select the video files from which you wish to create a DVD Video and then click DVD List at the bottom of screen The screen for selecting the DVD menu design size of DVD disc to be created 8 cm 12 cm and picture quality will appear Choose the desired settings and click OK The created DVD list will be added Th...

Page 127: ...to DVD will start If you wish to create multiple DVDs of the same contents choose Yes for the message Do you want to create another disc that will be displayed after a DVD is created Note If you load a written DVD RW in the write drive a dialogue Are you sure you want to delete the contents of disc will appear Deleting the content of disc will erase all data on the disc Carefully check the content...

Page 128: ...DCAM User Movies ImageMixer 3 for DVDCAM User Library Application Support ImageMixer 3 for DVDCAM User Library Preferences com PIXELA ImageMixer 3 DVDCAM plist Library Receipts ImageMixer 3 for DVDCAM pkg Note User will depend on the login user name Administrator authority is required for uninstallation Contact The Following Inquiries on software provided with this DVD video camera recorder should...

Page 129: ... Take care that the temperature of this DVD video camera recorder is not too high Fade skip or thumbnails set on the DVD video camera recorder will not be reflected in the provided software If the DVD video camera recorder is connected via USB hub or to a USB port on PC front panel or keyboard the DVD video camera recorder may not be recognised by PC If this happens connect the DVD video camera re...

Page 130: ...3037 for DZ GX5100SW p 51 POWER SUPPLY Battery DZ BP7SW Battery DZ BP14SW When using camera accessories be sure to read the instruction manuals for each accessory 1 You will need the optional step up ring when attaching these lenses Refer to the catalogue for details The models and specifications of the optional accessories shown on this page are subject to change and their production may be disco...

Page 131: ...tery If a battery has been attached turn the power switch off once connect the AC adapter charger and then start repairing Data may not be repaired depending on the timing when power was turned off Data may not be repaired normally if data recorded on another recorder is mixed in The repaired data may be different from the original recorded content because of partial deletion of defective portion ...

Page 132: ... button is pressed with the power switch set to You cannot record still image on DVD RW DVD R RW disc recordable of still images from PC Use DVD RAM disc to record still images 22 149 CANNOT RECORD VIDEO This message will appear when the REC button is pressed with the power switch set to or 41 Cannot replace thumbnail on PHOTO scenes The thumbnail of a still cannot be changed Select a movie 83 Can...

Page 133: ...rerecorded video materials such as movies are guarded against copying Copy guarded materials cannot be recorded on this DVD video camera recorder 109 DISC ACCESS The recorded scene is being stored on disc 40 41 This DVD video camera recorder is verifying whether the correct disc has been inserted Wait until the message disappears and you can start to use the DVD video camera recorder 37 DISC ALMOS...

Page 134: ...control info The number of entered scenes has reached the limit that can be entered so the control information for generating thumbnails cannot be added Combine several scenes or delete them 78 80 Disc is not formatted Format the disc now Has the disc been initialised on a PC Choose YES and initialise the disc when using it on this DVD video camera recorder Initialisation will delete all data on t...

Page 135: ...camera recorder are to be copied to card NO DISC This message may appear when the DVD video camera recorder or disc is moved from a cold place to a warm place Condensation has occurred on the camera recorder lens or DVD drive Do not remove the disc leave the DVD video camera recorder turned off in a place as dry as possible for 1 2 hours 5 The disc has not been inserted Insert it 37 The disc is no...

Page 136: ...ear if you press the FINALIZE button with a finalised DVD RW DVD R RW loaded in this DVD video camera recorder Finalising the disc is not necessary 101 This disc is recorded by the NTSC system Please replace disc This DVD video camera recorder can use only discs recorded on the PAL system A disc recorded on the NTSC system cannot be used on this DVD video camera recorder UNFORMAT DISC The disc is ...

Page 137: ... DVD R disc not finalised on this DVD video camera recorder Troubleshooting Check to see the following before asking for a repair If the suggested solution still cannot restore the DVD video camera recorder to normal do not attempt to repair it yourself but consult your dealer Power supplies Symptom Cause and Correction Reference page Battery cannot be charged Is the ambient temperature too low or...

Page 138: ...n specified it will automatically turn off to save battery power To restart recording in this case set the power switch to OFF and then set it to You can also specify Power Save Off to stop automatic power off 33 Is the DVD video camera recorder set to the sleep restart status If 30 minutes or more has elapsed with the DVD video camera recorder in the sleep restart status it will automatically tur...

Page 139: ... card have remaining recording space 23 26 32 99 LCD screen is hard to see Has brightness of LCD screen been adjusted Stop recording and adjust the brightness 35 Is the DVD video camera recorder being used outdoors Use the viewfinder When using LCD monitor adjust its angle so that LCD screen is not exposed to direct sunlight 31 Unevenness appears on LCD monitor screen Did you press the LCD monitor...

Page 140: ...sible on this DVD video camera recorder No playback picture appears on TV screen Is TV input selector set correctly Some TVs have multiple video input jacks Check whether the correct input was selected on TV to match the connected jacks If the DVD video camera recorder is connected to VCR set its input selector to external input LINE 106 Is the DVD video camera recorder connected to TV correctly C...

Page 141: ... large number of pixels will take some time to appear Symptom Cause and Correction Reference page No drive icon appears on PC The DVD video camera recorder is not turned on Check the power supply 30 Turn PC off and then disconnect the PC connection cable Turn PC on again and then use the PC connection cable to connect the DVD video camera recorder to PC Make sure the PC connection cable is complet...

Page 142: ...ing ImageMixer 3 uses the audio format of AC3 audio no audio will be played back even if the Quick Time MPEG 2 playback component is introduced Only video will be played back Use ImageMixer 3 for playback 124 When the time stamp of file in DVD RAM is viewed on PC it is different from the actual recording time The file system of this DVD video camera recorder is operated on Greenwich Mean Time GMT ...

Page 143: ... Did you detach the battery or AC adapter charger before setting the power switch to OFF Is the battery charged Connect a charged battery or the AC adapter charger and then press the DISC EJECT button to remove the disc Did the DVD video camera recorder turn off because the battery remaining level ran out Connect a charged battery or the AC adapter charger set the power switch to OFF and then pres...

Page 144: ...ches dirt or fingerprints is inserted When disc is subject to severe vibrations When the battery or DC power cord was disconnected instead of following the correct procedure using power switch to turn the DVD video camera recorder off 6 39 No image in viewfinder Is LCD monitor open No image will appear in viewfinder unless the LCD monitor is closed and securely locked to DVD video camera recorder ...

Page 145: ...be reset Note Do not press the reset button with undue force Before pressing the RESET button be sure to remove the disc from the DVD video camera recorder Pressing the RESET button with a disc loaded may erase the scenes recorded on the disc List of setting items Item Default Setting method Camera Functions Setup Program AE Auto p 56 White Bal Auto p 57 ElS On p 59 Dig Zoom 60 1 p 50 MIC Filter O...

Page 146: ... DZ GX5100SW F1 2 2 8 f 3 0 45 mm Filter diameter 30 5 mm Thread pitch 0 5 mm DZ GX5060SW F2 0 4 1 f 2 3 69 mm Filter diameter 34 mm Thread pitch 0 5 mm Focus Auto Manual Zoom Optical 15 DZ GX5100SW Optical 30 DZ GX5060SW 60 800 DZ GX5100SW 120 1 500 DZ GX5060SW with digital zoom added 60 DZ GX5100SW 120 DZ GX5060SW for still Required minimum illumination 0 3 lx in Low Light mode Viewfinder 0 2 in...

Page 147: ...nput 640 480 pixels DVD RW VF mode DVD R disc Movie Conforming to DVD video format Dolby Digital RW disc Movie DVD RW video format Dolby Digital Card Still Conforming to JPEG DZ GX5100SW 1 280 960 pixels DZ GX5060SW 640 480 pixels External input 640 480 pixels standard Audio playback format MPEG Audio layer 2 linear PCM Dolby Digital Recording medium 8 cm DVD RAM conforming to DVD RAM Ver 2 1 8 cm...

Page 148: ...S input output cable DZ GX5060SW is provided with AV S output cable Infrared remote control not provided with DZ GX5060SW Lithium battery for remote control not provided with DZ GX5060SW Lens cap Lens cap string Shoulder strap Mains lead DC power cord Software CD ROM PC connection cable Disc cleaning cloth Recording quality Movie recordable time Application XTRA Approx 18 min 1 Best quality FINE A...

Page 149: ... 160 KB When image quality is prioritised NORM Approx 480 KB Approx 120 KB Approx 120 KB Standard quality ECO Approx 320 KB Approx 80 KB Approx 80 KB When number of stills is prioritised quality will be slightly inferior Recording quality Capacity 32 MB 64 MB 128MB 256 MB 512 MB 1 GB FINE Approx 45 Approx 95 Approx 190 Approx 380 Approx 750 Approx 1 500 NORM Approx 60 Approx 120 Approx 250 Approx ...

Page 150: ...scene 78 94 Demo Mode 34 Detail scene 87 Dig Zoom 50 Dioptre control 31 Disc Available 23 Finalise 101 Format 98 Handling 8 Protect 99 Update Control Info 100 DISC EJECT button 37 Display Information LCD 43 Scenes information 87 Viewfinder 31 Divide 79 DVD player 107 DVD R 23 DVD RAM 23 DVD recorder 107 DVD RW 23 E Edit play List 93 EIS 59 EXPOSURE button 54 Exposure control 54 External microphone...

Page 151: ...8 R Record button 40 Recording indicator 34 Remote control 20 Repeat Play 103 Reset settings 34 system 145 RESET button 145 RW 23 S Sand Snow Programme AE 56 Scene 67 Combine 80 Delete 78 Detail 87 Divide 79 Fade 81 Move 80 96 Select 86 Skip 82 Searching for image 70 Select programme 88 Select Scene 74 SELECT button 74 Self Timer 64 Shoulder Strap 19 Skip Scene 82 Skip playback 71 Slide Show 104 S...

Page 152: ...puters on network you must obtain the right of use for each computer from Pixela Corporation You may not let any third party use this programme by granting reuse transfer lease lending etc You may not modify alter decompile or deassemble all or any part of this programme or its accessories And you may not allow any third party do so Termination of Agreement If you duplicate this programme and its ...

Page 153: ...terloo Road North Ryde N S W 2113 Tel 61 2 9888 4100 Fax 61 2 9888 4188 Hitachi Home Electronics Asia S Pte Ltd 438A Alexandra Road 01 01 02 03 Alexandra Technopark Singapore 119967 Tel 65 6536 2520 Fax 65 6536 2521 www hitachiconsumer com sg Hitachi Hong Kong Ltd 18 F Ever Gain Centre 28 On Muk Street Shatin N t Tel 852 2113 8883 Fax 852 2783 0655 www hitachi hk com hk ...

Reviews: