background image

LR5092-20

Instruction Manual

DATA COLLECTOR

EN

Mar. 2019  Revised edition 3

LR5092B980-03


19-03H

Be sure to read this manual  before using the instrument.


p.3

When using  the instrument for the 

first time

Troubleshooting

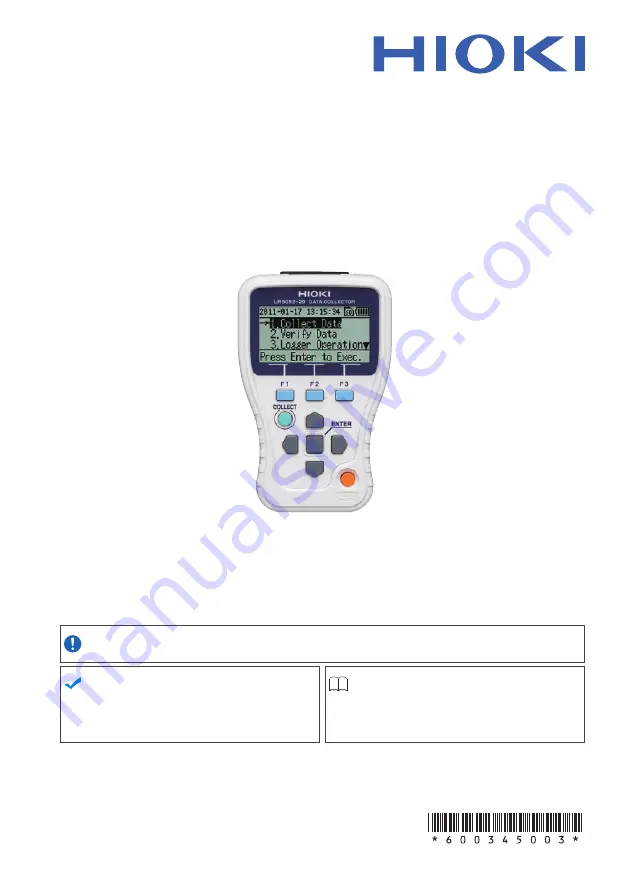
Part Names/Functions


p.10

Troubleshooting


p.128

Preparation for Use


p.15

Error Display


p.130

Summary of Contents for LR5092

Page 1: ...9 Revised edition 3 LR5092B980 03 19 03H Be sure to read this manual before using the instrument p 3 When using the instrument for the first time Troubleshooting Part Names Functions p 10 Troubleshoot...

Page 2: ......

Page 3: ...1 Installing or Replacing the Battery 15 Battery Status Indicator 15 2 2 Inserting an SD Card When Necessary 17 SD Memory Cards for which Operation is Guaranteed 18 2 3 Turning the Power On Off 19 2...

Page 4: ...Card 40 File Structure in SD Memory Card 41 5 2 Moving Data in Collector Memory to SD Memory Card 42 5 3 Saving and Importing Setting Conditions 46 5 4 Clearing Data 49 Clearing Data from Collector M...

Page 5: ...Graph of Saved Recording Data 100 7 8 Processing Recorded Data 102 Scaling 104 Calculating Electric Power 105 Calculating Energy Cost 106 Calculating Operating Rate 107 Integration 108 Calculating De...

Page 6: ..._______127 Requesting Repairs 127 When the logger will not be used for long time 127 Lifespan of Backup Battery 127 9 1 Cleaning 127 9 2 Troubleshooting 128 9 3 Error Display 130 9 4 Disposing of the...

Page 7: ...s provided below Menus commands dialogs buttons in a dialog and other names on the screen and the keys are indicated in brack ets SET Bold characters Bold characters within the text indicate operating...

Page 8: ...n parentheses Use the original packing materials when transporting the logger if possible Pack the logger so that it will not sustain damage during shipping and include a description of existing damag...

Page 9: ...recautions in the manual before use We disclaim any responsibility for accidents or inju ries not resulting directly from logger defects Safety Symbols In the manual the symbol indicates particularly...

Page 10: ...in serious injury or death to the user Indicates that incorrect operation presents a possibility of injury to the user or damage to the instrument Indicates advisory items related to performance or c...

Page 11: ...Do not use a ball point pen or hard tipped pen because there is a danger of scratching the surface and corrupting the data Do not use adhesive labels Do not expose the disc directly to the sun s rays...

Page 12: ...oggers Collect the data of all loggers send the data to a computer and ana lyze and store the data on the computer Quantities in parentheses Preparation for Use to Data Analysis Required Items LR5092...

Page 13: ...com puter using the supplied USB cable See 7 4 p 84 With the initial settings the LR5000 Utility Program starts automatically 10 Import the recorded data in the col lector to the computer See 7 4 p 84...

Page 14: ...Preparation for Use to Data Analysis 8...

Page 15: ...The LR5000 Utility Program is very easy to install After installation data management and browsing is easy with auto start data display and saving Large Display Shows Recorded Data as Numerical Value...

Page 16: ...he logger See One touch Collec tion p 31 POWER button Press and hold this button for approximately 1 second to turn the power on off The power is turned off automat ically auto power off when no opera...

Page 17: ...s Battery Status Indicator p 15 Indicates the battery charge status SD Memory Card Indicator Lit when an SD memory card is inserted See 2 2 Inserting an SD Card When Necessary Current Date Indicates t...

Page 18: ...14 Unit Settings Shows the Collector Settings display p 14 This display is shown for several seconds Software version information Memory Usage Status Display To Menu display To SD Card display p 14 To...

Page 19: ...e possible Showing detailed display of data numerical values and graph p 39 Moving data to SD memory card p 42 Clearing data p 49 Data Verification display Shows operation menu items for operating and...

Page 20: ...er setting con ditions from an SD memory card p 46 Clearing individual or all data in an SD memory card p 49 Initializing an SD memory card p 54 SD Card display Shows menu items for the system setting...

Page 21: ...leakage could result Battery may explode if mistreated Do not short circuit recharge disassemble or dispose of in fire Handle and dispose of batteries in accordance with local regula tions Data and s...

Page 22: ...n using a NiMH battery Moreover the battery life will vary greatly with the capac ity charging conditions and repeated uses Please take note of these points when using it The device s battery status d...

Page 23: ...saving In the worst case the memory card may be damaged so pay sufficient attention to amount of remaining battery power SD memory cards have a limited life due to using flash memory If an SD memory c...

Page 24: ...pen the cover of the SD memory card slot 2 Insert the SD memory card while paying attention to the orientation of the card SD Memory Card Slot Contact Surface of SD Memory Card Surface without Label H...

Page 25: ...rned off when the USB cable is removed 2 3 Turning the Power On Off This display is shown for several seconds Memory Usage Status Display To Menu display To SD Card display Top Display p 12 This displ...

Page 26: ...ible Clean the infrared port See 9 1 Cleaning p 127 If significant damage is evident request repair See Requesting Repairs p 127 Is display visible when the power is turned on Display visible No displ...

Page 27: ...y To return to the top display from another dis play select Back or Cancel 2 Move the cursor to Logger Operation and then press the button 3 Move the cursor to Logger Settings and then press the butto...

Page 28: ...nd and the instantaneous maximum min imum and average values are saved at each recording interval p 24 p 76 Comment Settings Collector ModelComment and CH Comment LR5000 Utility Program Set a comment...

Page 29: ...to PC Time LR5000 Utility Program Sends the time of the computer to the collector Not settable p 74 Range Select the measurement range p 24 Refer to the instruction manuals of LR5051 Preheat Outputs...

Page 30: ...tial Setting Do Not Include Recording Mode Instantaneous Initial Setting Statistical STAT Comment Settings No Initial Setting Yes Note Comment text is not settable Scaling OFF Initial Setting y Ax B 1...

Page 31: ...tton on the logger Start After Sent Starts recording from specified time after settings sent to the Data Logger Endless recording Scheduled time Starts recording from specified time after settings sen...

Page 32: ...ion and then press the button 3 Move the cursor to Send Receive and then press the button To return to the previous display press the F3 button 4 Place the logger and collector so that their IR ports...

Page 33: ...e cursor to Logger Operation and then press the button 3 Move the cursor to Send Receive and then press the button To return to the previous display press the F3 button 4 Place the logger and collecto...

Page 34: ...Back or Cancel 2 Move the cursor to Logger Operation and then press the button 3 Move the cursor to Logger Operation and then press the button To return to the previous display press the F3 button 4...

Page 35: ...nd then press the button 3 Move the cursor to Logger Operation and then press the button To return to the previous display press the F3 button 4 Place the logger and collector so that their IR ports a...

Page 36: ...3 6 Starting and Stopping Recording on Logger 30...

Page 37: ...nd a logger for which data was previously collected logger with same serial number Collecting and Browsing Data Chapter 4 4 1 Collecting Recorded Data of Logger One touch Collection Collecting Data Ea...

Page 38: ...Place the logger and collector so that their IR ports are aligned 2 Press the COLLECT button Data collection begins The display on the left is shown during data collection When you want cancel data co...

Page 39: ...educe the wave form and the F2 button to magnify the waveform Use to scroll the waveform To return to the previous display press the F3 button Numerical Value Display Use the F1 and F2 buttons to deci...

Page 40: ...ection is performed once during recording and then again after recording is finished The uncollected data will be collected What should be done if communication is interrupted during col lection Check...

Page 41: ...are aligned 3 Move the cursor to Collect Data and then press the button 4 Note This display may sometimes not appear Refer to the note on the next page Select the save destination and then press the...

Page 42: ...average value When the data of a logger which recorded on two channels is collected use to switch channels Press the F1 button to switch to waveform graph display and F2 button to switch the numerical...

Page 43: ...when data collection was performed However the time required to perform data collection is longer than when measurement is stopped What should I do if an error message appears See When attempting to...

Page 44: ...4 1 Collecting Recorded Data of Logger 38...

Page 45: ...e collector memory is listed by model Data Verification display Use the F button to select CMNT to dis play the data listed by comment set for each logger Use the F button to select SN to display the...

Page 46: ...ess the button or F1 button The data of the selected Data Logger is indicated by the recording start date and time Press the F3 button to return to the top display 5 Select data and then press the but...

Page 47: ...units of data retrieved Pressing the and button simul taneously will switch to the next data LRXXXX 123456789 Model serial number LRXXXX 123456790 Model serial number LRXXXX 123456791 Model serial nu...

Page 48: ...nd then press the button or F2 button To return to the previous display press the F1 button Press the F3 button to return to the top display 4 Press the button or F1 button When you want to cancel the...

Page 49: ...on To return to the previous display press the F1 button Press the F3 button to return to the top dis play 5 Move the cursor to the data you want to move to the SD memory card and then press the F1 bu...

Page 50: ...ing moving When you want to cancel moving part way through Press the F3 button to return to the top display After the data is moved the collector memory is cleared A message appears when clearing of t...

Page 51: ...F2 button To return to the previous display press the F1 button Press the F3 button to return to the top display 5 Press the button or F1 button When you want to cancel the operation Press the F3 but...

Page 52: ...Move the cursor to SD Card and then press the button 3 Move the cursor to Conditions and then press the button 4 Move the cursor to Save and then press the button or F2 button To return to the previo...

Page 53: ...setting conditions have already been saved a comment to confirm whether to overwrite them appears Press the button or F1 button To return to the previous display press the F3 button When saving is com...

Page 54: ...press the F1 button Press the F3 button to return to the top dis play 5 Move the cursor to the number of the set ting conditions you want to import and then press the button or F1 button Press the F2...

Page 55: ...g List of Data in Collector Memory p 39 2 Move the cursor to the data you want to clear and then press the button 3 Move the cursor to Clear Data and then press the button or F2 button To return to th...

Page 56: ...the button 3 Move the cursor to Clear All and then press the button The display for confirming the clearing of all data from memory appears Press the F3 button to return to the top dis play 4 Press th...

Page 57: ...mory card See Displaying List of Data in SD Mem ory Card p 40 2 Move the cursor to the data you want to clear and then press the button 3 Move the cursor to Clear Data and then press the button or F2...

Page 58: ...ncel 2 Move the cursor to SD Card and then press the button 3 Move the cursor to Clear and then press the button Press the F3 button to return to the top dis play 4 Move the cursor to Clear One List a...

Page 59: ...tton or F2 button The display for confirming the clearing of all data appears 5 Press the F1 button The message for reconfirming the clearing of all data appears 6 Press the F2 button The Clearing Dat...

Page 60: ...then press the button 3 Move the cursor to Initialize Card and then press the button Press the F3 button to return to the top dis play 4 Press the F1 button To return to the previous display press the...

Page 61: ...iously logger with same serial number the data is saved to the location collector memory or SD memory card where the previous collected data was saved regardless of the save destination set ting of on...

Page 62: ...n press the button 3 Move the cursor to One Touch Coll and then press the button Press the F3 button to return to the top dis play 4 Move the cursor to the save destination Collector Memory or SD Card...

Page 63: ...top display from another dis play select Back or Cancel 2 Move the cursor to Unit Settings and then press the button 3 Move the cursor to Startup Display and then press the button Press the F3 button...

Page 64: ...play select Back or Cancel 2 Move the cursor to Unit Settings and then press the button 3 Move the cursor to LANGUAGE and then press the button Press the F3 button to return to the top dis play 4 Move...

Page 65: ...previous display press the F3 button 5 Press the button The time of the clock changes to the set time and the previous display reappears 3 4 1 2 If the time of the clock is not correct the wrong time...

Page 66: ...op dis play 4 Move the cursor to Firmware and then press the button or F2 button To return to the previous display press the F1 button Press the F3 button to return to the top display The display on t...

Page 67: ...and then press the button Press the F3 button to return to the top dis play 4 Move the cursor to LCD and then press the button or F2 button To return to the previous display press the F1 button Press...

Page 68: ...Buttons Buzzers and then press the button or F2 button To return to the previous display press the F1 button Press the F3 button to return to the top display 5 Press each button When you press a butto...

Page 69: ...play press the F1 button Press the F3 button to return to the top display If an SD memory card is not inserted the display on the left appears Insert an SD memory card and then press the F3 button To...

Page 70: ...select Back or Cancel 2 Move the cursor to Unit Settings and then press the button 3 Move the cursor to Initialize and then press the button Press the F3 button to return to the top dis play 4 Press t...

Page 71: ...SB cable Using the LR5000 Utility Program Chapter 7 7 1 Installing the PC Application Program LR5000 Utility Program Operating Requirements CPU 1 GHz or faster processor clock RAM At least 512 MB OS W...

Page 72: ...y be prompted to reboot during installation If installation does not resume after rebooting execute setup exe again 2 3 2 Click Simple Installation or Advanced Installation on the screen Installation...

Page 73: ...n you uninstall or update the software Uninstall Procedure 1 Click Start Control Panel The Control Panel dialog box appears 2 Click Programs and Features The Programs and Features screen appears 3 Sel...

Page 74: ...ettings Displays the data import screens Logger data import Data Collector data import SD memory card data import Display Data Viewing screens Display Data Sorting screens Displays Option screens Disp...

Page 75: ...p 91 p 100 View imported data on these screens Select a file to view as a graph or table Example Screens for viewing the latest data Data Import Screens p 93 p 97 Import data from the logger Data Col...

Page 76: ...118 Make advanced settings on these screens You can specify the data importing method Example Import Method Setting screen Data Sorting Screens p 113 Sort imported data on these screens You can copy...

Page 77: ...7 2 Setting the Collector from the LR5000 Utility Program To avoid damage to the instrument do not short circuit the USB termi nal and do not input voltage to the USB terminal Plug the USB cable into...

Page 78: ...urns to the main screen Sets the clock setting of the col lector connected to the computer to the same time as the clock of the computer Select this check box to also display data collectors that are...

Page 79: ...ing the Collector from the LR5000 Utility Program 73 3 7 Chapter 7 Using the LR5000 Utility Program Select the check boxes of the set tings you want to import 1 Click this button 2 Import Settings Dia...

Page 80: ...Add button to display the setting dialog box p 75 A new setting is added Model Comme Enter a comment to describe the data collector as needed Sync to PC Time Check this to match the collector s clock...

Page 81: ...CH1 comment CH2 comment Enter a comment to describe the measurement channel as needed Note Comments may consist of up to 20 characters The following characters are not allowed and 1 2 Click this tab...

Page 82: ...indica tor on the logger display blinks until the specified start time Setting Item Setting Description Button Operation endless Stops recording by pressing the button on the logger The oldest data i...

Page 83: ...ogram 4 Settings on the Measurement Method tab Click the Edit button to display the setting dialog box 4 Click a tab Click one of these buttons 5 The Add as new setting button is not displayed when th...

Page 84: ...y by example or Specify by A B Setting Item Setting Description Specify by example Enter two known conversion points up to ten digits each Specify by A B Enter the scaling coefficients A and B up to t...

Page 85: ...red with the logger and those of the reference device select Specify by example 1 When the logger measures 0 2 C the reference device measures 0 0 C and 2 when the logger measures 50 4 C the reference...

Page 86: ...een Note Alarm judgment is performed at every recording interval during instantaneous recording and once per second during statistical recording Note Alarm judgment is performed using measurement valu...

Page 87: ...ger settings saved to the computer and then apply the settings Save Settings Saves settings to a computer file The Send comment to logger set ting is not saved In the dialog box that appears specify t...

Page 88: ...Data from the LR5000 Utility Program to the SD Memory Card 1 Insert the SD memory card in an SD mem ory card reader 2 Connect the SD memory card reader to a USB port on the computer Saving Setting Da...

Page 89: ...to the main screen Select 3 Click 4 Acquire and display a list of the removable disks connected to the computer Check 5 Click 5 Add the selected settings to the computer Select the check boxes of the...

Page 90: ...creen is enabled p 119 The data recorded in the logger is imported to the computer automati cally Imported data is saved to a file Auto Import Note By default Automatically import and store data when...

Page 91: ...ing recorded data Displayed graphs and tables can be printed p 112 The displayed time span can be specified Reloads and re freshes recorded data from a file Displays the Statistical In formation and...

Page 92: ...gram Process Data Scaling Applies scaling to data on one channel p 104 Power Calculation Performs approximate electric power calculation p 105 Energy Cost Performs approximate energy cost calculation...

Page 93: ...more axes select the axis to display nearest to the graph Click the buttons to switch between graph and table displays How can the displayed area be magnified Dotted Box Click 2 1 Drag over the area t...

Page 94: ...round color 4 Copies the graph to the clipboard The graph can then be pasted into Microsoft Word etc 1 2 3 4 Time axis tab 1 Automatically sets the time axis to the optimum scale 2 Zooms the display t...

Page 95: ...16 3 Displays all axes 4 A comment can be entered for each axis 5 Select the item assigned to each axis 6 Sets the Y axis scale for each axis 7 Automatically sets the currently selected Y axis to the...

Page 96: ...nts Property Type of measurement value Measured values at A B cursors Statistical data Units The following items appear on the Item settings tab Display on off Graph line colors and thickness Bar grap...

Page 97: ...of all data Double click a maximum or minimum numeri cal value to jump to the relevant cell or to the first if there are multiple relevant cells Time of Recording Recorded Values Blue indicates minimu...

Page 98: ...ct up to 600 items for display 2 Click the OK button Check 1 Click 2 Menu Items Contents Select Items Add and clear selection of multiple items display in blue selected with the mouse When there are 6...

Page 99: ...the Data Collector is not connected you are prompted to connect it Connect the Data Collector 3 Select the logger in the list of devices and click the Start Importing or Next but ton If Always specif...

Page 100: ...rding files Specify the file naming method and save destination folder When data from the same collector already exists newly recorded data is added if recording is in progress or saved to a different...

Page 101: ...importing data Click the button to display the table The Data Collector Settings screen p 71 appears Displays the Data Import screen p 93 Returns to the main screen Click the button to display the gra...

Page 102: ...Computer and Displaying Graph 1 Insert the SD memory card in an SD memory card reader 2 Connect the SD memory card reader to a USB port on the computer Saving Settings Data to SD Memory Card 1 If the...

Page 103: ...you click the Start Importing button data importing starts p 95 If you click the Next button the Collection Method Selection screen appears p 98 Returns to the main screen Click 3 When you want to im...

Page 104: ...d data to one recording file Method 2 Save to separate recording files Specify the file naming method and save destination folder When data from the same logger already exists newly recorded data is a...

Page 105: ...ng data Click the button to display the table Displays the data reorganization screen p 113 Displays the initial screen of the Data Import screen p 97 Returns to the main screen Click the button to di...

Page 106: ...tab shows a list of the loggers with data saved on the computer 2 Select the logger from the list Information about the latest data appears 3 Click the Display Graph button The viewer opens to display...

Page 107: ...click the Refresh List button Note You can enter up to 20 characters for Filter by Mod el Comment Display Table Opens the viewer to display the table of imported or selected data How can past data be...

Page 108: ...out the latest data 1 Continued 1 If the Utility Program is not running on the computer click the icon in the task tray notification area and click View Data The Data View screen appears The View late...

Page 109: ...tric power calculation p 105 Energy Cost Performs approximate energy cost calculation p 106 Operating Rate Performs approximate operating rate calculation p 107 Integration Integrates displayed data p...

Page 110: ...he time span Clicking this tab changes the setting options Make set tings on either tab The settings are ap plied to the other tab A B slope offset values 1 2 3 1 1 Setting Item Setting Description Sp...

Page 111: ...ck it then click the Delete button 3 Click the Execute button Calculation results are saved Note Click the Finish button to close the Power Calculation dialog box Calculating Electric Power Electric p...

Page 112: ...e Finish button to close the Energy Cost dialog box Calculating Energy Cost Energy cost calculations are only approximate so results do not always equal the true energy cost There is no way to confirm...

Page 113: ...displayed Note Click the Finish button to close the Operating Rate dialog box Calculating Operating Rate Item and range settings Select the item for operating rate calculation and the time span The t...

Page 114: ...ion results are saved as a new item in the recording file 1 Select the item and time span 2 Click the Execute button Integration results are saved Note Click the Finish button to close the Integration...

Page 115: ...Dew Point Temperature There is no way to confirm that a specified data item is really a tem perature or humidity value Dew point calculation occurs regardless of data type Only the specified temperatu...

Page 116: ...lect the calculation operator 3 Click the Execute button Calculation results are saved Note Click the Finish button to close the Two Data Item Arithmetic dialog box Two Data Item Arithmetic Calculatio...

Page 117: ...are saved as new data items in the recording file 1 Select the items and time span 2 Set the upper and lower threshold values and their corresponding conversion val ues 3 Click the Execute button Con...

Page 118: ...4 or B4 size paper With the desired graph displayed click the Print button See Graph Display Methods 7 4 p 84 7 5 p 93 and 7 7 p 100 7 9 Printing Recorded Data Click Example Graph Printout How can I p...

Page 119: ...or ta ble are listed Select the desired file Clears all selections removes check marks Click Click 4 1 If the LR5000 Utility Program is not run ning on the computer click the icon in the task tray not...

Page 120: ...ta 1 7 Click Select the folder 6 Example Copying files in the C Users hioki Documents LR5000 folder to the C backup folder The management format of the PC utility program LR5000 Utility will be retain...

Page 121: ...2 Select the folder 3 Select the file Up to 100 can be selected 4 Select Deleting Data 1 5 Click Example Deleting files in the C Users hioki Documents LR5000 folder How can the data in the collector m...

Page 122: ...drive 2 Select the folder 3 Select the file Up to 10 can be selected 4 Select Combining Data 1 6 Click Click to specify the desti nation and file name for the combined data file 5 Example Combining 2...

Page 123: ...ferent file name Extracting Data Select the drive 2 Select the folder 3 Select Extracting Data 1 7 Click Click to specify the destination and file name for the extracted data file 6 Example Extract th...

Page 124: ...screen 3 2 Click Click Note If the LR5000 Utility Program is running click Option on the main screen 1 If the LR5000 Utility Program is not run ning on the computer click the icon in the task tray no...

Page 125: ...lick to specify the save destination folder 2 If you select the check box select the folder name 3 How can the save destination folder be changed How can the file naming method be changed File names c...

Page 126: ...ngs Displays Task tray notification area icon p 93 Click the Details tab When cleared the Communication Utility program has to be started manually How can the device connection monitoring setting be c...

Page 127: ...idity 80 RH or less non condensating Operating environment Indoors pollution degree 2 up to 2000 m ASL Power supply 3 VDC 1 5 V 2 LR6 alkaline batteries Stored collected data retained when both batter...

Page 128: ...ted logger Data Recorded data saved to collector and SD memory card and recorded data of connected logger Data can only be transferred from the collector to the computer Powered by USB bus power when...

Page 129: ...ction Logger Settings Measurement condition settings Logger settings settable The setting items differ depending on the logger Setting Items Recording interval recording start method recording stop me...

Page 130: ...ttings Environment Settings Clock setting Set the built in clock Language selection Set the display language Status display Display the usage status of built in memory Set whether or not to show the i...

Page 131: ...hen using the model 3910 or 3911 Com munication Base All Data Logger models 363x to 364x Communication Base models 3910 3911 and 3912 Communication connec tions Communication with LR5000 series logger...

Page 132: ...display functions Browse recorded data in tabular format Displays up to 600 channels Displays statistical data maximum minimum and average Export functions Export all recorded data displayed in a tabl...

Page 133: ...or Hioki repre sentative To clean the instrument wipe it gently with a soft cloth moistened with water or mild detergent Never use solvents such as benzene alcohol acetone ether ketones thinners or ga...

Page 134: ...e is removed Press and hold the POWER button for 1 second The power turned on even though the POWER button was not pressed Is the POWER button in a pressed state Is the collector connected to a comput...

Page 135: ...s being used Use new LR6 alkaline battery The collector is connected to a computer with the USB cable but it is not recog nized by the LR5000 Utility Program When using the collector via USB the maxim...

Page 136: ...the F2 button No The data from last time will be retained Press the F1 button Yes to show the next display Press the F3 button Cancel to return to the top display Select one of the items and then pre...

Page 137: ...card with one that has sufficient space and then press the F1 button The display for confirming the start of collection appears Error Displays Meaning Remedies When new logger When logger for which p...

Page 138: ...when an SD memory card is not inserted in the col lector Press the F1 button to return to the previous display Insert an SD memory card in the collector and then press the F3 button The self check pro...

Page 139: ...ted Do not short circuit recharge disassemble or dispose of in fire Keep batteries away from children to prevent accidental swallowing How to Remove the Lithium Battery 1 Turn off the power p 19 and t...

Page 140: ...9 4 Disposing of the Logger 134...

Page 141: ...levels 4 Data collection display 13 Data List 39 Data management 39 Data verification display 13 Date and time 76 Decimal Point 24 Device connection monitoring setting 120 Display 11 Display graph 95...

Page 142: ...ne touch collection 31 55 Operating buttons 10 Operating precautions 4 Operating requirements 65 Operation flow 6 Options settings LR5000 Utility Program 118 Organizing data 113 Combining 116 Copying...

Page 143: ...ing 29 Starting and stopping recording on logger 29 Startup Display 12 57 Statistical Recording 76 Stop Time Data 24 Symbols for various standards 3 System settings 55 T The installation screen does n...

Page 144: ...Index Index iv...

Page 145: ...HIOKI E E CORPORATION...

Page 146: ......

Page 147: ......

Page 148: ......

Reviews: