

LR5051
CLAMP LOGGER
Operation Manual
Apr. 2016 Revised edition 3 Printed in Japan
LR5051B981-03 16-04H
Read First
Thank you for purchasing the HIOKI LR5051
Clamp Logger.
This guide introduces the logger’s basic mea-
surement procedure to first-time users.
Before using the instrument, be sure to read the Instruc-
tion Manual carefully.
1
2
3
4
1
2
3
4
When the battery is installed, the logger
turns on (there is no power switch).
2
Preparations
1
Confirmation
Clamp Sensor
(Use a Hioki optional product.
See the Instruction manual.)
3
Settings
1
2
3
4
Recording
From the Measurement display, hold the
button for two seconds.
Note: Continue pressing the button until the
[REC]
indicator changes from a blink-
ing to on state.
When the blinking stops and the data count
is zeroed, recording starts.
After one second, the measurement display
reappears.
Hold the
button for two
seconds while recording (while
[REC]
is displayed).
Note: Continue pressing the button until
the
[REC]
indicator changes
from a blinking to off state.
[REC]
disappears when record-
ing stops.
If the stop method is set to
[OFF]
, recording stops auto-
matically when memory
becomes full.
Before recording, install the logger and
perform pre-measurement inspection.
(See the Instruction manual for details.)
Stop
LR6 alkaline
battery
(Pre-installed in
the logger.)
Connecting a Clamp Sensor
Obtain an optional clamp sensor. Select a sensor that is suitable for
your application.
See the instruction manual for details about connecting the cable
to an object to be measured.
Lock
Pins in the jack
Slots in the
BNC plug
1
2
Align the slots in the BNC
plug on the sensor cable
with the pins in the jack on
the logger.
Push and turn clockwise to
lock.
1
2
Importing data to a computer requires the optional LR5091
Communication Adapter or LR5092-20 Data Collector
LR5051
Confirm package contents, and prepare needed items.
Install the battery and connect the clamp sensor
to the logger.
Logger and Accessories
Instruction manual
Refer to this manual for operating
procedure details, or when prob-
lems occur.
Option
LR5091 Communication Adapter
(Includes LR5000 Utility Program CD
[PC application software] and USB
Cable)
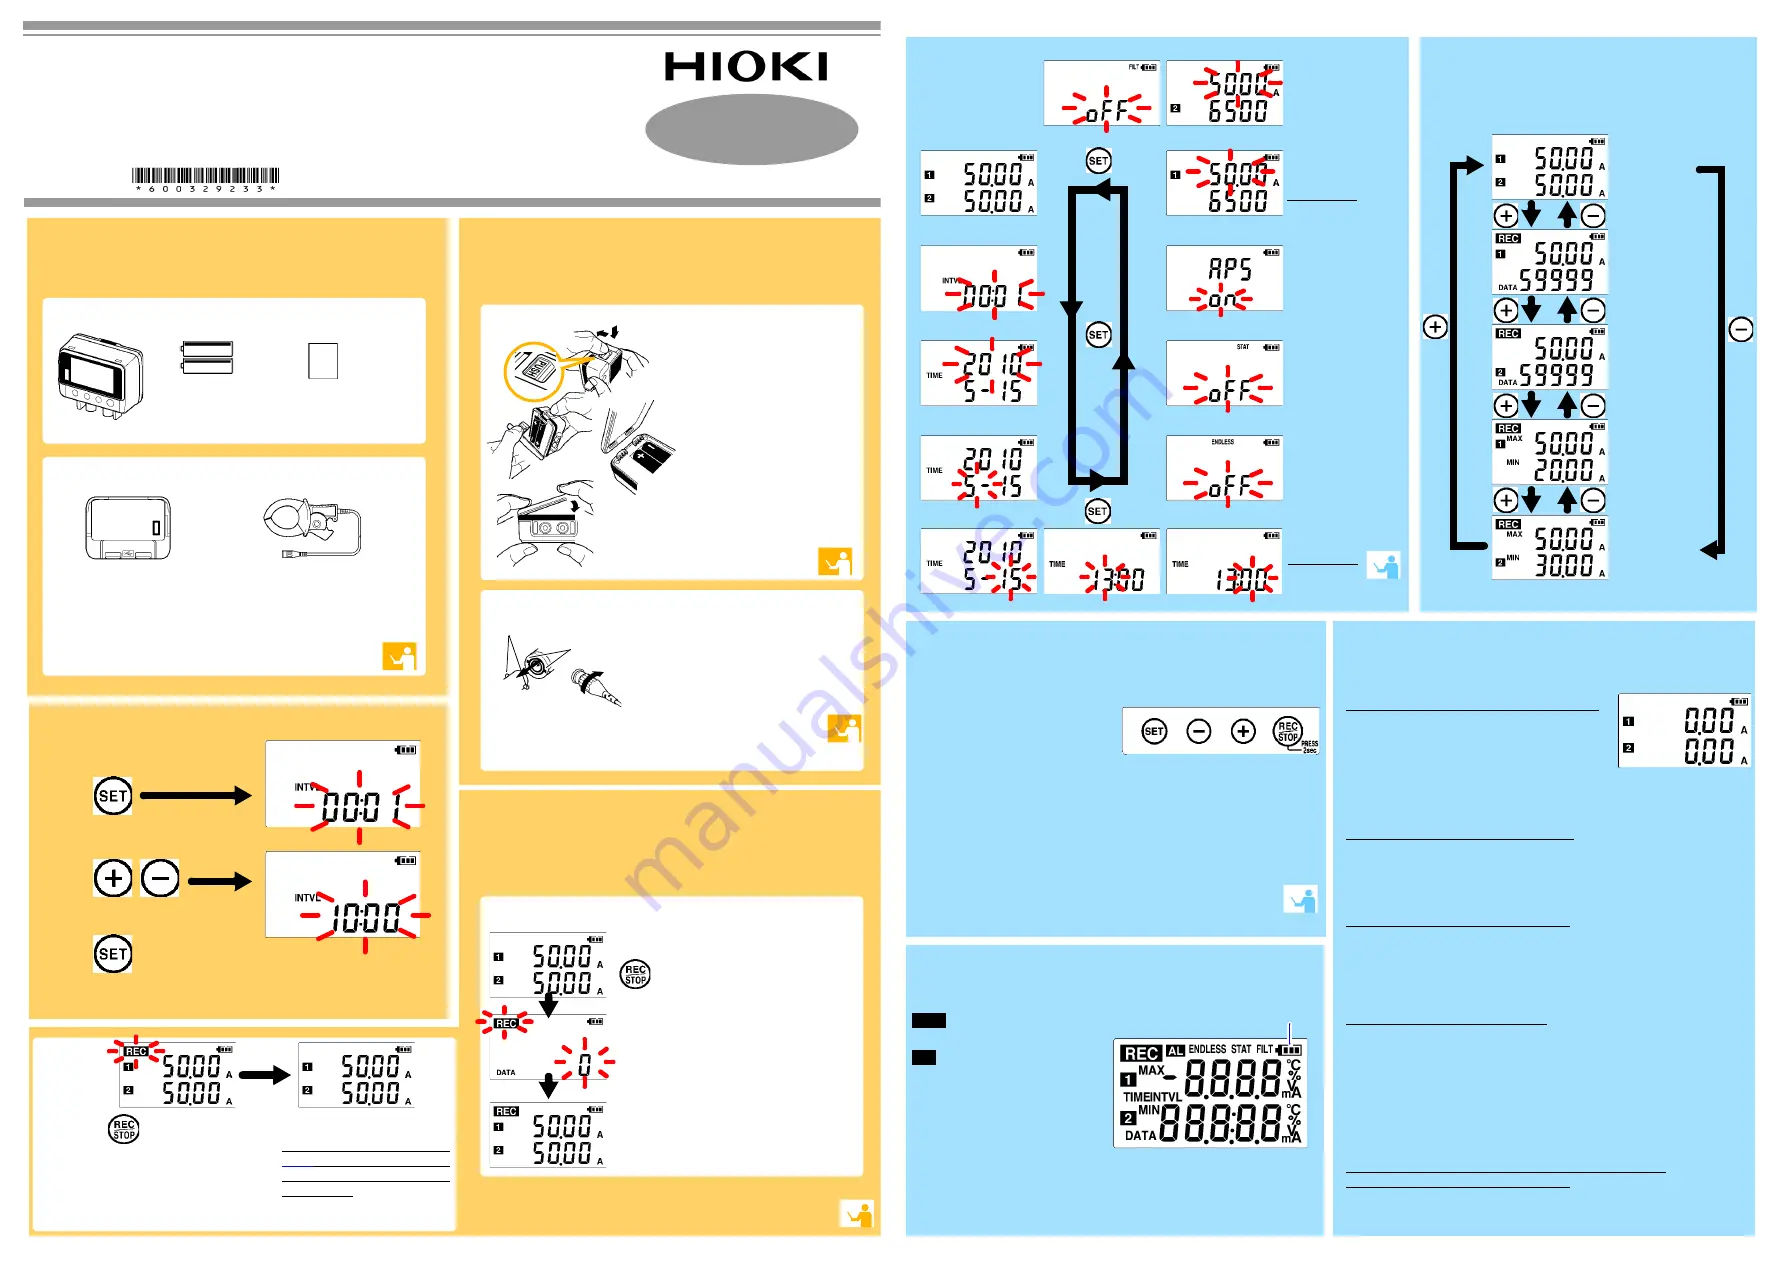
Display Example: Setting the
recording interval to 10 minutes.
Display the settings,
and select the setting item.
Configure the setting as
needed.
Apply the new setting contents.
(The setting items are displayed as shown under Setting Display on
page 2.)
Installing the Battery
Press the PUSH tab as
shown, and pull the bat-
tery cover back.
Install the battery as
shown.
Align the holes in the
battery cover with the
projections on the back
of the logger.
While confirming that
there are no gaps, press
with your fingers to
close the battery cover.
Logger memory contains the data for two recording sessions. (Be
aware that old data is erased when starting recording after two
recording sessions.)
Data can be imported to a computer without stopping recording.
Start
No measured value is displayed
Is the clamp sensor inserted as far as possible?
Insert the clamp sensor as far as possible.
If the values are not displayed despite these measures, the clamp sensor
and logger need to be inspected and repaired.
Please contact your dealer or Hioki representative.
Note: The maximum and minimum values are not displayed when the
recorded data count is 0.
The display is blank.
Is auto power saving enabled (set to ON)?
When enabled, the display blanks after 30 seconds of operator inactivity.
Press any button or send a communication signal to turn on the display.
The
[REC]
indicator disappears even though recording has not
been stopped.
Is the stop method disabled (set to OFF)?
With disabled, recording stops automatically when memory becomes full.
To record continuously until stopped by the
REC/STOP
button, enable the
stop method.
(In this case, old data is overwritten when the memory becomes full.)
Recorded data has disappeared.
Does recording restart after stopping?
Note that if recording is accidentally restarted after stopping, data recorded
prior to the last recording is automatically erased.
(The logger retains the data from both current and most recent prior
recording operations.)
To erase logger memory
Erase using the PC Utility program. See the Instruction manual for details.
The battery is depleted too quickly.
Are you using the battery originally supplied with the logger?
Are you using a zinc-manganese battery?
Install a new LR6 alkaline battery.
Measuring
Troubleshooting
(Returns to the
measuring display)
Recording Interval Setting
Year Setting
Month Setting
Channel 1 Range
Setting
Power Save Setting
Recording Mode Setting
Stop Method Setting
Stop Method
Select what happens
when memory
becomes full.
When on, the oldest
data is overwritten
(Endless Record-
ing), and when off,
recording stops
(One-Time Record-
ing).
Default is on.
Channel 1
Measured value
Channel 2
Measured value
Channel 1
Measured value
Recorded data
count
Channel 2
Measured value
Recorded data
count
Channel 1
Maximum value
Channel 1
Minimum value
Channel 2
Maximum value
Channel 2
Minimum value
Indicators
Battery Status Indicator
REC
Recording in progress
AL
Upper/lower threshold exceeded
ENDLESS
Stop method enabled
STAT
Recording mode enabled
MAX, MIN
Maximum and minimum values
DATA
Recorded data count
Filter Setting
Channel 2 Range
Setting
Setting
Filter
Enable (set to ON) to
remove frequency
components such as
noise.
Default is off.
Operating Buttons
Display
Power Save
Battery life is extended
when on (enabled).
Default is on.
Recording Mode
When on (statistical
recording), instanta-
neous, maximum,
minimum, and aver-
age values are
recorded at each inter-
val. (Record statistical
values) Battery life is
shorter.
Default is off.
Display
SET
Displays settings.
(-), (+)
Changes Measurement display contents.
Changes setting values on the Settings display.
REC/STOP
Hold for two seconds to start/stop recording.
From a setting display, switches to measurement display.
Setting Display: Displays settings (recording interval, date and
time, etc.)
Measuring Display: Displays recorded data (measured values,
recorded data count, etc.)
Day Setting
Minute Setting
Hour Setting


