background image


Hensel Turntable 360° 


QUICK START GUIDE 

 
First, connect the included adapter with the turntable 
 (POWER), then connect the power cord to the socket 
and switch the main switch (ON/OFF) until the green  
LED (ON) is lit.  
Now, connect the release cable to the camera jack  
(CAMERA) on the turntable and to the remote release jack  
of your camera. Cables are available for most current DSLR 
and EVIL cameras. When using flashes, synchronize these  
directly with your camera, as you normally would, via cable or remote transmitter.  
 

Connecting with the turntable: 

The Hensel Turntable 360° comes with a build-in WLAN module. In order to connect 
to it, activate the WLAN of the control device (computer, laptop, tablet, smartphone) 
and follow these steps:  
 

Attention:

 Depending on the operating system / 

language version used, the display names in the 
app user interface may differ from this manual!


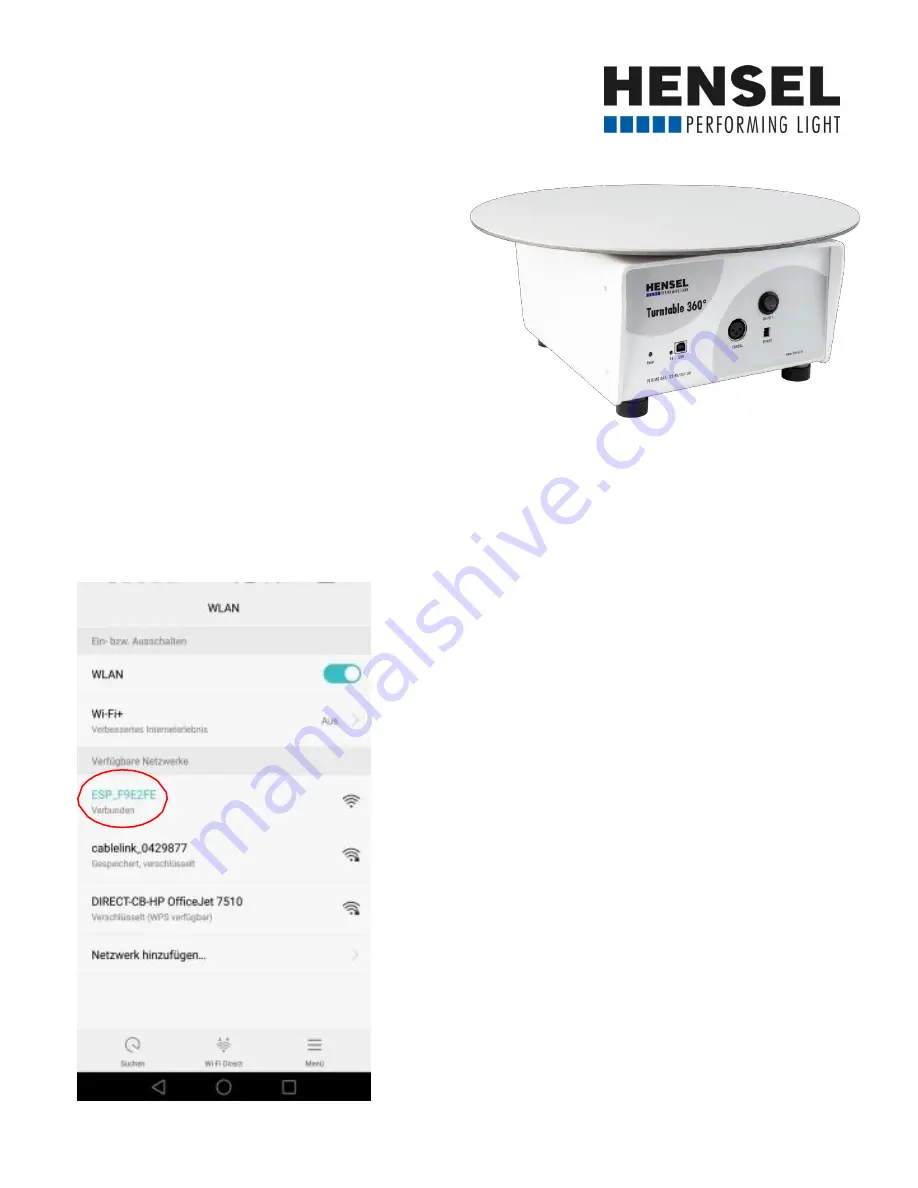
Dial into the integrated WLAN module: 
 

1. 

Open the WLAN settings of the device used 

for control. 
 
2. 

Search for the network name ESP_XXXXXX 

(X stands for a series of different letters and 
signs - e.g. ESP_F9E338). 
 
3. 

Click on the found network name and 

confirm dial in as required.  
 
4. 

Dial-in can take several seconds and is 

confirmed by most devices with “connected”.


Summary of Contents for Turntable 360

Page 1: ...r Connecting with the turntable The Hensel Turntable 360 comes with a build in WLAN module In order to connect to it activate the WLAN of the control device computer laptop tablet smartphone and follow these steps Attention Depending on the operating system language version used the display names in the app user interface may differ from this manual Dial into the integrated WLAN module 1 Open the ...

Page 2: ...use your browser s refresh function for a new connection attempt This procedure does not install any software on the control device The turntable is ac cessed via a local network and control does not depend on the operating system or an Internet connection In case the connection is not established or the buttons on the user interface do not function please follow the instructions starting on page ...

Page 3: ...d angle 7 is set to 90 the first exposure is done at 0 and the last one at 90 The exposures inbetween are evenly distributed If a value is entered here the selected exposure is repeated when using the start button 10 Start button for automatic exposure 11 Here you can pause the automatic exposure This button is only active in the setting QUICK SHOT IS OFF 15 12 Here you can cancel the automatic ex...

Page 4: ...IXED NETWORK CONNECTION Apple iPhone or iPad iOS 1 Dial into integrated WLAN module as described on page 1 2 Click on i to open the configuration mode of the network 3 Change IP configuration from automatic to manual ...

Page 5: ...4 Manual configuration IP address 192 168 4 2 Subnet mask 255 255 255 0 Router 192 16 4 1 Confirm configuration with save Now you can continue with the point Opening the operational environment on page 2 ...

Page 6: ...hone or Tablet Android 1 Dial into integrated WLAN module as described on page 1 2 Open the configuration mode of the network by pressing min 2 sec on the network to be adjusted 3 Activate Expanded Options and change IP settings from DHCP to Fixed ...

Page 7: ...7 4 Manual configuration IP Address 192 168 4 2 Gateway 192 16 4 1 DNS 1 192 16 4 1 Confirm configuration with Connect Now you can continue with the point Opening the operational environment on page 2 ...

Page 8: ...t exposure yes Number of exposures rotation max 360 Individual start and end angle yes Multiple exposures within pre selected angles yes Special functions Quick Shot Repeat Shot Pause Camera connector XLR jack cable for many EVIL and DSLR cameras available Power supply with 24V DC adapter included Size 30 x 24 x 15 cm without plate 40 x 40 x 17 cm with plate Diameter turntable 40 cm changeable Wei...

Reviews: