HELIX DSP PRO MK2, Manual
The HELIX DSP PRO MK2 comes with a comprehensive user manual, providing detailed instructions and specifications for optimal performance. Easily accessible for download, this manual ensures you can fully utilize the product's advanced features and settings. Visit manualshive.com to download it for free and unlock the true potential of your audio system.
Share
Download


Reviews:
No comments
Related manuals for DSP PRO MK2
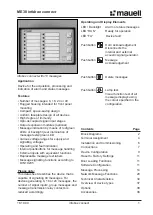
ME30 infobox connect
Brand: Mauell Pages: 40

FP14DCE
Brand: Cuisinart Pages: 104

nanoclocks GL
Brand: Rosendahl Pages: 14

EP-3WXA
Brand: EPOX Pages: 70

FP9043
Brand: izzy Pages: 15

TMS320C2810
Brand: Texas Instruments Pages: 172

Frix air
Brand: Nemox Pages: 24

INTEGRAL-VC1
Brand: DAS AUDIO Pages: 10

EASY123
Brand: PALSON Pages: 16

70590
Brand: Proctor-Silex Pages: 52

DSP-2040
Brand: D.A.S. Pages: 32

MT-1566
Brand: Marta Pages: 10

Fresh Express Plus
Brand: TEFAL Pages: 14

404011
Brand: Termozeta Pages: 20

DSP-220
Brand: Sonken Pages: 10

PC-KM 1025
Brand: Profi Cook Pages: 74

PC-KM 1063
Brand: Profi Cook Pages: 82

FP6000
Brand: Mezzo Pages: 6


