Hay PAO GLASS TABLE LAMP, Instruction Manual
Introducing the Hay PAO Glass Table Lamp, a sleek and modern lighting solution for your space. For your convenience, we provide a detailed Instruction Manual that can be easily downloaded for free at manualshive.com. This manual ensures a hassle-free setup, allowing you to enjoy the ambience of this stunning lamp effortlessly.
Share
Download


Reviews:
No comments
Related manuals for PAO GLASS TABLE LAMP

Mondo
Brand: ACDC Pages: 4

VENTRUS TBL4374
Brand: Safavieh Lighting Pages: 2

39.LED0613
Brand: Life Pages: 2

Luxe Rose XT 200Z VW
Brand: Gamma Pages: 12

LightDNA-8
Brand: Valoya Pages: 16
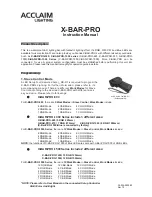
X-BAR-PRO
Brand: Acclaim Lighting Pages: 6

AR700
Brand: San Marina Pools Pages: 66

MAXIWOODY EH35
Brand: iGuzzini Pages: 33

VSSI-2005-50-BK
Brand: Volt Pages: 12

F-720SSC
Brand: Aqua Creek Products Pages: 2

LED DUAL-T
Brand: LIGHTSIDE Pages: 8

Mood 1818WP
Brand: CentoLight Pages: 32

XORR TASK
Brand: XAL Pages: 4

Lytecaster 2000LVR
Brand: Lightolier Pages: 1

Pro Color Cannon
Brand: MegaLite Pages: 11

Actionpanel FULL COLOR
Brand: Lupo Pages: 8

AMBIT WALL LAMP
Brand: muuto Pages: 2

80/1323
Brand: Satco Products Pages: 10


