

Scanning for channels
When running
WinTV2000
for the first time, you will
need to scan for your HDTV channels. The
WinTV-HD
board has two coax video connectors: a
UHF/VHF TV antenna connector and a cable TV connec-
tor. You will need to scan for TV channels on each con-
nector.
When scanning the UHF/VHF Antenna
Connector, set the Tuner Format to
DTV-ATSC
. Make
sure the Broadcast entry is set to Antenna.
When scanning the Cable Connector for HDTV channels,
set the Tuner Format to
MN
. Make sure the Broadcast
entry is set to
Antenna
or to
Cable
for regular cable channels.
Setting up the channels
After you have scanned for channels, you can
add the channel names. To do this, click on the
Suite button on
WinTV2000
.
Then double click on Input Sources.
Chose
Tuner
for the
Antenna
, or
Tuner2
for
Cable TV
.
Click on the desired channel, then click on
Edit
.
Change the
ChannelName
to the name of the
station. Then click
OK
.
After the PC reboots the
WinTV Application
Setup
will be run.
To use the remote control, make sure
Install the
Hauppauge IR Remote Control Application
is
checked.
Click
Install
to install the
WinTV2000.
After the Setup program is complete, you will see
a
WinTV2000 icon
on your Windows desktop. To
run the
WinTV2000
application, double click on
the
WinTV2000 icon
. After rebooting your PC,
the Remote Control will be enabled.
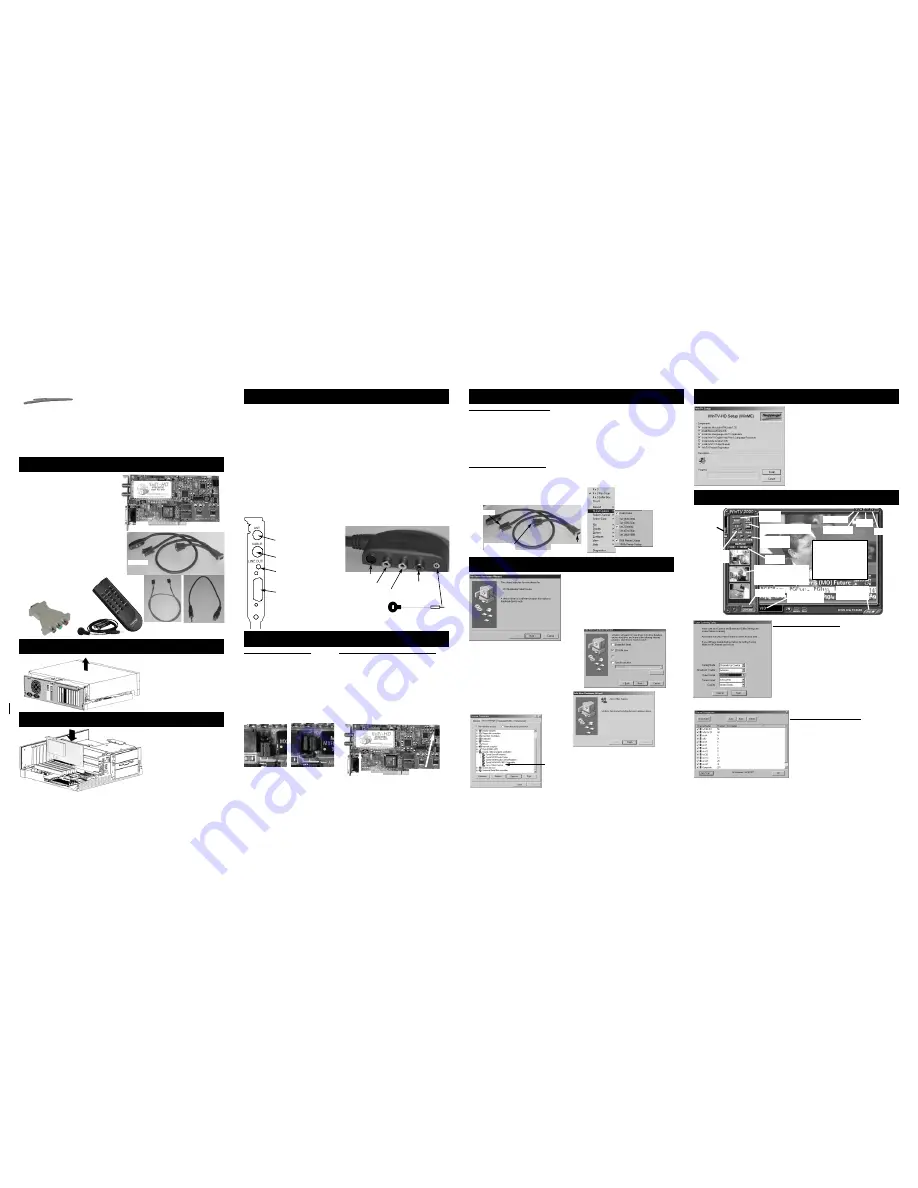
WinTV-HD
Quick Installation Guide
for Windows
®
98/Me/2000
WinTV-HD
board
Pod Cable,
with A/V inputs, IR connection
and Monitor interface
External Audio cable
- 1/8” miniplug to
1/8” miniplug.
S/PDIF cable
,
to convert LineOut jack to
Phono plug for S/PDIF Applications
Internal Audio Connector,
Connect
Analog Audio Internal to your sound card.
Wireless Remote
with 2 AAA batteries.
Remote receiver
with velcro fastener.
WinTV-HD for Windows Installation
CD-ROM
with:
WinTV driver and application
Remote control application
Utilities
Contents of the WinTV-HD package
Switch off the computer.
The manufacturer of your PC sup-
plies instructions on removing the
PC cover.
Remove the cover.
Step 1: Prepare the computer
Locate a free PCI slot (a short
white slot).
Unscrew and remove the metal
cover plate which covers the back
of the empty slot.
Plug the
WinTV-HD
board into the
PCI slot, and screw the WinTV’s
metal cover plate to the PC.
Replace the computer cover.
Step 2: Install the WinTV-HD board
The
WinTV-HD
board has two coax video
connectors: one for a
UHF/VHF TV antenna
and one for
cable TV
. Screw your UHF/VHF
antenna (a rooftop antenna is recommended
for digital TV reception in most areas) into the
Antenna connector
. Plug your cable TV con-
nection to the
Cable TV connector
.
One end of the
External Audio cable (1/8”
minijack)
should be plugged into
WinTV-HD’s
Audio LineOutput,
and the other end plugged
into the
Line-In connector
on your PC’s
sound card for stereo speaker sound.
If you are connecting the
WinTV-HD
to a
Home Theater system which uses a Digital
sound input, the
WinTV-HD’s
S/PDIF adapter
lets you convert the 1/8” Line-Out jack to a
Digital sound RCA jack
. See
Step 3a
below.
Plug the Pod Cables’
26-pin male connector
into the
WinTV-HD Pod Cable connector
.
The yellow
VideoIn jack
, the 4pin
S-Video In
connector
and the
AudioIn (L) and (R)
on the
Pod Cable can be used to input analog
audio/video from a VCR, camcorder, DVD
player or satellite TV receiver.
The
Remote receiver (IR)
is plugged into the
Pod Cable’s (IR) plug
. Use the Velcro dot to
position the Remote Receiver (IR) where it
will be able to receive line of sight, infra-red
commands from the Remote Transmitter.
Step 3: Connect the WinTV-HD cables
Page 2
Page 3
Step 4: Using the S/PDIF & Internal Analog connectors
Page 1
Step 6: Install the WinTV driver for Windows
Note:
The
WinTV-HD
requires the latest version of Windows98, known as Windows98-SE,
any version of Windows2000 or WindowsMe.
Note:
We recommend a PII 600 or better for recording transport streams to you hard disk.
Page 4
Step 7: WinTV Software installation
Step 8: The new WinTV2000 application
Hauppauge!
®
This board and remote are subject to change
Pod Cable
Wireless
Remote
Remote
receiver (IR)
VGA to
Y-Pr-Pb
Adapter
Internal Audio
Connector
S/PDIF
Cable
Audio LineOutput
or S/PDIF
Antenna connector
Cable TV connector
Pod Cable connector
WinTV-HD
Connections
(Pod) A/V Connectors
Remote
Receiver (IR
)
S-Video In
VideoIn
AudioIn
(L)
AudioIn
(R)
S/PDIF Jumper setting
To configure the WinTV-HD for an exter-
nal S/PDIF decoder, place the
2 Shunt
jumpers vertically
on the top half of
jumper JP4
. This routes the S/PDIF
output to the
Audio LineOutput
mini
stereo connector. Then connect the
supplied
S/PDIF cable
between the
Audio
Line-Out jack
on the WinTV-HD
back panel connector and a
Digital
input on your Home Theater sys-
tem
.
Internal Analog Audio Connector
When using the
S/PDIF output
for audio from
your digital channels, audio from your analog TV
channels comes from the Internal Analog Audio
connector.
-
Connect one end of the supplied internal
audio cable to connector
JP2
on the
WinTV-HD
-
Connect the other end to your sound card’s
black internal audio input connector.
Internal Analog
Audio connector
(JP2)
S/PDIF Shunt
Jumpers (JP4)
Analog audio setting
JP4
(Factory default)
S/PDIF audio setting
JP4
Step 5: Single and Dual Monitor Setup
Single Monitor mode (SMS)
In Single Monitor mode, you can watch analog
and digital TV-in-a-window plus see Hi-Def TV
full screen on your VGA monitor.
Remove your VGA monitor cable from your
VGA card and connect it to the short leg of the
Pod cable labeled “MONITOR”.
Now, connect the long leg of the Pod cable
labeled “VGA” to your VGA card.
Dual Monitor mode (DMS)
In Dual Monitor mode, you can watch analog
and digital TV-in-a-window on your VGA
screen, plus at the same time see Hi-Def TV
full screen on another Hi-Def monitor or anoth-
er VGA monitor. Connect your high definition
monitor to the short leg of the Pod cable
labeled
“MONITOR”
. Leave your VGA monitor
connected to your VGA card. During operation
you need to tell the software you are in DMS.
Right click the mouse button on the TV screen
and keep the right mouse button depressed
for a few seconds until you’ll see the Settings
menu pop up. Then go to Hi-Def Options and
click Dual Monitor.
If you are using the supplied
VGA to Y-Pr-Pb
adapter
, check
YPrPb Primary display
as
your Primary display.
You can choose the Hi-Def output resolution by
clicking one of the Set resolutions settings.
to the WinTV-HD
board
to VGA card
to VGA or HiDef
monitor
5a.
When re-starting Windows for the first time
after the
WinTV-HD
board has been
installed, the Add New Hardware Wizard will
appear.
Click Next.
Select Search for the best dri-
ver for your device
Recommended
Click
Next.
5b.
When you see the above dialog box, insert the
WinTV Windows Installation CD-ROM into your
CD-ROM drive.
Select
CD-ROM drive
and
click
Next
.
5d.
You will see a number of files being copied to
your hard disk drive.
5e.
Click
Finish
. You will need to reboot your
system for the changes to take effect.
5f.
The
WinTV-HD
will be listed in Device Manager
in Sound Video and Game
controlers as
Janus Video Capture
Snapshot button
Freeze TV
Software remote
control & Video
controls
Color/audio
configuration
Preferences
menu
Full screen TV
Minimize
Close WinTV
Channel
configuration
Snapshot viewer window
Double click on each
“thumbnail” to see
image full size
Current TV channel
or video source
Click your right mouse button
here to remove toolbars. Click
again to restore toolbars.
Click and hold your right
mouse button to see the
Options menu.
Remove toolbar
Channel Up & Channel Down
Volume Up
& Down


