

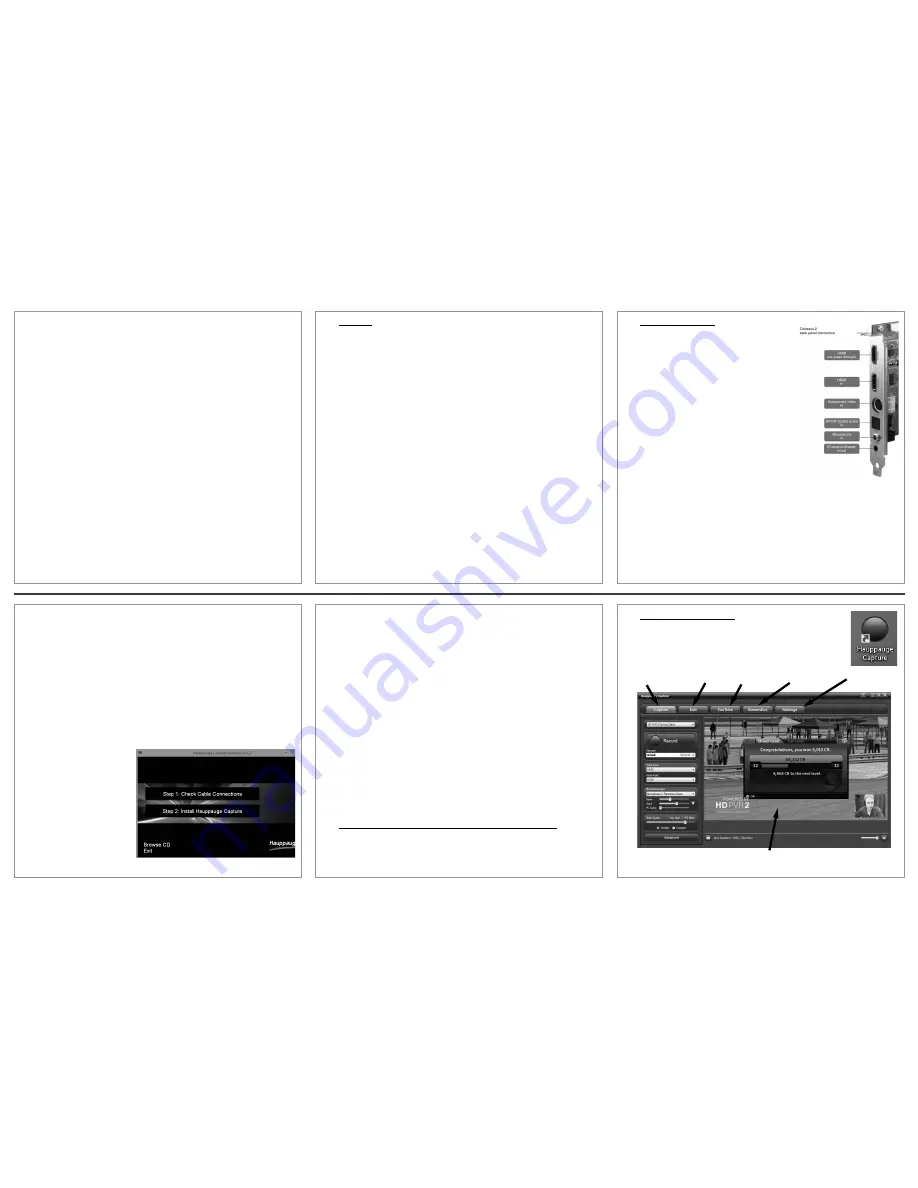
Colossus 2
Professional HD Video Recorder
for cable TV and satellite boxes, plus
video game consoles
Quick Installation Guide
©2015 Hauppauge Computer Works, Inc. QI-Colossus2_v1.0_ENG March 8, 2015
Hauppauge Computer Works, Inc.
Telephone:631-434-1600
91 Cabot Court, Hauppauge, NY 11788
Tech Support:631-434-3197
Web site: www.hauppauge.com
Hours: M-F 9:00AM to 6:30PM EST
Internet addresses:
Sales:
Tech Support:
Included in the Colossus 2 box:
•
Colossus 2 H.264 high definition video recorder
, PCI Express
•
Hauppauge A/V adapter cable
, for Component video
•
HDMI video cable
2 meter
•
IR Receive/Blaster cable
to control the channel changing on your cable TV or satellite set top box
•
HD PVR 2 Installation CD
for Windows plus WinTV v7 and Hauppauge Capture. This CD also is for
the Colossus 2
•
Colossus 2 Installation Guide
(this guide)
•
Set up and using the WinTV v7 application
guide (also used for the WinTV v8 application)
Overview
The Hauppauge
Colossus 2
is an internal PCI Express board for desktop PCs, and records video
in HD from a cable or satellite set top box, PC video (through the PC’s HDMI video output port) or a
video game console such as the Xbox One, Playstation 4 and other HDMI equiped game consoles.
Colossus 2 is essentially the HD PVR 2 model 1512 on an internal PCI Express board.
There are two video recording applications which come with Colossus 2:
-
WinTV v8 is used to schedule TV recordings from a set top box
-
Hauppauge Capture was designed to record video from game consoles and has a convenient
one-click upload to YouTube. But many users find this easy to use recording application handy
for recording video from cable and satellite set top boxes
Colossus 2 recordings are made onto a computer’s hard drive in a compressed H.264 format. It
records from HDMI or Component Video (also called YPrPb). You can also record S-Video or com-
posite video using and optional A/V cable (you can purchase this on the Hauppauge Webstore). It
will record at 1080p30, 720p or 480p at datarates from 1Mbit/sec up to 13.5Mbits/sec. Using
Variable Bit Rate encoding, datarates will range up to 21 Mbits/sec when there is fast motion.
N
ote: if you are recording from a cable or satellite box or a PS3, you will use Component
Video. Most set top boxes and the PS3 do not allow recording from the HDMI port.
Audio can be supplied to the Colossus 2 from stereo audio connectors on the Hauppauge AV
cable, optical audio cable or HDMI. Colossus 2 comes bundled with the
WinTV v8 and
Hauppauge Capture applications
to record videos. There are three types of recording formats:
TS:
this is a native H.264 format used by WinTV v8 and Hauppauge Capture. TS files are often used to
burn Blu-ray discs. The TS files recorded with the HD PVR 2 can be edited with Sony Vegas (all ver-
sions).
M2TS:
a popular format used by many video editors
MP4:
this is similar to the TS file but has an index at the beginning of the file.
Installing Colossus 2
Step 1. Install the Colossus 2 board in your PC
Turn the power off on your PC. Install Colossus 2 into a
PCI
Express X1 or X16 slot
. Turn the power on to your PC.
Step 2: Connect the Colossus 2 cables.
HDMI video input
You can connect the HDMI output of some cable TV or satellite
boxes and game consoles such as the PS4 and the Xbox One into
Colossus 2. Colossus 2 supports HDMI sources up to 1080p60,
though the maximum record resolution is 1080p30.
The HDMI video source needs to be un-encrypted. If you try to view
or record encrypted video sources, you will get a black screen.
Component video input (YCrCb or YPrPb)
Plug the Hauppauge
A/V adapter cable
into
A/V input
on the
back of Colossus 2. Then connect the
Component video cable
from your game console or cable TV or satellite set top box into the
Hauppauge
A/V cable set
.
HDMI Output (no delay pass through video)
The HDMI output can support TV monitors up to 1080p60.
Connecting Colossus 2 to a cable TV or satellite set top box
There are three ways to connect to the Colossus 2 from your cable TV or satellite TV set top box:
a)
you can connect using HDMI
, though some cable TV and satellite set top boxes encrypt the HDMI
output from their box. If you get a black screen on WinTV or Hauppauge Capture using HDMI, then it
is likely your set top box is encrypting the HDMI output.
b)
you can connect the Component video (YCrCb or YPrPb) output
from your set top box to the
A/V adapter cable
located on the rear of the Colossus. The Component video colors are normally
Red/Green/Blue
.
c)
you can connect the Composite video output
of your set top box (normally the yellow RCA con-
nector on a set top box) to the
Blue connector
on the
A/V cable set
.
Audio connections
If you are using an HDMI cable from your video source, audio is carried along with video on the HDMI
cable.
If you are using Component or composite video, then you can connect audio from either the
RCA audio
input
(Red/White connectors) on the
A/V cable set
or the
Optical audio input connector
Step 3: Install the Colossus 2 Windows driver and applications
Turn on your PC, and boot into Windows.
If a '
Found New Hardware
' wizard appears, please cancel it. Allow windows to load before proceeding.
Insert the HD PVR 2 Installation CD-ROM in your PC’s CD-ROM drive.
This CD is used with
both the Colossus 2 and the HD PVR 2.
N
ote: if the CD does not
autorun, navigate to the CD
and run the 'Setup.exe' file.
The
Hauppauge Installation CD
win-
dow will appear on the screen. Choose
a language.
Step 1: Check your cables:
Click
Check cable connections
Step 2: Install Hauppauge Capture:
This step installs the Windows driver for
Colossus 2, the WinTV v8 and the
Hauppauge Capture applications.
Click
Step 2.
Click
Next
.
The Colossus 2 Windows driver will be installed first.
Next, the Colossus 2 applications will be installed. The
WinTV v8
application includes a TV sched-
uler which allows you to record TV programs from a cable or satellite set top box. The
Hauppauge
Capture application
is for recording and uploading the rcordings to YouTube.
Once comp lete,
you will be asked to restart your PC
. Please do so.
N
ote: the latest driver updates are available at: www.hauppauge.com in the
Support section under HD PVR 2.
Step 4: Install the IR Blaster cable
(optional - for use with a cable TV or satellite receiver box)
N
ote: information on the installation of the IR blaster can also be found in
Set up and using the WinTV v7 application
guide (included with Colossus 2).
Plug in the IR Receive/Blaster cable
Plug the jack at the end of the IR Blaster cable into the IR receiver jack on the Colossus 2.
Install the IR transmitter (blaster) at your set top box
Attach the end of the IR transmitter over the remote sensor on the set top box to be controlled.
Placement
of the IR transmitter is important!
The IR transmitter only works over a 1 inch distance, so you need to
make sure it is placed over the remote sensor in your set top box. Some set top boxes have the position of
the remote receiver indicated on the plastic front of the set top box. With others, you might need to look
carefully at the set top box for what looks like a round or square area underneath the plastic front panel.
There is double sided tape on the back of the IR transmitter to hold it in place over the remote sensor in
your set top box.
You will configure the IR Blaster for your set top box in the
Set up and using the WinTV v7 appli-
cation
guide.
Using WinTV v8 to record TV programs from your set top box
You will find information on the setup and use of WinTV v8 in the
Set up and using the WinTV v7
application
guide (included in the Colossus 2 package).
Using Hauppauge Capture
After restarting your PC, you will see the
Hauppauge Capture icon
on your
Windows desktop. Click this icon to start Hauppauge Capture.
For more information on Hauppauge Capture, how-to videos and the latest ver-
sion of Hauppauge Capture, please look here:
www.hauppauge.com/capture
Page 1
Page 2
Page 3
Page 5
Page 6
Capture:
to record videos
Edit:
to trim videos
YouTube:
to upload videos
StreamEez:
for video streaming
Settings
menu
Preview window:
when you have chosen your video source, you
should see your video here
Page 4


