background image

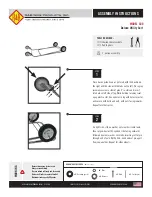
A minimum of 2 people are required for this assembly
Estimated 60 minutes assembly time

INS696

Revision 0

17/10/2017

FBL-699

3G Weighted UEFA Portagoal

60

mins

i

IMPORTANT:

Please read these assembly instructions carefully

before starting to assemble your Goal

ASSEMBLY INSTRUCTIONS

net sold separately

Summary of Contents for FBL-699

Page 1: ...ly Estimated 60 minutes assembly time INS696 Revision 0 17 10 2017 FBL 699 3G Weighted UEFA Portagoal 60 mins i IMPORTANT Please read these assembly instructions carefully before starting to assemble your Goal ASSEMBLY INSTRUCTIONS net sold separately ...

Page 2: ...upport 9 Solid Ballast 1 x2 FEP360 parts are not to scale ode in brackets refers to packed parts c Page 1 2 x2 FEP945 4 x4 PEP947 FEP947 Tools Required 17mm 6mm 1x 17mm Spanner 1x 6mm Key supplied Hex 5 x2 FEP951 4mm 1x 4mm Hex Key supplied 8mm 1x 8mm Key supplied Hex Optional Extras FBL 689 FBL 698 Box Net Bottom Hinged Net Support 3 x2 FEP946 6 x2 FEP949 7 x2 FEP950 9 x4 FEP070 8 x4 PEP639 FEP63...

Page 3: ...s Wtd UEFA Portagoal 10 Ballast Tube 11 R H Hi Raise Wheel 12 L H Hi Raise Wheel 13 R H CAM Raise Wheel 14 L H CAM Raise Wheel 11 x2 FPK282 parts are not to scale ode in brackets refers to packed parts c Page 2 14 x2 FPK321 13 x2 FPK321 12 x2 FEP282 10 x2 FEP551 ...

Page 4: ... Net Holder Clip E M10 Handwheel H M10x40mm Button Screw I M10x50mm Button Screw J M10x25mm Square Screw K M6x10mm Button Screw L M10 Washer M M10 Nyloc Nut F M10 Spacer G M10x30mm Cap Screw Fittings Pack Contents A x4 PEP062 C x4 PEP328 D x4 CLP055 E x4 BOL399 F x4 BOL739 G x16 BOL333 J x28 BOL336 I x12 BOL308 H x4 BOL321 Page 3 K x4 BOL672 M x24 BOL202 ...

Page 5: ...9 FPK699 Weighted UEFA Portagoal Fittings N M10 Nord Lock Washer O Net Strap P Net Hook Q 8mm Key R 6mm Key S 4mm Key Hex Hex Hex Fittings Pack Contents N x12 BOL714 Q x1 BOL790 R x1 BOL791 Page 4 Code Product FBL 699 3G Weighted UEFA Portagoal S x1 BOL793 O x4 STR110 ...

Page 6: ...locating it in the channel of the Crossbar and Upright Secure the Uprights to the Crossbar using four M10 Nyloc Nuts M three M10 Washers L and a Net Holder Clip D per Upright Leave the top of the Net Holder Clip open for fitting the net at a later stage Page 5 1 17mm 2 Slide the Ballast Tube 10 into the Backbar 5 ensuring the Ballast tube sits centrally in the Backbar Slide one Solid Ballast 9 int...

Page 7: ...Cap Screws per Sidebar 8mm i INFO The uprights will have approximately 1 of forward lean at this point This will be counteracted by net tension when fully assembled 4 3 G J 3 Slide the Net Support Brackets 6 7 into the Backbar 5 and Sidebar 4 secure in place using a hand tightened M10x30mm Cap Screw G in the hole farthest from the bracket tube Repeat this step for the Sidebars again hand tightenin...

Page 8: ... an Aluminium Spacer and Spacer Plate both supplied with FPK282 The remaining M10x25 Square Screws and M10 Binx Nuts supplied with FPK282 are not required with this product please keep for spares Tighten the M10x30mm Socket Screws previously fitted in step 3 13 3 4 Aluminium Spacer M10 Binx Nut 11 I N Aluminium Spacer Spacer Plate 17mm i INFO Twelve M10x25mm Square Screws and twelve M10 Binx Nuts ...

Page 9: ... Button Screw H Place the Strap Bracket assembly over the M10 Square Screw placed a third of the way down the Net Support and fix in place with an M10 Handwheel E To move the bracket loosen the handwheel and slide along the section tighten to fix the position Place the Top Bracket C over the two M10 Square Screws near the top of the Net Support and fix in place using two M10 Nyloc Nuts and two M10...

Page 10: ... K Net P P 1 Remove the carbine clip from the single end of the Net Strap O Feed it through the Top Bracket and reattach the carbine clip and clip the Net Strap onto the Strap Bracket Clip the shorter strap onto the rear corner mesh of the Net take the longer strap and count 18 meshes into the Net and clip on Repeat for both sides Loosen the Handwheel on the Strap Bracket and slide it down the Net...

Reviews: