P O W E R
B U D S
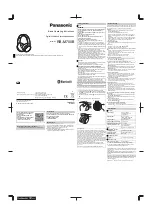
The perfect accessory for anyone who wants to be truly wireless
PLEASE READ BEFORE OPERATING THIS EQUIPMENT
HALO POWERBUDS
Thank you for choosing HALO. The HALO POWERBUDS are the
perfect accessory for anyone who wants to be truly wireless! The
HALO POWERBUDS feature ultra small, hassle-free, Bluetooth
wireless earbuds and a convenient, compact 2100mAh portable
charger. The innovative HALO POWERBUDS design allows you to
quickly and easily recharge the Earbuds with a unique magnet
design and built-in Power Bank function within the Earbud Case.
The HALO POWERBUDS portable power source allows you to
charge any small electronic device, including mobile phone,
camera, iPod, and gaming system. Its Micro USB charging input
allows for a quick seamless charge so that you can take it with
you and use it over and over again!
Please read the operating instructions carefully before using the
HALO POWERBUDS.
TABLE OF CONTENTS
Included Items
Operating Instructions
Maintenance and Care
Safety Precautions
Specifications
Warranty and Contact Information
INCLUDED ITEMS
- HALO POWERBUDS
- Standard USB to Micro USB Cable
- Additional Ear tip sizes
- Operating Instructions
LOCATION OF CONTROLS
1
| Earbud Charging Socket
2
| Earbud Multifunction Button
3
| Earbud LED Indicator/Microphone
4
| Ear Tips
5
| Power Bank/Earbud Case
6
| Micro USB Charging Input
7
| Power Bank LED Battery Indicator
8
| USB Output Port
OPERATING INSTRUCTIONS
Prior to first use, it is recommended to fully charge the HALO
POWERBUDS (Earbuds and Power Bank).
In order to get the best audio performance, try every ear tip
(small, medium, large). The correct ear tip will help achieve
optimal fit and stability.
CHARGING THE HALO POWERBUDS
The HALO POWERBUDS operate on a rechargeable, Li-ion
battery. First, use the Standard USB to Micro USB Cable
(included) and connect the Micro USB tip into the Micro USB
Charging Input on the Power Bank / Earbud Case. Next, connect
the Standard USB end into your computer’s USB port or a USB
adapter (not included).
While charging, the Power Bank LED Battery Indicator will flash
BLUE. When battery is fully charged, the LED Battery Indicator
will turn solid BLUE.
Note: The Micro USB Charging Port located on this unit is only
used for charging the internal battery of the Power Bank/Earbud
Case.
CHARGING THE HALO POWERBUDS EAR BUDS
The HALO POWERBUDS ear buds are charged via magnetic
contact recharging. Push up on the internal sleeve of the Power
Bank Case so that the Earbud Charging Sockets are flush with
the top surface. See diagram below. Then, simply place the
earbuds facing down onto the charging sockets of the Power
Bank/Earbud Case. The Earbud LED Indicator will be solid red
when charging and will turn off automatically when the earbuds
are fully charged.
HALO POWERBUDS POWER LEVEL INDICATORS
The BLUE LED light will flash different times according to how
much battery remains.
Note: To tell the Power Bank charge level without charging it:
A. Remove and reinsert one Earbud, the LED Battery Indicator
will flash.
B. There is a motion sensor built inside the Power Bank. Tap the
Power Bank with your hand or push up the internal sleeve of the
Power Bank Case. The LED Battery Indicator will flash.
TURNING HALO POWERBUDS ON/OFF FOR FIRST
TIME PAIRING
To turn ON, first remove the Earbuds from the Power
Bank/Earbud Case, then long press the Multifunction button for
4 seconds until the indicator light flashes BLUE. To turn OFF, long
press the Multifunction button for 4 seconds until the indicator
light flashes RED, or simply dock ear buds in Earbud Charging
Socket.
PAIRING VIA BLUETOOTH
With the Earbuds off, simultaneously long press the
multifunction button on each of the Earbuds for 6 seconds
until the indicator light on each of the Earbuds begins to flash
red and blue.
Turn on your device’s Bluetooth and search for
“HALO powerbuds”. Click to connect. If prompted to enter a
passkey, enter “0000”.
- WAIT 10-15 seconds while HALO POWERBUDS synchronize
and only one HALO POWERBUDS is showing on Bluetooth
connection screen.
- Once the HALO POWERBUDS are successfully paired and
connected with your mobile phone, you can use it to make calls
and listen to music.
- To answer/end calls, click the multifunction button once to
answer the incoming call. Click the multifunction button once to
end a call.
- To reject a call, hold the multifunction button for 2 seconds to
reject the incoming call.
- To redial, double click the multifunction button to redial the
last number on your phone.
- To play or pause your music, click the multifunction button.
WHICH IS LEFT/RIGHT CHANNEL
After the Earbuds are successfully connected, the RIGHT channel
will flash the blue LED twice continuously, the LEFT channel will
flash the blue LED once continuously.
TROUBLESHOOTING
MAINTENANCE AND CARE
After prolonged use, the internal battery will become weak and
the operation may become intermittent.
To maximize battery life: once the battery is fully discharged,
immediately recharge (regardless of whether you plan to use
this unit or not). If you do not plan to use the battery for an
extended period of time (one week or longer), we recommend
that you fully charge the battery. For longer periods of storage,
please recharge the battery at least every two months to
maintain the battery in optimum condition.
SAFETY PRECAUTIONS
This HALO POWERBUDS has been designed and manufactured
to ensure your personal safety when used in the directed
manner. Improper use can result in potential hazard.
Please read all safety and operating instructions carefully before
installation and use. Keep these instructions handy for future
reference.
- It is recommended not to listen to music at high volumes as it
can cause damage to hearing
- The HALO POWERBUDS should not be used near water or wet
areas such as bathtubs, showers, bathrooms, sinks, swimming,
or pools.
- To clean, use damp cloth to gently wipe the surface of the
HALO POWERBUDS.
- To reduce the risk of fire or electric shock, do not expose the
HALO POWERBUDS to rain or moisture. Keep the HALO
POWERBUDS away from dripping, splashing, or any objects filled
with liquids. Do not place anything on HALO POWERBUDS .
- Keep away from heat sources, including but not limited to:
open flame sources, radiators, stoves, ovens, cars, and amplifiers
that produce heat.
- Do not puncture, crush or subject to mechanical shock.
- Do not disassemble .
- Unplug the charger when batteries are fully charged or not in
use.
- Li-ion batteries must be recycled. Do not dispose of in the
trash.
SPECIFICATIONS
Battery Capacity:
2100mAh
Micro USB Input Charging:
5V 1.0A
USB Output:
5V 1.0A
Dimensions (W x H x D):
23.5 mm x 41 mm x 91 mm
Weight:
94.2 g
Working Temperature:
0ºC to 45ºC
Working Humidity:
Max 85%
Total Use Time:
3 hours
COMPLIANCE WITH FCC REGULATIONS
“This device complies with Part 15 of the FCC Rules. Operation is
subject to the following two conditions: (1) this device may not
cause
harmful interference, and (2) this device must accept any
interference received, including interference that may cause
undesired operation.”
“Warning: Changes or modifications to this unit not expressly
approved by the party responsible for compliance could void
the user’s authority to operate the equipment.”
“NOTE: This equipment has been tested and found to comply
with the limits for a Class B digital device, pursuant to Part 15 of
the FCC Rules. These limits are designed to provide reasonable
protection against harmful interference in a residential
installation. This equipment generates, uses and can radiate
radio frequency energy and, if not installed and used in
accordance with the instructions, may cause harmful
interference to radio communications.
However, there is no guarantee that interference will not occur
in a particular installation. If this equipment does cause harmful
interference to radio or television reception, which can be
determined by turning the equipment off and on, the user is
encouraged to try to
correct the interference by one or more of the following
measures:
- Reorient or relocate the receiving antenna.
- Increase the separation between the equipment and receiver.
- Connect the equipment into an outlet on a circuit different
from that to which the receiver is connected. Consult the dealer
or an experienced radio/TV technician for help.
LIMITED WARRANTY
HALO INTERNATIONAL SEZC LTD warrants its products to be free
from defects in material and workmanship under normal use.
Conditions are as follows:
- During the first 90 days from date of purchase, HALO
INTERNATIONAL SEZC LTD will repair or replace the defective
product.
- HALO INTERNATIONAL SEZC LTD will, subject to inspection,
repair the defective product or replace it with a new or
reconditioned unit. The return must be accompanied by a
Return Merchandise Authorization
(RMA) number to be issued upon request, and must be shipped
prepaid. We do not offer shipping rebates at this time.
- Warranty is void if the product has been improperly handled or
misused in any way, or if the label and/or bar-coded warranty
label has been removed or tampered with.
- Where applicable, all requests for warranty returns must be
accompanied by a proof of purchase.
- The warranty does not extend to the electronic equipment that
is used or which incorporates with any of our products and
accessories. HALO INTERNATIONAL SEZC LTD shall not be held
responsible for the improper use of its products.
- For all questions or exchange requests, please call
888-907-6274, or email us at [email protected]
This Limited Warranty sets forth the full scope of HALO’s
obligations and liabilities with respect to the product. All
implied warranties, including, without limitation, implied
warranties of merchantability and fitness for a particular
purpose, are limited to the duration of this Limited Warranty. In
no event shall HALO be liable for any incidental, special,
consequential or punitive damages or any damages or losses of
or to electronic equipment or products that are used with any of
HALO’s products.