HAKO 7300.10, Instruction Manual
Introducing the HAKO 7300.10, a powerful and versatile machine designed to simplify your tasks. To maximize your experience, make sure to download the comprehensive Instruction Manual absolutely free from manualshive.com. Learn every detail of this remarkable product and unleash its full potential at your convenience.
Share
Download


Reviews:
No comments
Related manuals for 7300.10

F3435
Brand: jbc Pages: 8

BA 410
Brand: Nilfisk-Advance Pages: 4

Focus II 56381828
Brand: Clarke Pages: 56

Mopit 3.0
Brand: Spectrum Pages: 27

SGE28
Brand: Glide Pages: 125

MINI-EDGER
Brand: Pacific Pages: 6

Cyclone CM-5.3
Brand: parktool Pages: 2

BD 70/75 W Classic Bp
Brand: Kärcher Pages: 40

Flex 3 FLX3
Brand: Windsor Pages: 45
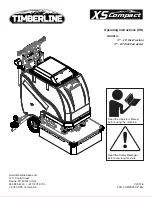
XS Compact 17" Disk Pad Assist
Brand: Timberline Pages: 30

TASKI Swingo 150B
Brand: Sealed Air Pages: 18

EBEL:VENT EN-U
Brand: Priorit Pages: 62

21-E Series
Brand: KUKKO Pages: 2

SSM 385 BC
Brand: Kränzle Pages: 72

RA 330 IBC
Brand: Cleanfix Pages: 17


