

Copyright © Fire4 Systems Inc., 2011. All rights reserved.
Hotspot Gateway Product Setup
- Quick Start Guide 1
The Guest Internet Hotspot Internet gateway products (GIS-R2, R4, R5, R6 and R10) have Ethernet LAN ports
that can be used to connect wireless access points, Internet café kiosk computers, wired hotel rooms and
business center computers. The Internet (WAN) port must be connected to the DSL or cable modem
First Time Product Configuration
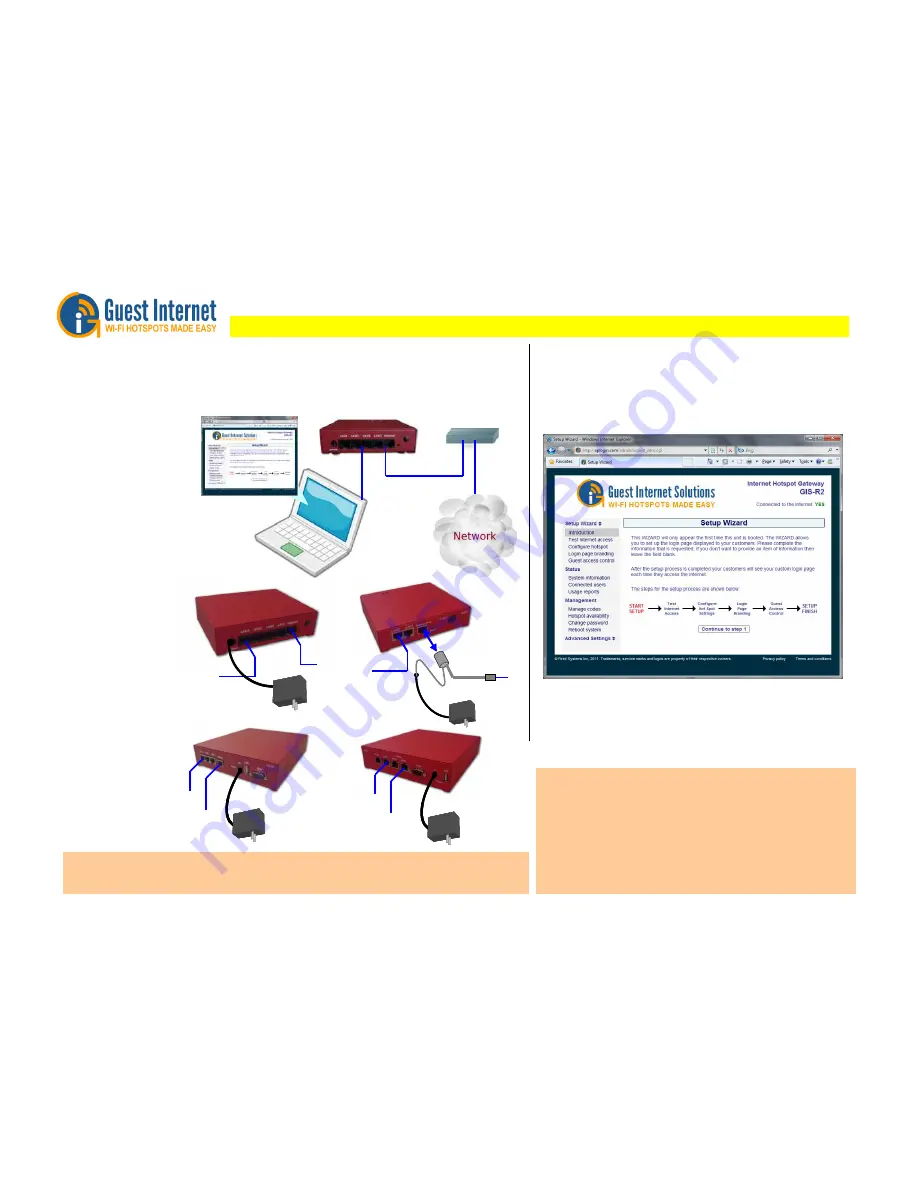
Connect your laptop computer to one of the LAN ports of the gateway.
Connect the Internet port to you DSL router.
Open your computer browser. Instead of your login page you will see the
page shown below. This page is the SETUP WIZARD.
The setup process has four steps. Follow the instructions to type in the
information requested on each page. Then click on the button to go to the
next page. When the setup process is completed your personalized
wireless Internet service will be ready for your guests to start using. The
setup process is shown overleaf: flip this page over to start the setup
process.
Connect your computer
Ethernet connector to the
LAN1 connector of the
gateway. Your computer
Ethernet connector should
be configured for dynamic
IP or as a DHCP client. It
cannot be used with a fixed
IP.
Login to the Admin pages at any time. Connect your computer to the
gateway via an Ethernet cable of wireless. Then open your browser and
type in the URL:
http://aplogin.com/admin
The username is
admin
, and the password is
the one that you entered
with the wizard.
When the page opens select the option you need in the menu. See the
manual for more information about configuration.
Download the product manual at: http://www.guest-internet.com/gateway
For operation the WiFi
Hotspot users will use
the wireless network or
kiosk computers.
Connect wireless access
points and kiosk
computers to the
gateway LAN ports.
Reset to Factory Defaults
:
With the GIS-R2 powered up, use a paperclip to press the reset button
through the hole. Hold the reset button down for 10 seconds the release. All parameters will be reset.
First connect the gateway
as shown in the diagram
to configure it using the
setup wizard.
Connect the Internet
connector of the gateway
to the DSL or cable
modem LAN Ethernet
connector. The DSL of
cable modem should have
the LAN network
connector configured as a
DNCP server. Check with
the equipment manual to
verify the LAN connector
configuration.
If you wish to connect
more devices then
connect an Ethernet
switch to one of the
LAN ports.
GIS-R6
48 volt power supply
For 110/220volts
48 volt power supply
For 110/220volts
Computer
DSL/Cable
router
GIS-R6
48 volt power supply
For 110/220volts
48 volt power supply
For 110/220volts
Computer
DSL/Cable
router
GIS-R10
12 volt power supply
For 110/220volts
12 volt power supply
For 110/220volts
Computer
DSL/Cable
router
GIS-R10
12 volt power supply
For 110/220volts
12 volt power supply
For 110/220volts
Computer
DSL/Cable
router
12volt power supply
For 110/220volts
Power over
Ethernet
PoE
injector
DSL/Cable
router
GIS-R5
Computer
12volt power supply
For 110/220volts
Power over
Ethernet
PoE
injector
DSL/Cable
router
GIS-R5
Computer
GIS-R4
Computer
12volt power supply
For 110/220volts
DSL/Cable router
GIS-R4
Computer
12volt power supply
For 110/220volts
DSL/Cable router
DSL
Or
Cable
GIS-R2
Internet
Configuration
computer
GIS-R2 Configuration
Internet port
LAN port
DSL
Or
Cable
GIS-R2
Internet
Configuration
computer
GIS-R2 Configuration
Internet port
LAN port


