

Grundium Ltd. | Hermiankatu 6-8F | 33720 Tampere, Finland | www.grundium.com
→
→
→
→
User Guide
Sales package contents
•
Ocus® scanner
•
Protective cover
•
Power supply and mains cable
•
User guide
•
Carrying case
To use the Ocus
®
scanner, you also need
•
Computer or tablet
•
Internet connection
•
Browser (Chrome, Edge, Firefox, Safari)
Introduction to the Ocus
®
Portable Whole Slide
Image Scanner
Grundium Ocus® is an In Vitro diagnostic Medical Device
Grundium Ocus® is a professional imaging instrument for digitizing
microscope slides. The device is used in in vitro diagnostics, which aims
to gather information about the physiological or pathological state of
the patient based on the specimens derived from the human body.
The device produces image data, which medical professionals can use
as input information when making patient diagnosis or therapeutic
measures.
1. Before you start
Check the carrying case for damages. If you notice any damage on the
case or the scanner, contact
.
Note:
More detailed user guide can be found in www.grundium.com.
Remove the transportation support pin from the bottom of the scanner
by turning the pin counter-clockwise. Remember to handle the scanner
carefully to avoid dropping or damaging it and avoid leaving fingerprints
on the glass surfaces or lenses while removing the pin.
Important Notice:
The functionality of the scanner must
be verified every time before critical operation. The scanner
intended usage flow, including the connectivity, scanning and
exporting, must be verified. It must be verified that the user’s
equipment produces slides suitable for scanning with Ocus®.
Image quality must be verified with known sample. Also, there
must be a back-up solution for critical operations.
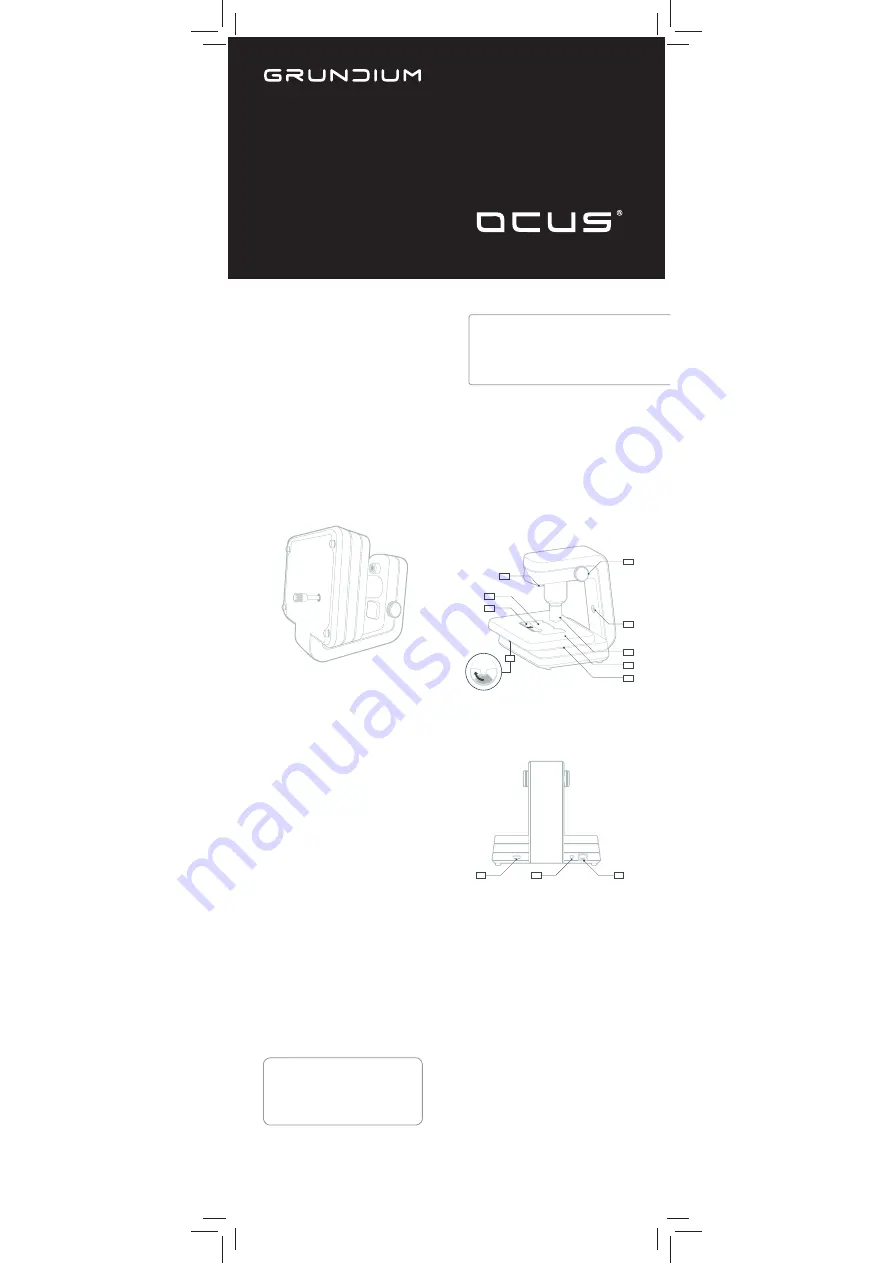
Image 1.
Remove the transportation support pin
Place the scanner on a flat surface and make sure there is at least 10
centimeters (4 inches) free space around it.
Tip:
To ensure safe transportation, screw the transportation support pin
back in before moving the scanner to another location. Do not tighten
the pin, turning it until it stops is enough.
Scanner parts
6
4
5
8
7
9
3
2
1
Image 2.
Scanner parts
1. Focus knob
2. Power button
3. Objective
4. Cover plate
5. X-Y-stage
6. Lever
7. Slide holder
8. Slide support glass
9. Overview camera
Power button lights
Light
Explanation
Green breathing
Scanner is switched off. Power cable is connected.
Green steady
Scanner is connected to the Internet.
Green blinking
Scanner is in live view mode, scanning or exporting.
Yellow steady
Scanner is connected to the Internet via proxy.
Red steady
Scanner is in error state (see Troubleshooting).
Red blinking
Scanner is powering up or shutting down.
Blue steady
Scanner’s WLAN access point is on.
Purple steady
Scanner’s first start-up is ongoing.
Purple blinking
Scanner’s software update is in progress.
3
2
1
Image 3.
Scanner connectors
1. USB connector
2. Power cable connector. Use only the power cable supplied with
the scanner.
3. Network cable connector
2. First use
When you use the scanner for the first time, you need to connect
it to your computer or tablet and set up an Internet connection for
the scanner. You can use either a network cable or a WLAN for the
connection.
Image 4.
Product label of your scanner
Note:
If the network you use has a firewall, make sure that the scanner
is allowed to use the outgoing connection to the Internet. If the firewall
uses a MAC filter, you can find the MAC address of the scanner on the
label at the bottom of the scanner. Also, traffic between devices in the
network must be allowed.
First use with a network cable connection
1. Attach the power cable to the scanner and plug the cable in a wall
outlet. The power button shows a breathing green light.
2. Connect one end of the network cable to the scanner and the other
end to the Ethernet connector for your network.
3. Press the power button. The power button flashes red. Once the
scanner is switched on and connected to the Internet, the power
button shows a steady green light.
4. Open the browser in your computer or tablet and type the following
in the browser’s address field:
http://mgu-XXXXX-XXXXXX.device.grundium.net.
Replace the X’s with the scanner’s serial number (eleven digits) found
on the label at the bottom of the scanner or on the sticker attached
to quick start guide.
5. Follow the instructions on your computer or tablet to register a new
user account or to use an existing one. The account enables you to
use the scanner.
You can also create a new team. A team enables you to share the
scanner with other team members. If you want to join an existing team,
ask someone from the team to add you. See instructions for creating a
new team in www.grundium.com.


