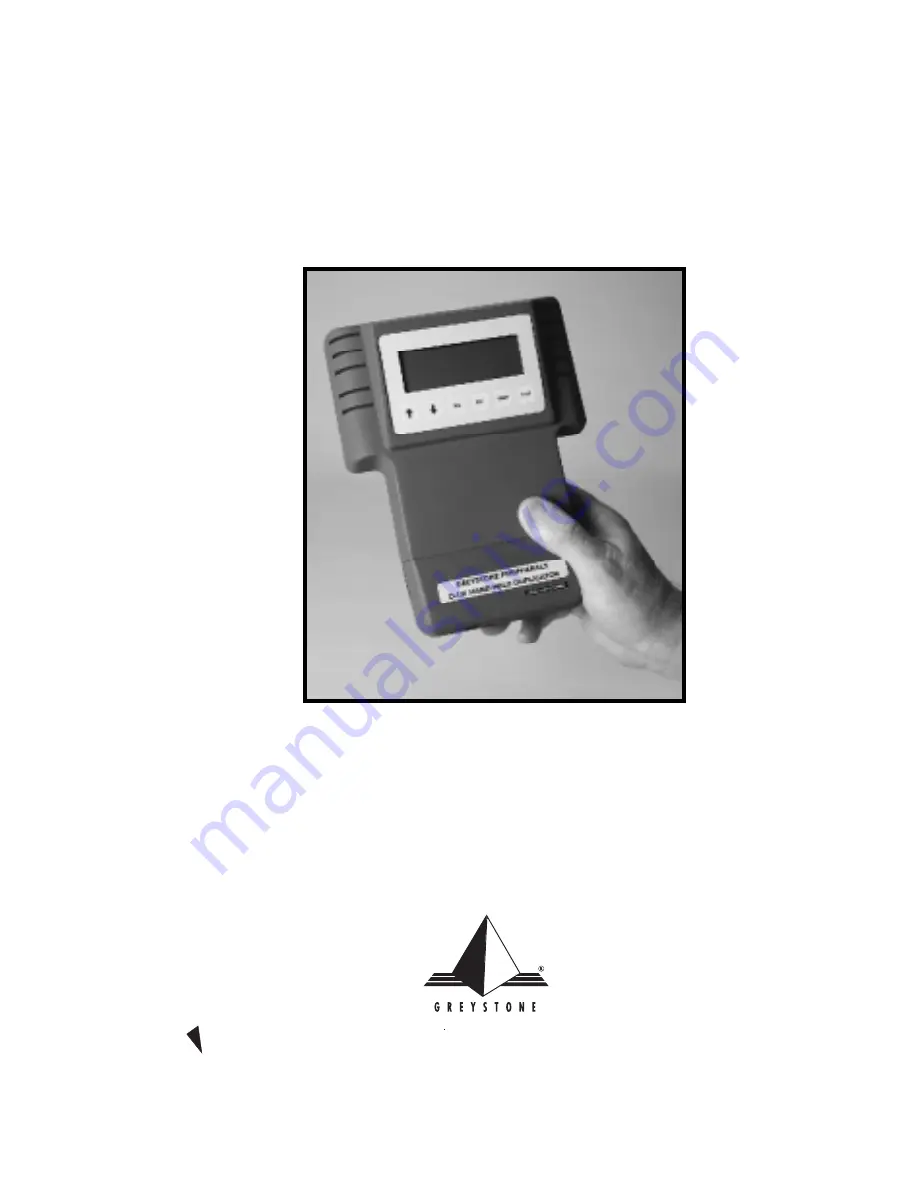
background image

DataFast

™ 

D-101

Hand Held Duplication Unit

User’s Manual

GREYSTONE PERIPHERALS INC., 150 Knowles Drive, Los Gatos, CA 95030

TEL: (408) 871-4000  FAX: (408) 871-4100

E-Mail: [email protected]  Web Page: http://www.grystone.com

A PubliCARD, Inc. Company

Summary of Contents for DataFast D-101

Page 1: ...nd Held Duplication Unit User s Manual GREYSTONE PERIPHERALS INC 150 Knowles Drive Los Gatos CA 95030 TEL 408 871 4000 FAX 408 871 4100 E Mail grystone grystone com Web Page http www grystone com A PubliCARD Inc Company ...

Page 2: ...ormcanbereasonablyexpectedtocontribute to the failure or malfunction of the life support device or system or may be expected to affect the safety or effectiveness of such life support device or system GreystonePeripherals Inc cannot anddoesnot assumetheresponsibilityorriskof anyinjuryordeathrelatedtoanydefect error failureormalfunctionofthehardware software or manuals which taken together comprise...

Page 3: ...g a Job 3 3 3 2 3 Standard Jobs 3 3 Smart Copy 3 4 Job Completion Status Display 3 5 Mirror Copy 3 6 Disk Test 3 7 Wipe Disk 3 8 3 2 4 SRCE IN TARGET EXT 3 8 Set System Options 3 9 Maintenance Menu 3 10 System Statistics menu 3 10 View Log File 3 11 Set Time Date 3 11 Update Software 3 11 Chapter 4 Remote Operation 4 1 Setup for Remote Operation 4 1 4 2 Using the Remote Software Utility 4 2 4 2 1 ...

Page 4: ......

Page 5: ...tever the job requires TheD 101unitallowsyoutoselectivelycopyprogramsoftwareanddata from a master source drive to a target disk drive Target drives that are identical to the source drive may be mirrored or duplicated exactly sector by sector A Smart Copy mode is used for faster copying or for dissimilar drives using a FAT16 FAT32 or NTFAT file system The D 101 is ideal for applications that requir...

Page 6: ...es all FAT file systems Mirror mode copies even unknown file systems to drives with identical cylinder head and sector counts Duplicates drives larger than 8 GB Supports LBA CHS addressing and Read Write Multiple modes Automatic parameter translation option to keep logical cylinder count below 1024 Wipeout mode fills each sector on disk with zeroes Verify option reads back copied data and compares...

Page 7: ...ble TheD 101serialportisconfiguredas DOS COM1 9600 baud 8 bit data 1 stop bit no parity IBM PC AT compatible DB 9 connector Parallel Port The parallel port is used to connect the D 101 to a host PC through a standard IEEE 1284 parallel interface A PC bootable floppy containing remote software utilities is provided to enable copying between the D 101 and a PC and for D 101 software upgrades The D 1...

Page 8: ...1 4 D 101 DataFast User s Manual Introduction ...

Page 9: ...101 BeforesettinguptheD 101 verifythatyouhavereceivedalltheitemsfor the system configuration you ordered Please consult your dealer or Greystone Peripherals if any item is damaged or missing 1 One D 101 unit 2 One 40 pin data cable 3 One 4 pin power cable 4 One IEEE 1284 parallel cable 5 One AC power adapter 6 3 5 D 101 utilities diskette 7 Registration card 8 User s manual Record the D 101 Serial...

Page 10: ...he drive manufacturer s instructions as MASTER DRIVES They must not be set as slave drives or set to cable select NOTE The D 101 supports bi directional copying You can designate the internal drive to be either the source master or the target destination drive Target Drive IDE Data Ethernet Power IN D 101 Connector and Feature Locations Target Drive Power Parallel Port Serial Port Cover to Master ...

Page 11: ...ver must remain attached to the unit because of the cooling fan wire connection 2 Slide the master drive into the D 101 case with the data and power connectors accessible from the open end Cover Cooling Fan Wire Connection Remove the Master Drive Compartment Cover Master Drive Data Power Connectors Slide Master Drive into Drive Compartment ...

Page 12: ...s on the master drive The connectors are keyed for proper insertion 4 Replace the cover 5 Plug the round single prong end of the AC power adapter into the power IN connector on the D 101 unit Connect the Data and Power Connector Cables Power IN AC Power Connection Connect the AC Power Adapter AC Power Adapter 40 pin Data Cable Connections 4 pin Power Cable Connections ...

Page 13: ... will be displayed Otherwise A SELF TEST PASSED message will be displayed The self test completion status will be visible during system loading before the main menu is displayed 7 Attach the external target drive after the following Main Menu is displayed M A I N M E N U S T A N D A R D J O B S S R C E I N T T A R G E T E X T S E L S E L E C T Use the 4 pin power and 40 pin data cables included wi...

Page 14: ...ower Cable Attach the Target Drive 8 Your D 101 is ready to perform the selected functions from the program menu screens Next refer to Chapter 3 for the operation of your D 101 NOTE ThemethodforturningyourD 101unitON or OFF is by unplugging the AC power source Data Cable ...

Page 15: ...he LCD Menu Keypad The D 101 control panel consists of an LCD menu screen 4 lines by 20 characters andsixnavigationkeys Thefirstmenutitlelineandfourth keypad prompt line are static and do not scroll M A I N M E N U S T A N D A R D J O B S S R C E I N T T A R G E T E X T S E L S E L E C T é ê SEL ESC START STOP The user keypad consists of six keys assigned the following functions é Up key Moves the...

Page 16: ...e the target To change this position the cursor on the SRCE INT TARGET EXT line and press SEL Tochangethe sourcemasterdrive select SourcePort andpress SEL Use the éê keys to toggle between INT internal drive port EXT external drive port or PAR parallel port Press SEL to set the desired option This changes the configuration and returns to the Select Port menu The target port can be changed using th...

Page 17: ... to invoke the disk duplicating process from the master to the connected target drive If both drives are of the same manufacturer and model with the same cylinders heads and sectors select Mirror Copy Mode or Smart Copy mode Thefollowingsectionsdescribehowtoruncopyjobsfromthe Standard Job menu 3 2 3 Standard Jobs The following describe the options that are available through the Standard Jobs scree...

Page 18: ...y has been specified Selecting the submenu options enables you to viewthesourceandtargetdriveinformation Ifeitherthesourceortarget drive is not detected the manufacturer and serial number data will be replacedwithaNODRIVEindicationandthemissingdriveinfowillbe displayed as zeros Tostart SmartCopy press START Thenextscreenwillpromptyou to confirm the action to start Press START again The next screen...

Page 19: ...view the log data or hit ESC to return to the job menu where the job originated Job completion will power down the drives Thefollowingliststheadditionalstatusstatementsthatcanbeseeninline 2 of the job completion status display C A N C E L B Y U S E R S O U R C E D R I V E E R R O R T A R G E T D R I V E E R R O R S M A R T C O P Y V F Y O P E R A T I O N C O M P L E T E n n n n n n M B E T h h m m...

Page 20: ...settothetotalsizeoftheSourcedrive in megabytes To change the settings press SEL to select front or back and use the éê keys to change the values in 100 MB increments To start Mirror Copy press START The next screen will prompt you to confirm the action to start Press START again The next screen will display a progress bar showing completed in 5 incrementsorthefilenameduringthecopyprocess thetransf...

Page 21: ...n of the drive youcanspecifydifferentFront begin andBack end parameterstotest The second and third lines are used to set the Front and Back parameters to limit the test operation to specific parts of the target disk By default the Front is set to the total size of the drive in megabytes To change the settings press SEL toselectfrontorbackandusetheéê keystochange the values in 100 MB increments Tos...

Page 22: ...l prompt you to confirm the action to start Press START again The next screen will display a progress bar showing completed in 5 incrementsorthefilenameduringthecopyprocess thetransferspeedand estimated time remaining Youcanpress STOP atanytimedodiscontinuetheWipeDiskprocess Press ESC to return to the Wipe Disk menu To view the copy log for more details about the job press SEL 3 2 4 SRCE INT TARGE...

Page 23: ... increment or decrement by using the arrow keys The indicated values are default S E T S Y S T E M O P T I O N S V E R I F Y F I R S T 1 0 0 E N A B L E L B A X L A T E X E S C E X I T S E L S E L E C T E N A B L E I N T 1 3 X L A T E P W R S E T T L I N G 0 5 S E C C M D T I M E O U T 1 5 S E C X L O G A L L J O B S X L O G F A I L E D J O B S L O G D E T A I L S X S H O W S M T C O P Y F N A M S...

Page 24: ... selection and can be changed by selecting the menu item and using either arrow key to toggle the setting ESC returns to Main Menu Maintenance Menu Use the arrow keys to scroll line three of the Maintenance menu System Statistics menu Use the arrow keys to scroll line three of the System Statistics menu S E T T I M E D A T E U P D A T E S O F T W A R E M A I N T E N A N C E M E N U S Y S T E M S T...

Page 25: ... set the log to provide details of the source and target disks Set Time Date SEL selects a line and the arrow keys increment decrement the value ESC or SEL stops the change preserving the setting The Time mode will toggle from AM to PM to 24 to AM again The changes ifany arenotsetuntilexitinguptotheMaintenancemenu L O G E N T R Y 0 0 0 0 1 1 2 0 4 P M 0 6 0 7 1 9 9 9 S M A R T C O P Y V R Y 1 0 0 ...

Page 26: ...u enter this menu the D 101 will attempt to connect through the parallel port to a connected PC running the Remote Software After the connection is made the second line will change to CONNECTED Whentheupdateoperationisstartedthrough theRemoteSoftware thesecondlinewillchangeto UPDATING While updating the keypad is inactive to prevent accidental inter ruption If the update transfer is successful the...

Page 27: ... D 101 Update the D 101 application software 4 1 Setup for Remote Operation Your D 101 was shipped with a Remote Software Utility diskette and 6 foot IEEE 1284 compatible cable with DB25 P male connectors at both ends Proceed with the following steps to set up your D 101 for remote operation 1 Connect one end of the supplied parallel port cable to the 25 pin connector on the D 101 as shown below 2...

Page 28: ...e diskette To run the utility from this disk place it in the A drive If Windows is currently running select Shutdown and then Restart from the Start menu If the PC is powered down turn it ON and the system will boot automatically from the floppy diskette and display the following screen on the PC while attempting to establish communication with the D 101 PC Screen A remote Establish a connection w...

Page 29: ...for remote operations with the D 101 A submenu is provided to allow for selection of one of four different local IDE hard drives The current selected drive number is shown in the drive operation menu line PC Screen A status line at the bottom of the PC screen keeps you informed of the status of remote operations Select the desired operation by using the arrow keys to highlight the operation and th...

Page 30: ...enu heading Once youhaveselectedthisoption returntotheD 101andrunjobsjustasyou normally would PC Screen D 101 Screen Use the SRCE TARGET selection from the D 101 main menu to select either the source or the target to PAR to establish communication through the parallel port to the remote computer Select the desired operation using the STANDARD JOBS selection on the D 101 MAIN MENU Then begin the jo...

Page 31: ...tion with the D 101 Normally drive C is connectedtoprimaryIDEport0asthemasterdrive whiletheDOSletter assigned to other drives are not predictable This menu allows the user to select one of four local physical hard drives that may be cabled to the internal IDE ports PC Screen Select a drive by using the arrow keys to highlight the desired drive number thenpress Enter Press Esc toreturntothemainmenu...

Page 32: ...PC press any key From the D 101 s main menu use the arrow and Select keys to navigate to the MAINTENANCE then UPDATE SOFTWARE menu The following will be displayed on the D 101 D 101 Display U P D A T E S O F T W A R E E S C E X I T Upload New Software Press F1 to begin or ESC to cancel Handheld Information Software Version G 3 Serial 1462 Press any key when the distribution diskette is in drive A ...

Page 33: ... as each file is transferred to the D 101 When the software upload is complete the PC screen displays SUCCESS The D 101 performs a reset to initialize and use the new software and the remote software returns to the main menu If any errors occur during the upload process both the remote software and the D 101 will display error messages and the D 101 will discard the updated software ...

Page 34: ...4 8 D 101 DataFast User s Manual Remote Operation ...

Page 35: ......

Page 36: ...8 871 4039 Monday Friday 9 00 a m to 5 00 p m PST For Sales call toll free 800 600 5710 or 408 871 4000 To order by Fax call 408 871 4100 World Wide Web http www grystone com http www greystoneperipherals com Fax Back 408 871 4100 ...

Reviews: