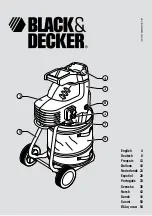
background image

REV 08/22/18

Instruction Manual

Chipper Shredder

WARNING: 

Read carefully and understand all INSTRUCTIONS before operating. Failure to follow the safety rules
and other basic safety precautions may result in serious personal injury.
Save these instructions in a safe place and on hand so that they can be read when required. Keep 
these instructions to assist in future servicing.

Summary of Contents for LCE01

Page 1: ... all INSTRUCTIONS before operating Failure to follow the safety rules and other basic safety precautions may result in serious personal injury Save these instructions in a safe place and on hand so that they can be read when required Keep these instructions to assist in future servicing ...

Page 2: ...th all safety and operating instructions in this manual before attempting to setup and operate your chipper shredder 2 Failure to comply with all safety and operating instructions can result in loss of machine control serious personal injury to you and or bystanders and risk of equipment and property damage The triangle in the text signifies important cautions or warnings which must be followed WA...

Page 3: ...9x23 8x22 2 SPECIFICATIONS Engine Brand Engine Type Power Displacement Starting RPM Fuel Capacity Oil EPA3 Approval CARB Approval Rato OHV 7HP 212CC Recoil 3600 0 7Gal 10W 30 for 32 F above 5W 30 for 25 F below YES YES Engine Specifications Handle Shredder Hopper Engine Chipper Cone Stand Rotor Housing Vacuum Inlet Discharge Chute Wheel 1 INDEX Features 1 Specifications 1 Safety 2 4 Assembly 5 Ope...

Page 4: ...or roads Stay alert for hidden hazards or traffic PRODUCT SPECIFIC SAFETY DANGER The chipper shredder has spinning blades that can amputate hands and feet Do not place hands or feet in the hopper or chipper cone or discharge chute WARNING This unit discharges debris at high speeds Always wear protective goggles and do not operate without the debris bag in place Do not allow anyone in the area whil...

Page 5: ...erating the machine ENGINE SPECIFIC SAFETY Before cleaning repairing or inspecting shut off the engine and make certain that all moving parts have come to a complete stop Disconnect the spark plug wire and secure the wire away from the spark plug to prevent accidental starting DANGER 1 Engines give off carbon monoxide an odorless colorless poison gas Carbon monoxide may be pres ent even if you do ...

Page 6: ...by mouth to drain fuel tank 13 Always have an adult fill the fuel tank and never allow children to fill the engine 14 Never allow an adult or anyone under the influence of drugs or alcohol to fill engine 15 When storing gasoline or equipment with fuel in the tank store away from furnaces stoves water heaters or other appliances that have a pilot light or other ignition source because they can igni...

Page 7: ...t the cotter pin C into the hole to secure the wheel on the axle Install Chipper Cone See Figure 3 1 Position the chipper cone B over the three M8 thread studs protruding from the engine plate 2 Attach the three M8 flange nuts C and tighten to secure the cone 3 Rubber cone cover A can be used when using the vacuum function Install the Handle See Figure 4 1 Position the handle A to by aligning the ...

Page 8: ...of the hammers by air flow Vacuum Attachment Optional In addition to the chipper cone and hopper loose debris may be processed by the Vacuum hose adapter kit Leaves may be raked directly into the leaf tray where vacuum action will draw them into the shredder For hard to reach areas the nozzle and hose assembly may be used The strength of the Vacuum may be changed using the rotating sleeve on the n...

Page 9: ... IMPORTANT Engine is shipped from factory without oil You must add engine oil before starting engine Adding Fuel To add fuel 1 Remove the fuel cap 2 Fill the tank Do not overfill Leave room in the tank for fuel expansion Refer to your engine manual for specific fuel recommendations 3 Install and hand tighten the fuel cap Starting the Engine 1 See engine manual for starting up instructions 2 Ensure...

Page 10: ...rm up for several minutes before use MAINTENANCE Schedule Procedures The following schedule should be followed for normal care of your unit Engine Maintenance Refer to the engine manual included in your package for information on engine maintenance Your engine manual provides information and a maintenance schedule for performing the following tasks 1 Always check oil level before starting engine R...

Page 11: ...igure 7 Service Interval Every 25 Hours or As Necessary The shredding hammers of this unit can be rotated to provide a new cutting surface as required The Y hammers can be flipped over once To inspect the shredding hammers 1 Disconnect the spark plug wire and secure it away from the spark plug 2 Remove the small circular access panel B from the back of the shredder housing SEE FIGURE 7 3 Inspect t...

Page 12: ...m after long storage periods 8 Low engine oil 1 Dirty air filter 2 Choke closed 1 Fuel tank empty or full of impure or low quality gasoline 2 Low oil shutdown 3 Disconnected or improperly connected spark plug cap 4 The limb is too long 1 Discharge chute clogged 2 Engine not running at full speed 1 Branch diameter is too thick 2 Throttle set is too slow 3 Tree limbs are extremely hard or dried out ...

Page 13: ...ing knives should be sharpened or replaced when tree limbs require extra force to feed into the chipper cone 2 The chipping knives may be sharpened at a 39 degree angle until the distance between the edge of the blade bevel and the mounting hole is less than 1 16 1 6mm SEE FIGURE 13 To inspect sharpen or replace the chipping knives 1 Turn the engine off and wait for all moving parts to stop 2 Disc...

Page 14: ...her Cotter pin Handwheel Spring washer Washer Q ty 1 1 1 1 2 11 4 2 2 2 2 1 1 1 Part No 15 16 17 18 19 20 21 22 23 24 25 26 27 28 Description Discharge guard Flange nut M6 Flange bolt M6x20 Damper attachment Damper Flange bolt M8x20 Retainer hopper guard Hopper Guard Flange hopper guard Handle Hopper Bag Screw plate Socket Cap Screw M6x40 Q ty 1 17 17 1 1 4 1 1 1 1 1 1 1 2 ...

Page 15: ...ng washer 8 Hex bolt Key parallel pin Bearing spacer Rotor assembly kit Spring washer 10 Socket head cap screw Q ty 1 2 1 4 4 1 1 1 1 1 Part No 1 2 3 4 5 6 7 8 9 10 11 Description Socket head cap screw M10x50 Spring washer 10 Spacer Y hammer Bearing sleeve Knives plate Locknut M8 Spring washer 8 Washer 8 Knife Screw Q ty 4 4 4 4 4 1 4 4 4 2 4 ...

Page 16: ... lubricants accessory parts such as collection bag etc 3 Manufacturer s liability is limited to replacement or repair of defective material within the warranty period when returned freight prepaid to the distributor or their designated servicedepot 4 The warranty does not cover damage caused by accident misuse or faulty installation 5 The chipper shredder must be installed and maintained in compli...

Page 17: ...ered for small loose waste and for cleaning around decorative landscaping and flower beds Twigs wet leaves and other bulky materials will clog the hose or obstruct the shredding chamber Vacuum Kit Item LC901 Optional Accessory for LCE01 Wood Chipper Shredder Specification 4 x10 extension hose with vacuum nozzle 15 ...

Page 18: ...running at full RPM SOLUTIONS 1 Slide gate to closed position 2 Install the cone cover 3 Clear blockage or replace 4 Set throttle control to FAST if equipped Part No 1 2 3 4 5 Description Adapter Hose adapter Extension vacuum hose End cap Handle Q ty 1 1 1 1 1 Part No 6 7 8 9 10 Description Handle grip Vacuum nozzle Plastic ring Hex bolt Locknut Q ty 1 1 1 1 1 16 ...

Reviews: