

Read Me First
Unpacking, Connections & Channel Setup
VR3930
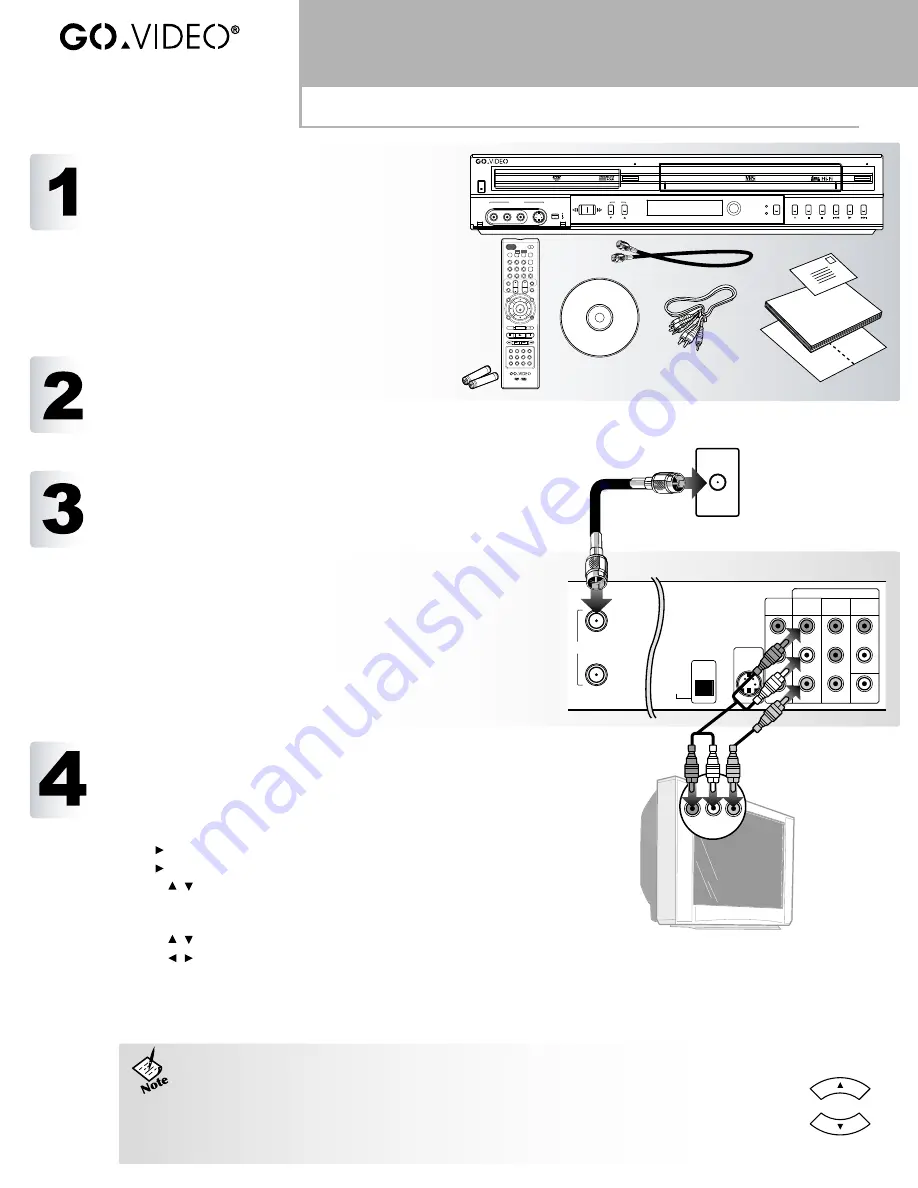
UNPACK YOUR DVD RVCR
• VR3930 DVD RVCR (1)
• Remote control (1)
• 1.5V AAA alkaline batteries (2)
• Audio/video cable (1)
• RF (Antenna) cable (1)
• User manual (1)
• Quick reference guide (1)
• Warranty registration card (1)
• Blank DVD-R disc (
2
)
INSERT REMOTE CONTROL BATTERIES
1
Remove battery cover on back of remote control.
2
Insert two 1.5V AAA batteries, paying attention to the
correct polarities (+/–).
3
Replace cover.
TV
POWER
CH
VOL
1
2
3
4
5
6
7
8
9
0
ENTER
VCR
REC
TRACK+
TRACK-
CHILD LOCK
REW
FF
PAUSE/STEP
STOP
PLAY
DISPLAY
REC MODE
TIMER RECORD
EJECT
INPUT
COPY
CLEAR
TV/VCR
TV POWER
MUTE
TV INPUT
SETUP
CH+
CH–
LIST
DVD
AUDIO
SUBTITLE ANGLE
ZOOM
ADD CHAP THUMBNAIL REPEAT
A-B
MARKER SEARCH
RANDOM
PREV
NEXT
RETURN
TITLE
DISC MENU
DVD RE VCR VR3930
EJECT
EJECT
COPY
DVD
VCR
DVD
VCR
POWER
CH
PAUSE
PLAY
REW
STOP
FF
REC
SELECT
AV 2 IN
DV IN
L - AUDIO - R
S-VIDEO
VIDEO
Rear of DVD RVCR
Television
DVD + VCR OUT
R
L
R
L
R
L
VIDEO
Pr
Pb
Y
COMPONENT/
PROGRESSIVE
VIDEO OUT
AV
OUT
AUDIO
OUT
AV 1
IN
S-VIDEO OUT
VIDEO
DIGITAL
AUDIO OUT
OPTICAL
COAXIAL
IN
(FROM ANT.)
OUT
(TO TV)
RF
A/V IN
RUN “AUTO CHANNEL SET”
Follow these instructions to scan for channels if you are using an antenna or basic cable TV
connection.
1
Press SETUP on the remote control.
• The VR3930 Setup menu appears.
2
Press to select “Tuning Band.”
3
Press again to highlight “TV.”
4
Use the / buttons to select “TV” or “CATV” and press ENTER:
• Select TV if you are using a standard antenna to receive channels.
• Select CATV if you are using basic cable to receive channels.
5
Use the / buttons to select “Auto Channel Set”.
6
Use the / buttons to highlight “Start” and press ENTER:
• Auto Channel Set scans all receivable channels in the selected Tuning Band and stores them in memory. This may take
several minutes.
• When scanning is complete, the DVD RVCR tunes to the lowest channel found. Press SETUP to exit the Setup
menu.
• If you are using an antenna or basic cable TV connection, the DVD RVCR clock is set
automatically whenever the unit is turned off. If the clock is set incorrectly, you can set the clock
manually in the Setup menu; see the User Manual for details.
• To select channels on the DVD RVCR, be sure to use the CH+/– buttons located above and
below the ENTER button, and NOT the CH keys in the TV control section, which are reserved for
MultiBrand TV control. See the User Manual to program the MultiBrand Remote.
CONNECT DVD RVCR
1
Connect the RF cable from your antenna or basic cable TV jack to
the RF IN (FROM ANT.) jack on the back panel of the DVD
RVCR.
2
Connect the supplied audio/video cable from the A/V OUT jacks
on the back panel of the DVD RVCR to the A/V IN jacks
on your television and/or stereo receiver.
3
Plug the DVD RVCR into a standard wall outlet and press
the POWER button on the remote control or front panel.
4
Turn on your TV and select the Video input connected to the DVD
RVCR.
5
The GoVideo splash screen will appear.
• Continue with “Auto Channel Set” below.
• See the User Manual for advanced connections.
CH+
CH–
Antenna/Cable


