background image

MDE-5412C Passport® EDGE Installation and Start-up Manual · February 2019

   Page 1

MDE-5412C

Passport

®

 EDGE Installation and Start-up Manual

February 2019

Introduction

Purpose

This manual provides instructions for:

• The importance of 

“Why a site survey is needed prior to installing the Passport

®

 Edge and

Secure Zone Router (SZR)”

• How to properly install the Passport Edge Hardware with the SZR
• How to configure the Passport Edge to support communication between Passport Edge

server and clients, PIN pads, dispensers, Applause

 Media System, and other site LAN

devices

Gilbarco

®

 Veeder-Root

®

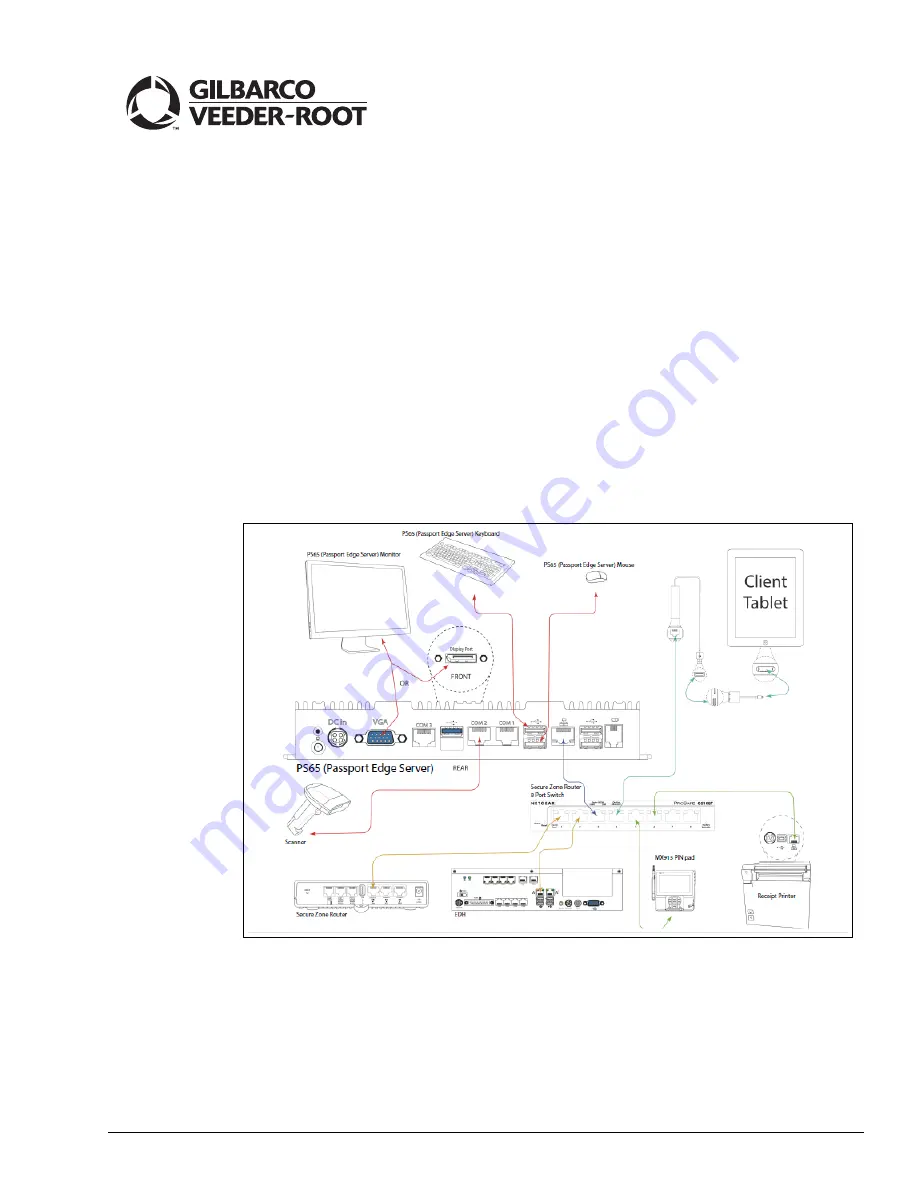
 introduces the Passport EDGE. The Passport Edge introduces new 

Passport Server (PS65) and Passport Client (Tablet) Hardware. The Passport Edge requires the 
installation of the SZR as the connection point for site LAN devices (see 

Figure 1

).

Figure 1: Passport EDGE Connection Point

Summary of Contents for Passport MDE-5412

Page 1: ... to properly install the Passport Edge Hardware with the SZR How to configure the Passport Edge to support communication between Passport Edge server and clients PIN pads dispensers Applause Media System and other site LAN devices Gilbarco Veeder Root introduces the Passport EDGE The Passport Edge introduces new Passport Server PS65 and Passport Client Tablet Hardware The Passport Edge requires th...

Page 2: ... s Training for installation of SZR Training for installation of Applause if installed Table of Contents Topic Page Introduction 1 Performing a Site Survey 5 Passport EDGE Hardware Setup 6 VeriFone MX915 PIN Pad 17 Xenon 1900 Scanner 22 Passport Edge Software Setup 24 Passport Edge Installation 72 Appendix A Epson TM M30 Programming 74 Appendix B GDS Programming 79 Appendix C Registering the Store...

Page 3: ...wood backboard may be needed Cable Tester Power Drill RJ 11 and RJ 45 mod plugs DSL Filters Crimping and punch down tools Cable ties for tying down LAN cables and power cords Label printer to label power supplies cables and Managed NETGEAR Switch es Power sStrip as required Gender Menders Q1380 63B Q13180 20B Q13180 17B Technical Assistance If you need assistance with the tasks detailed in this ma...

Page 4: ...stribution Box EDH Enhanced Dispenser Hub EMV Europay MasterCard and Visa GDS Gilbarco Deployment Service IP Internet Protocol ISP Internet Service Provider LAN Local Area Network LED Light Emitting Diode MG Manage Gateway MWS Manager Workstation PC Personal Computer PDL Parameter Data Load or Parameter Download POS Point of Sale SSL Secured Socket Layer or Secure Sockets Layer SZR Secure Zone Rou...

Page 5: ...red out to the Internet DO NOT proceed with the installation process if the Perimeter device or Internet Service Provider ISP are not provisioned and or the firewall settings are not correctly set as this will impede the SZR part of the installation from working properly IMPORTANT INFORMATION During the Site Survey select the correct template for this location refer to Secure Zone Router on page 6...

Page 6: ...ort EDGE clients tablets Enhanced Dispenser Hub EDH 2 receipt printer scanner report printer and Distribution Box D Box Figure 2 Passport EDGE Hardware Secure Zone Router The Passport Edge system uses the SZR PA04240000 as the device to connect IP based Gilbarco devices to it During the Site Survey process one of the template mentioned in the table see page 7 through page 12 is selected which indi...

Page 7: ... V LAN Segment Device 1 Switch Trunk IN MG 2 EDH EDH 3 POS TPOS Server 4 Auxiliary Tablet 1 5 PayDev PIN Pad 1 6 Auxiliary Receipt Printer 1 7 PaymentZone Payment 8 PayDev Dispensers 32T 8 FRONT EDGE PAYMENT TRUNK Port V LAN Segment Device 1 Switch Trunk IN MG 2 EDH EDH 3 POS TPOS Server 4 Auxiliary Tablet 1 5 PayDev PIN Pad 1 6 Auxiliary Receipt Printer 1 7 PaymentZone Payment 8 Switch Trunk OUT ...

Page 8: ...let 2 9 PayDev PIN Pad 2 10 Auxiliary Receipt Printer 2 11 Auxiliary Applause 12 PayDev Dispensers 13 Not Used Not Used 14 Not Used Not Used 15 Not Used Not Used 16 Not Used Not Used 35T 16 FRONT EDGE PAYMENT Port V LAN Segment Device 1 Switch Trunk IN MG 2 EDH EDH 3 POS TPOS Server 4 Auxiliary Tablet 1 5 PayDev PIN PAD 1 6 Auxiliary Receipt Printer 1 7 Payment PAYMENT 8 Auxiliary Tablet 2 9 PayDe...

Page 9: ... another switch 2 Auxiliary Tablet 2 3 PayDev PIN Pad 2 4 Auxiliary Receipt Printer 2 5 Not Used Not Used 6 Not Used Not Used 7 Auxiliary Applause Media System 8 PayDev Dispensers 32T 8 FRONT EDGE PAYMENT TRUNK Port V LAN Segment Device 1 Switch Trunk IN MG 2 EDH EDH 3 POS TPOS Server 4 Auxiliary Tablet 1 5 PayDev PIN Pad 1 6 Auxiliary Receipt Printer 1 7 Not Used Not Used 8 Switch Trunk OUT To an...

Page 10: ...Port V LAN Segment Device 1 Switch Trunk IN MG 2 EDH EDH 3 POS TPOS Server 4 Auxiliary Tablet 1 5 PayDev PIN Pad 1 6 Auxiliary Receipt Printer 1 7 Auxiliary Customer Display 1 8 PayDev Dispensers 40T 8 FRONT EDGE CD PAYMENT Port V LAN Segment Device 1 Switch Trunk IN MG 2 EDH EDH 3 POS TPOS Server 4 Auxiliary Tablet 1 5 PayDev PIN Pad 1 6 Auxiliary Receipt Printer 1 7 Auxiliary Customer Display 2 ...

Page 11: ...IN From front another switch 2 Auxiliary Tablet 2 3 PayDev PIN Pad 2 4 Auxiliary Receipt Printer 2 5 Auxiliary Customer Display 2 6 Not Used Not Used 7 Auxiliary Applause 8 PayDev Dispensers 43T 8 FRONT EDGE CD PAYMENT TRUNK Port V LAN Segment DEVICE 1 Switch Trunk IN MG 2 EDH EDH 3 POS TPOS Server 4 Auxiliary Tablet 1 5 PayDev PIN Pad 1 6 Auxiliary Receipt Printer 1 7 Auxiliary Customer Display 1...

Page 12: ... Used 9 Auxiliary Tablet 2 10 PayDev PIN Pad 2 11 Auxiliary Receipt Printer 2 12 Auxiliary Customer Display 2 13 Auxiliary Applause 14 PayDev Dispensers 15 Not Used Not Used 16 Not Used Not Used 46T 16 FRONT EDGE CD PAYMENT Port V LAN Segment Device 1 Switch Trunk In MG 2 EDH EDH 3 POS TPOS Sever 4 Auxiliary Tablet 1 5 PayDev PIN PAD 1 6 Auxiliary Receipt Printer 1 7 Auxiliary Customer Display 1 8...

Page 13: ... 18 inches above the floor and if mounted in the manager s office area consideration should be taken as to CAT5 cabling along with Serial Line Booster s that maybe needed due to the fact that the scanners are connected to the PS65 on either COM 1 and or COM 2 port The Passport Edge PS65 supports a Visual Graphics Adapter VGA type monitor customer provided along with a USB keyboard and USB mouse cu...

Page 14: ...ox so that they communicate to the Passport EDGE once the installation completes Use at least two four is recommended 8 X 1 inch wood screws to mount the PS65 see Figure 5 on the left and right side of the unit using the keyholes on the PX65 Ensure that you mount the PS65 in a position that allows the cashier and manager to view the Light Emitting Diodes LEDs see Figure 6 and prevent liquid from e...

Page 15: ...he installation of the Passport Edge with the EDH note that if you are converting a site that currently has a PX52 Passport with an EDH PA04030000 that EDH can be used if the EDH has installed 2G of memory and a 16G compact flash card formatted for NTFS to work properly If these items are not installed then they MUST be installed prior to upgrade the location site IMPORTANT INFORMATION Passport Cl...

Page 16: ... BASIC Port V LAN Segment DEVICE 1 Switch Trunk In MG 2 EDH EDH 3 POS TPOS Server 4 Auxiliary Tablet 1 5 POS PIN Pad 1 6 Auxiliary Receipt Printer 1 7 Not Used Not Used 8 Auxiliary Tablet 2 9 PayDev PIN Pad 2 10 Auxiliary Receipt Printer 2 11 Auxiliary Applause Media System 12 PayDev Dispensers 13 Not Used Not Used 14 Not Used Not Used 15 Not Used Not Used 16 Not Used Not Used ...

Page 17: ...nnects to the SZR using a CAT5 cable see Figure 9 For PIN pad installation instructions refer to MDE 5213 VeriFone MX915 PIN Pad Installations Instructions 30T 8 FRONT EDGE BASIC Port V LAN Segment DEVICE 1 Switch Trunk In MG 2 EDH EDH 3 POS TPOS Server 4 Auxiliary Tablet 1 5 PayDev PIN Pad 1 6 Auxiliary Receipt Printer 1 7 Auxiliary APPLAUSE 8 PayDev DISPENSERS Example of the 8 port switch Figure...

Page 18: ...liary Receipt Printer 1 7 Not Used Not Used 8 Auxiliary Tablet 2 9 PayDev PIN Pad 2 10 Auxiliary Receipt Printer 2 11 Auxiliary Applause 12 PayDev Dispensers 13 Not Used Not Used 14 Not Used Not Used 15 Not Used Not Used 16 Not Used Not Used Page 18 MDE 5412C Passport EDGE Installation and Start up Manual February 2019 VeriFone MX915 PIN Pad ...

Page 19: ...ver 4 Auxiliary Tablet 1 5 PayDev PIN Pad 1 6 Auxiliary Receipt Printer 1 7 Auxiliary Applause 8 PayDev Dispensers 34T 16 FRONT EDGE BASIC Port V LAN Segment DEVICE 1 Switch Trunk In MG 2 EDH EDH 3 POS TPOS Server 4 Auxiliary Tablet 1 5 POS PIN Pad 1 6 Auxiliary Receipt Printer 1 7 Not Used Not Used 8 Auxiliary Tablet 2 9 PayDev PIN Pad 2 10 Auxiliary Receipt Printer 2 11 Auxiliary Applause 12 Pay...

Page 20: ...ut maybe required in other locations based on local requirements 30T 8 FRONT EDGE BASIC Port V LAN Segment Device 1 Switch Trunk IN MG 2 EDH EDH 3 POS TPOS Server 4 Auxiliary Tablet 1 5 PayDev PIN Pad 1 6 Auxiliary Receipt Printer 1 7 Auxiliary Customer Display 1 8 PayDev Dispensers 34T 16 FRONT EDGE CD BASIC Port V LAN Segment DEVICE 1 Switch Trunk IN MG 2 EDH EDH 3 POS TPOS Server 4 Auxiliary Ta...

Page 21: ...412C Passport EDGE Installation and Start up Manual February 2019 Page 21 VeriFone MX915 PIN Pad Example of the 8 port switch Figure 11 Connecting Passport Customer Display to the SZR Customer Display Cable ...

Page 22: ...om Xenon 1900 to the Passport Edge Server is more that 50 feet a serial line booster maybe required to ensure communication For more information refer to the table in Table of Serial Line Booster Requirements when and if needed to select the type of serial line booster that might be needed Figure 12 Connecting Xenon 1900 Scanner to Passport EDGE Server Table of Serial Line Booster Requirements whe...

Page 23: ...ort Report Printer The Passport Edge system will use the Brother Compact Laser Report Printer PA03400008 Follow the installation instructions found in the shipping box to connect this printer to the Passport Edge Server using a USB cable Figure 13 Connecting Brother Report Printer to Passport EDGE Server ...

Page 24: ...nstallation instructions for the Passport PS65 Passport EDGE Server PA0324PS65 along with the different devices that are connected to it to form the Passport EDGE System If the location site is equipped with a PX52 or PX60 perform the steps found in Appendix E Moving a Snapshot Backup from the PX52 PX60 System on page 85 to transfer the information contained in those systems to the Passport Edge S...

Page 25: ...ion starts If the software needs to be reloaded the installation should start from step 1 In either case the default IP address of PS65 is 10 5 48 2 DO NOT CHANGE THIS SETTING IMPORTANT INFORMATION To complete software installation on PS65 proceed as follows 1 Boot up the PS65 device using the USB Thumb Drive KS7S65 001FD for either version 11 02J and or version 11 04B 2 When powering up press F7 ...

Page 26: ...ory image recovery screen opens leave the USB thumb drive plugged in as it contains the PS65 recovery images Figure 16 Passport EDGE Image Recovery Screen 5 From the Available Images field select 11 02 xx01JMP2 tbi or 11 04xx 01BMP7 tbi or higher depending on what version is required for this location Figure 17 Selecting the Machine Type ...

Page 27: ...Page 27 Passport Edge Software Setup 6 Once the server image is selected click Restore Figure 18 Clicking Restore Figure 19 Restore in Progress 7 The device will reboot when this process is completed Remove the USB Thumb Drive from PS65 Server as the reboot process starts ...

Page 28: ...sport Edge Software Setup 8 As the PS65 reboots the following screens open see Figure 20 Figure 20 Reboot Screen i ii 9 Once the installation process completes the branding screen opens Select the correct brand for the location that you are installing Figure 21 Brand Selection Screen ...

Page 29: ...February 2019 Page 29 Passport Edge Software Setup 10 Once the brand is selected select Yes to start the process Figure 22 Starting the Branding Process 11 Once the branding process is completed the Passport login screen opens Figure 23 Passport Login Screen ...

Page 30: ...yalty Interface Multiple Loyal Interface and Tablet POS 2 The only other feature bundle that can be activated with Passport Edge is Mobile Payment Figure 24 Passport Activation Application 13 Once the feature bundle process is complete install any service and or maintenance packs that might be required for the brand you have selected Note This should be completed prior to moving onto the EDH2 or T...

Page 31: ...lcenter as the user and the weekly password Figure 26 System Maintenance Screen b From System Maintenance screen select Call Center Adv User Figure 27 Selecting Call Center Adv User c To open Image Control Panel enter Username as PassporttTech and the correct password in the Please Sign On dialog box and click OK Figure 28 Image Control Panel Login Dialog Box ...

Page 32: ...t Edge Software Setup d From the Image Control Panel select Window Control Panel Figure 29 Image Control Panel Login Dialog Box e Once the Adjust you computer s Setting screen opens under Appearance and Personalization select Adjust screen resolution Figure 30 Adjusting Screen Resolution ...

Page 33: ...ge the appearance of your display screen select 800X600 from the Resolution drop down list and then select Landscape from the Orientation drop down list Figure 31 Changing Appearance of the Screen g Once this is done click OK The system will ask if you want to apply these settings select Yes Figure 32 Confirming Settings ...

Page 34: ...lation and Start up Manual February 2019 Passport Edge Software Setup h Once this is completed reboot the PS65 Once it reboots the Passport screen should be displayed in Landscape orientation Figure 33 Correct Orientation of passport Screen ...

Page 35: ...er connections that are required for EDH refer to MDE 4910 Passport Enhanced Dispenser Hub Connections Manual and MDE 5239 Passport EDH2 Installation Start up and Service Instructions Loading the software onto the EDH2 requires the software upgrade on the PS65 Edge Server to be completed To install the software after the EDH2 is connected proceed as follows 1 Connect a monitor USB keyboard and a U...

Page 36: ...ick Clean Image When the screen loads it will automatically search all the drives attached and networked looking for image files Ghost GHO old Image for Windows IMG new Image for Windows TBI Figure 35 Selecting Clean Image 5 Select the E40 8 25PE60 TBI image that matches the EDH2 hardware profile Figure 36 Selecting the E40 8 25PE60 TBI Image ...

Page 37: ...estoring the Clean Image i ii 7 After the installation completes approximately 5 minutes with USB 2 0 enabled the EDH will automatically reboot Remove the USB drive any time after the reboot 8 After the reboot is completed the following screen opens see Figure 38 Figure 38 Login Screen After the OS installation is completed on the EDH the remaining steps is performed on the Passport EDGE Server 9 ...

Page 38: ...l February 2019 Passport Edge Software Setup 10 From the System Maintenance toolbar select Tools Dashboard Figure 39 System Maintenance Toolbar Tools Dashboard 11 From the Dashboard Main window click Push And Install Packages on EDH Figure 40 Selecting Clean Image ...

Page 39: ...ssport Edge Software Setup 12 The ASU tab opens EDH installation progress is shown on the ASU tab Monitor the EDH installation progress in the Automated Software Upgrade ASU window Figure 41 EDH Installation Progress Bar 13 The EDH dashboard reboots Figure 42 EDH Dashboard Rebooting ...

Page 40: ...Service Maintenance Pack if installed on the server Figure 43 Loading the Passport Service Maintenance Pack 15 After successfully installing the Passport Service Maintenance Packs the EDH Dashboard will reboot the EDH 16 After the reboot is successful the final screen when ASU connects again opens see Figure 44 Figure 44 Screen after ASU Connects Again ...

Page 41: ...lete for this process go to Platform Support Open and Connect PSS on EDH Figure 45 Selecting Open and Connect PSS on EDH 18 Once all buttons become active ensure that the EDH Brand and Server Brand are showing the same information Figure 46 Selecting EDH Brand 19 Close the EDH Dashboard The programming is now complete ...

Page 42: ...ly IPad tablet currently support are Apple iPad 9 7 5th and 6th Generation and the iPad Pro 9 7 both equipment with 32GB and Wi Fi IMPORTANT INFORMATION Page 42 MDE 5412C Passport EDGE Installation and Start up Manual February 2019 Passport Edge Software Setup Passport Client Tablet To configure and set up the Passport Edge tablets Cashier Workstation CWS proceed as follows Configuration of the ta...

Page 43: ...ections for the tablet have been completed to ensure connectivity between the tablet and SZR For additional information refer to the passport edge enclosure training portion within the SABA Training IMPORTANT INFORMATION 1 Ensure that the tablet is on the latest version of software 2 From the main screen tap the Setup icon Figure 47 Selecting Setup Menu 3 Ensure that both the Wi Fi and Bluetooth c...

Page 44: ... Manual February 2019 Passport Edge Software Setup 4 Tap Display Brightness Figure 49 Selecting Display Brightness 5 Set the screen brightness to about 75 percent Figure 50 Setting the Screen Brightness 6 Set the Auto Lock to Never Figure 51 Setting Auto Lock ...

Page 45: ...ablet Number Main IP Address Subnet Mask Default Gateway Tablet One 10 5 61 2 255 255 254 0 10 5 60 1 Tablet Two 10 5 61 3 255 255 254 0 10 5 60 1 9 From the Setting screen select Ethernet Apple USB Ethernet Adapter DNS SERVER setting and then configure the DNS IP Address using the information in the table below Figure 53 Configuring LAN Connection DNS Server DNS IP Address SZR power by Acumera lo...

Page 46: ...that are going to be connected to the SZR should be online the minimum devices connected to the SZR are the Edge Sever and all tablet s Once this is accomplished contact Acumera at 1 512 687 7401 Press option 1 or Gilbarco Help Desk at 1 800 743 7501 Press option 3 Press option 2 to register the equipment This must be completed so that the Edge Sever and tablet s can communicate in order to procee...

Page 47: ... the Passport Edge Server To configure the Passport Edge Server prior to connecting to the tablet proceed as follows 1 In Register Setup enter the correct number of register s Figure 54 Entering the Registers 2 Enter the register s and the IP addresses for the receipt printer and PIN Pad Figure 55 Entering the Registers ...

Page 48: ...isters 4 Click Save to complete this part of the tablet configuration Configuring the Tablet s After Connecting and Registering onto the SZR To configure the tablet s after connecting and registering onto the SZR proceed as follows 1 Using safari go to http passportedge com Note This is a non SSL URL so do not enter the port number as it is set to 80 by default Figure 57 Logging into Passport Edge...

Page 49: ...oftware Setup 2 The screen with the links to the configured terminals opens with two links that are used to secure the tablet to the sever The links are root and intermediate Figure 58 Screen with the Links to Configured Terminals 3 Click Root to install the certification Figure 59 Clicking Root ...

Page 50: ... and Start up Manual February 2019 Passport Edge Software Setup 4 Tap Allow to see the configuration profile Figure 60 Installing the Certificates Screen 2 5 Tap Install to install the certification Figure 61 Installing the Certificates Screen 1 ...

Page 51: ...sport Edge Software Setup 6 Tap Install to install the certification Figure 62 Installing the Certificates Screen 3 Figure 63 Installing the Certificates Screen 4 7 Tap Done to return to the main screen and install the next certification Figure 64 Installing the Certificates Screen 5 ...

Page 52: ...lation and Start up Manual February 2019 Passport Edge Software Setup 8 Tap Intermediate and install the certification Figure 65 Clicking Intermediate 9 Tap Install to install the certification Figure 66 Installing the Certificates Screen 1 ...

Page 53: ...19 Page 53 Passport Edge Software Setup 10 Tap Allow to see the configuration profile Figure 67 Installing the Certificates Screen 2 11 Tap Install to install the certification Figure 68 Installing the Certificates Screen 3 Figure 69 Installing the Certificates Screen 4 ...

Page 54: ...een 3 Figure 71 Installing the Certificates Screen 4 13 Tap the home button and use the following steps to authorize the root certification to validate servers a Go to iPad settings applications b Tap Settings General About Certificate Trust Settings Enable the Certificate Trust Settings to allow the certificate to verify the servers Figure 72 Installing the Certificates Figure 73 Enabling the Gil...

Page 55: ...he following screen indicates that the certificates are activated Figure 75 Activated Certificate 14 Using Safari enter https passportedge com 7501 The tablet is unauthorized and needs a device key to pair it with the Passport Edge Server Use https passportedge com 7502 for second Tablet Workstation Note HTTPS must be used Figure 76 Pairing the Tablet with the Passport Edge Server ...

Page 56: ...and Start up Manual February 2019 Passport Edge Software Setup 15 To obtain that device key click I don t care show me my device Key Figure 77 Obtaining the Device Key 16 Note the device key displayed on the screen Figure 78 Noting the Device key ...

Page 57: ...r use enter the device key as shown in Figure 79 Note Device Key used in this figure is an example and not the device key used for pairing the tablet Figure 79 Entering the Device key 18 Once the tablet is authorized the following login screen opens To add the new software icon to the Home page tap the pin icon on the top of the page Figure 80 PIN to Homepage ...

Page 58: ...add this new feature to is displayed Select Add to Home Page Figure 81 Adding Home Page 20 Once you have selected the Add to Home Screen icon the EDGE icon is displayed Tap the Add icon to assign that icon to the Home Page Figure 82 Assigning EDGE icon to Home Page 21 Press the Home button then move the EDGE icon to the selection bar Figure 83 Moving EDGE icon to Selection Bar ...

Page 59: ...ollowing steps are used to change that setting to 10 5 61 53 so that the printer can be used for a second CWS IMPORTANT INFORMATION Note Before beginning the configuration ensure that you have administrator right on the laptop PC that you will be using 1 Power up the printer while holding down the paper feed button 2 When the blue light flashes five times release the paper feed button 3 The Epson ...

Page 60: ...of the laptop Note The following example includes typical Epson Printer Default settings The default IP address settings are listed in the following table Main IP Address Subnet Mask Default Gateway 192 168 192 168 255 255 255 0 0 0 0 0 6 Ensure that you can ping the Epson Printer using the IP information off of the printout provided earlier 7 Enter the IP address that the printer printed in the a...

Page 61: ...e Setup 8 Click Continue to this web site not recommend to open the following pop up window see Figure 87 Figure 87 Windows Security 9 Enter the User name as epson and Password as epson and then click OK Note The username and password fields are case sensitive Figure 88 Entering User Name and Password ...

Page 62: ...the Epson TCP IP programming screen Note The IP address used will should reflect what CWS it is tied two Ensure that the acquired IP address is set to manual and all other settings are set as shown in Figure 90 Figure 90 Network Configuration Receipt Printer Number Main IP Address Subnet Mask Default Gateway Receipt Printer One 10 5 61 52 255 255 254 0 10 5 60 1 Receipt Printer Two 10 5 61 53 255 ...

Page 63: ...hown in the following table PIN Pad Number Main IP Address Subnet Mask Default Gateway PIN Pad One 10 5 55 11 255 255 255 0 10 5 55 1 PIN Pad Two 10 5 55 12 255 255 255 0 10 5 55 1 Passport Customer Display To configure and set up the Passport customer display proceed as follows Note Ensure that you have administrator right on the laptop PC that you will be using 1 Connect the Serial to IP Adapter...

Page 64: ...at after configuring the IP to Serial Adapter you can return your laptop to original settings 6 Configure the laptop PC with the following IP settings see Figure 92 Figure 92 Internet Protocol Version 4 TCP IPv4 Dialog Box Field Description IP address 192 168 0 1 Subnet mask 255 255 255 0 Default gateway N A 7 On the laptop PC open Internet Explorer or Google Chrome and enter 192 168 0 7 in the ad...

Page 65: ...assport Edge Software Setup 8 When prompted for a User name and Password enter admin in both the fields Note User name and password are both in lower case Figure 94 Entering Username and Password On login the following screen opens 9 Click Serial Port Figure 95 Clicking Serial Port ...

Page 66: ...mation provided in the table and click Save Figure 96 Serial Port Parameters Field Description Baud rate 9600 Data Size 8 bits Parity None Stop Bits 1 bit Local Port Number 10002 Remote Port Number 10002 Work Mode TCP Server Remote Server Address 192 168 0 201 RESET Cleared LINK Selected INDEX Cleared Similar RFC2217 Selected ...

Page 67: ...7 Making Changes Active 12 Select Local IP Config and the screen as shown in figure Figure 98 opens Figure 98 Local IP Config Screen 13 Program one of the two IP addresses listed in the table Note The IP used will should reflect the CWS it is connected to Customer Display Number Main IP Address Subnet Mask Default Gateway Customer Display one 10 5 61 102 255 255 254 0 10 5 60 1 Customer Display tw...

Page 68: ...and then click OK to make the changes active Figure 100 Making Changes Active 16 Connect the customer display to the Serial to IP Adapter and then connect the Serial to IP Adapter to the SZR using the template that was selected from page 7 through page 12 17 Once connected contact Acumera at 1 512 687 7401 and press option 1 or contact Gilbarco TAC at 1 800 743 7501 Select option 3 then option 2 t...

Page 69: ...g the correct IP address for each of the customer displays to the correct register positions Figure 101 Example of the Register Setup Screen 19 After configuring the registers on the MWS click Save and exit the Register setup screen 20 To configure message that is displayed on the MWS go to Setup Register Register Group Maintenance Figure 102 Programming Display Message ...

Page 70: ... Register Group and click Change Figure 103 Register Group Maintenance Screen 22 Select the Customer Display tab to program in the customer display message Note If the customer would like the idle message to scroll select the check box Message on the customer display should scroll during idle times Figure 104 Customer Display Message ...

Page 71: ...a dongle or a CAT5 cable with a Q13180 63 gender adapter Programming of the Xenon scanner is completed by using MDE 4956 Honeywell Xenon 1900 Scanner Setup Service Instructions with the settings required to meet the site s needs age verification QR codes etc as well as those required by the site s backoffice provider Passport Report Printer Configuration and setup of the Passport Edge Brother Repo...

Page 72: ...sed i e install additional LAN cabling etc Connect to the site s perimeter ISP device using the same method that was used during the site survey with your laptop to ensure that you can connect to www acuvigil acumera net Verify with the network administrator or Internet provider that the Perimeter ISP Device setting s is correctly set Confirm that all site devices are currently working correctly b...

Page 73: ...ts connected to the SZR and any required IP Addresses for third party providers For more information on InSite360 refer to steps in Appendix C in MDE 7171 Insite360 Passport Configuration and Troubleshooting Manual for Passport V10 and Later For more information refer to steps in Appendix B in MDE 5157 Gilbarco Deployment Service GDS Start up and Service Manual Notify that the IT Owner is aware if...

Page 74: ...Schema information in step 5 IMPORTANT INFORMATION Note Before beginning the configuration ensure that you have administrator right on the laptop PC that you will be using 1 Ensure that the Epson Ethernet printer is plugged into the laptop PC using a standard CAT5 cable 2 Power up the printer once connected to the Laptop and in a minutes the following IP will appear see Figure 106 Note This is an ...

Page 75: ...30 Programming 3 Enter the IP address that the printer printed see Figure 106 in the address bar of your laptop and click the search button Figure 107 Entering the IP Address 4 Click Continue to this web site not recommend to open the following pop up window see Figure 108 Figure 108 Windows Security ...

Page 76: ...M30 Programming 5 Enter the User name as epson and Password as epson and then click OK Note The user name and password section is case sensitive Figure 109 Entering User Name and Password 6 Select and expand Network Interface TCP IP Basic Information tab Figure 110 Network Interface Basic Information ...

Page 77: ... 60 1 Configuration of the Receipt Printer s is done using a routing device with the EpsonNet Configuration Tool loaded onto a laptop PC IMPORTANT INFORMATION 8 Once the IP Address information is entered click Send Press Reset once it is displayed on screen To configure the receipt printer using a routing device with the EpsonNet Configuration Tool proceed as follows 1 Ensure that the EpsonNet Con...

Page 78: ... Epson TM M30 Programming 5 Enter the IP address in the address bar and click the search button The following screen opens see Figure 112 Figure 112 Configuring Epson Ethernet Printer 6 Select and expand Network Interface TCP IP highlight the Basic tab Figure 113 Expanding Network Interface ...

Page 79: ...ng GDS To configure GDS proceed as follows 1 Access the GDS Configuration Application Central Deployment GDS through Image Control Panel Note Passport Image Control Panel may vary by version Figure 114 Accessing GDS Configuration Application Do not change the central server IP address IMPORTANT INFORMATION Figure 115 Central Server IP Address ...

Page 80: ...7498 to retrieve the GVR ID 3 Enter the GVR ID and click Look Up Store Id Figure 116 Passport Central Deployment The following error message is displayed if the GVR ID is entered incorrectly IMPORTANT INFORMATION The following error message is displayed when the network connectivity from the MWS through the SZR to the GDS Server is not established ...

Page 81: ...he Register Store ID button is also enabled if the store has not been previously registered If the store is registered and there is a problem then contact Gilbarco Technical Assistance Center TAC to have the registration flag reset Figure 117 Passport Central Deployment 1 After the registration is successful the screen as shown in Figure 118 opens Click Look Up Store Id Figure 118 Passport Central...

Page 82: ...s received from the BOS Price Sign enabled Apply fuel price changes immediately If Passport has Price Sign configured this field is available If selected when Passport receives fuel price changes from Insite360 Passport immediately downloads fuel price changes to dispensers and price sign If not selected when Passport receives fuel price changes from Insite360 Passport displays a notification on t...

Page 83: ... 6 If registration is unsuccessful refer to the Troubleshooting section in MDE 5171 Insite360 Passport Configuration and Troubleshooting Manual for Passport V10 and Later 7 If the registration is successful select Save to save the configuration to the Passport database and exit from Insite360 interface 8 To verify if Insite360 has registered the store successfully contact the Gilbarco Help Desk at...

Page 84: ...ct Language Recommended is English 2 Select Your Country or Region Recommended is USA 3 Connect to Wi Fi This is Recommended for updates to be performed on the tablet 4 Allow Touch ID Recommended to not set up 5 Create a Passcode for the iPad Recommended to not set up 6 Set up as New iPad Recommended to be used 7 Set up Apple ID Recommended to not log in with an Apple ID 8 Set up App Analytics Rec...

Page 85: ... part of the data restore process IMPORTANT INFORMATION Before beginning the snapshot process s ensure the following 1 Using Figure 120 check the feature bundles that are currently turned on in the Passport system If there are bundles that are currently turned ON that will not be available when the Passport Edge is installed those MUST be discussed with the manager owner prior to the conversion Fi...

Page 86: ...ore moving to the next step 4 In register setup the POS registers should be deleted so that after the data is converted the new TabletPOS register can be added Note Ensure that the register number 99 is NOT removed as that is used by Passport to book dispenser sales Figure 121 Register Setup Screen 5 In System Recovery Maintenance clear the mirroring option to avoid unnecessary calls to the Help D...

Page 87: ...plete the following steps on the PX52 PX60 System 1 From Passport MWS access System Maintenance Note Use the second level User Name and Password 2 From the System Maintenance toolbar select Call Center Figure 123 System Maintenance Call Center 3 From the Call Center tab select Adv User Figure 124 Call Center Tab 4 Enter the user name as PassportTech and the required password ...

Page 88: ...the Passport Image Control Panel select System Recovery Note Passport Image Control Panel may vary by version Figure 125 System Recovery 6 Connect external drive to the unused USB port on the rear of the PX52 PX60 Passport System 7 From the Passport System Recovery screen select Tool Snapshot Backup Take a Snapshot Backup Figure 126 Snapshot Backup ...

Page 89: ...PX60 System 8 Wait for the snapshot process to complete then exit from the Passport System Recovery screen 9 In the Image Control Panel Screen select Windows Explorer d gilbarco snapshot and copy the directory to USB Drive Note Passport Image Control Panel may vary by version Figure 127 Snapshot Backup Figure 128 Snapshot Screen ...

Page 90: ...11 Select Shutdown from System Maintenance Figure 129 System Maintenance Shutdown 12 Verify that the Passport Server is completely shut down remove PX52 60 hardware cables monitor etc Note All peripherals will be reused 13 Install the new PS65 hardware that has been either preloaded from the Gilbarco factory with Passport V11 02 or pre staged from the factory location 14 Power ON the server PS65 s...

Page 91: ... Note Use the second level User Name and Password 2 From the System Maintenance toolbar select Call Center Figure 130 System Maintenance Call Center 3 Select Adv User from the Call Center tab Figure 131 System Maintenance Call Center 4 Enter the user name as PassportTech and password as required and the screen shown in Figure 132 on page 92 is displayed 5 Insert USB drive containing the snapshot d...

Page 92: ...ving a Snapshot Backup from the PX52 PX60 System 7 Open System Recovery on PS65 and click Upgrade Figure 132 System Recovery Upgrade 8 Browse and select USB Drive Snapshot directory specifically the version txt file and click Open as shown in Figure 133 Figure 133 USB Drive Snapshot Directory ...

Page 93: ...ackup from the PX52 PX60 System 9 Verify that the source field contains the proper snapshot that was selected from the USB device Figure 134 Verifying Proper Snapshot 10 Click Restore Backup and Migrate Data as shown in Figure 134 on page 93 11 Read the warning confirm that everything is correct and click Yes ...

Page 94: ...kup from the PX52 PX60 System Figure 135 Conforming Snapshot 12 On clicking Yes another warning message is displayed Click Yes Figure 136 Warning Message During the migration steps notice the following different console windows populate at various times during the restore process Figure 137 Restore and Migration ...

Page 95: ...a few minutes i Replication ii CSoft Database iii Fuel iv CRIND v Misc e Setting the Brand f Saving registry keys to files g Checking integrity of GlobalSTORE Database h Performing Full Backup of databases i Performing extract j Installing Reinstallation of Replication k Reapplying Jobs 13 Once the restore process is complete a message is displayed see Figure 138 Click Yes to reboot the machine Fi...

Page 96: ...port Edge POS Appendix F Converting Site from a Non Gilbarco POS to a Passport Edge POS To convert from a non Gilbarco POS proceed as follows Work with the site owner manager to understand what data on the current POS they need to convert or program into the Passport EDGE Work with the site owner manager to understand the disposition of the current equipment once it is removed 24 hours prior to in...

Reviews: