Genexis FiberTwist G6426, Installation Manual
The Genexis FiberTwist G6426 is a cutting-edge networking device that offers lightning-fast internet connectivity. Ensure a hassle-free installation by following the step-by-step instructions provided in the easy-to-understand Installation Manual. Download it for free from our website to unlock the device's full potential.
Share
Download


Reviews:
No comments
Related manuals for FiberTwist G6426

PowerLine DHP-W611AV
Brand: D-Link Pages: 78

340
Brand: Vanguard Pages: 121

I-7532M-FD
Brand: ICP DAS USA Pages: 48

WF-2572
Brand: ICP DAS USA Pages: 24

MSM-508
Brand: ICP DAS USA Pages: 4

QMiroPlus-201W
Brand: QNAP Pages: 20

Nighthawk M6 Pro
Brand: AT&T Pages: 2

RAXE500
Brand: NETGEAR Pages: 169

FWA8207 Series
Brand: IBASE Technology Pages: 39

18x18 Card Cage
Brand: WolfPack Pages: 31

FieldPoint FP-3000
Brand: National Instruments Pages: 118

EVK-351
Brand: Unex Pages: 27

WP2002000-01
Brand: Lantronix Pages: 75
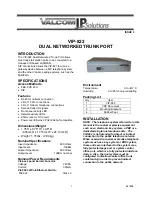
VIP-822
Brand: Valcom Pages: 4

HRDSL512P4
Brand: Hamlet Pages: 11

ipBTS C30
Brand: Airvana Pages: 90

DR-8364F
Brand: Idis Pages: 16

IR615-S Series
Brand: InHand Pages: 69


