Geemarc AMPLIDECT 260, User Manual
The Geemarc AMPLIDECT 260, a state-of-the-art amplified telephone, offers exceptional sound quality and enhanced volume control for individuals with hearing impairment. Ensure optimal usage by accessing the free User Manual available for download at manualshive.com - your trusted source for comprehensive product guidance and support.
Share
Download


Reviews:
No comments
Related manuals for AMPLIDECT 260

Liberty
Brand: WatchOvers Pages: 10

SIP-T23P
Brand: Yealink Pages: 3

V6201
Brand: TCL Pages: 25
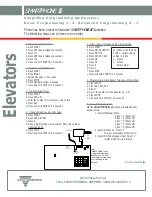
SMARTPHONE III
Brand: RATH MICROTECH Pages: 2

CW30
Brand: Catchwell Pages: 101

PhoneEasy 337ip
Brand: Doro Pages: 144

TP1705EN
Brand: Activexpression Pages: 20

FIG FLIP
Brand: Kosher Pages: 19
814SH
Brand: SoftBank Pages: 357

Alcatel 9015W
Brand: TCL Pages: 62

PP4GA-160C
Brand: Pantech Pages: 82

Shuttle CDM8964VM
Brand: UTStarcom Pages: 39

SM-J120H
Brand: Samsung Pages: 87

GSM EB-G500 Series
Brand: Panasonic Pages: 40

Z730
Brand: Zte Pages: 116

T41P
Brand: Commander Pages: 120

PIX2000
Brand: Oricom Pages: 67

C2-03
Brand: Nokia Pages: 9


