GE Monogram ZDI15, Руководство пользователя
Владение руководством GE Monogram ZDI15 является обязательным для правильной эксплуатации данного продукта. Вы можете загрузить бесплатное руководство пользователя с нашего сайта manualshive.com. Это даст вам полную информацию о функциях и настройках вашего устройства, обеспечивая оптимальную производительность и долгий срок службы.
Поделиться
Скачать


Отзывы:
Нет отзывов
Похожие инструкции для Monogram ZDI15

1200 series
Бренд: U-Line Страницы: 21

Monogram Refrigerator
Бренд: GE Страницы: 2

IM-4A
Бренд: GE Страницы: 8

Monogram Refrigerator
Бренд: GE Страницы: 12

monogram ZDIC150
Бренд: GE Страницы: 12

UCC15NP
Бренд: GE Страницы: 84

IM4D
Бренд: GE Страницы: 12

Ice Maker
Бренд: Rangemaster Страницы: 8

Q25
Бренд: Bartscher Страницы: 30

Q25
Бренд: Bartscher Страницы: 52

ECO Series
Бренд: IceTech Страницы: 28

ICE20A
Бренд: BARMATIC Страницы: 32

DSIM100
Бренд: Dash Страницы: 28

IM Series
Бренд: icetro Страницы: 50

IC Series
Бренд: icetro Страницы: 37

Outdoor Series
Бренд: U-Line Страницы: 28

Petra
Бренд: Yonanas Страницы: 32
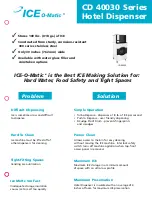
Hotel Dispenser CD 40030 Series
Бренд: Ice-O-Matic Страницы: 2


