background image

Pub No. DWWR1053E

GC*200YAWC**

GC*200YHWC**

GC*200NGWC**

GC*200NHWC**

Summary of Contents for GCW200YAWC

Page 1: ...Pub No DWWR1053E GC 200YAWC GC 200YHWC GC 200NGWC GC 200NHWC...

Page 2: ...Type Condenser Type Dryer Capillary Tube Electronic Part Refrigerator Lamp Condenser Fan Motor Freezer Lamp Refrigerator Fan Motor Heater Sensor Refrigerator Sensor Freezer Sensor Defrost Sensor Defr...

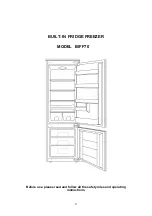
Page 3: ...2 External Size Features are model dependent All model has same size SPECIFICATIONS 2...

Page 4: ...efrigerator Case 2ea 12 Dairy Pocket 13 Refrigator Pocket 3 2 200YH SPECIFICATIONS 2 3 4 5 6 7 8 9 11 10 12 13 1 1 Freezer Pocket 5ea 2 Cover Feezer Fan 3 Freezer Lamp 25Wx1ea 4 Ice Tray 5 Freezer She...

Page 5: ...se 3ea 13 Magic Cool Zone 14 Dairy Pocket 15 Refrigerator Pocket 3 ea 16 Refrehsment Pocket 3 4 5 6 7 8 9 10 12 11 1 2 14 15 16 13 1 Freezer Top Pocket 1ea 2 The mouth of the ice 3 Freezer Pocket 3ea...

Page 6: ...2 Initial power plug in Medium 3 Every time you press the FRZ SET button the setting temperature changes below order 4 REF SET button 1 Temperature control of refrigerator compartment 2 Initial power...

Page 7: ...ntrol 3 FRZ SET button 1 Temperature control of freezer compartment 2 Initial power plug in Medium 19C Every time you press the FRZ SET button the setting temperature changes below order 4 SUPER FRZ B...

Page 8: ...UBED ICE mode available 2 Every the button press the order is WATER CRUSHED ICE CUBED ICE 3 The initial mode is WATER 9 ICE MAKER LOCK 1 Press the Dispenser button continue Press again the mode is OFF...

Page 9: ...C 4 Control Temperature Point in Each Mode FUNCTIONS TEMPERATURE CONTROL_Basic Model Initially On 1st Press 2nd Press 3rd Press 4th Press Sensor On 14 0 15 0 17 0 11 0 13 0 Sensor Off 16 0 17 0 19 0 1...

Page 10: ...Freezer Fan motor is on unconditionally for 150min free of freezer sensor FUNCTIONS TEMPERATURE CONTROL_Dispenser Model Initially On 1st Press 2nd Press 3rd Press 4th Press 5th Press 6th Press Sensor...

Page 11: ...is mode runs for 40 minutes Until the sensor reaches the Excess Refrigeration OFF point 7C Refrigerator Fan and compressor is ON Until the QUICK Mode ends the appliance runs with MAX dial mode After Q...

Page 12: ...RT Sensor C1 Door switch etc But F3 error happens then defrost mode start without Pre cool FUNCTIONS Defrost Mode Compressor runing time is over 2hours Start Total appiance runing time is over 60hours...

Page 13: ...il Freezer sensor temperature reaches 27C 2 HEATER DEFROSTING Defrost heater is switch on until Defrost Sensor temperature reaches 13C Heater operation time 30 seconds Heater is ON free of Defrost Sen...

Page 14: ...Code No 1 2 3 4 5 6 7 8 All Error Code reset when the relative parts turn into normal Abnormal return after defrosting Freezer Door switch is defective Abnormal or defective cycle Defrost sensor disc...

Page 15: ...5V normal If voltage is 0V short or 5V disconnect change new one 4 Defrost sensor error Cause Defrost sensor disconnection or short Check point Measure the resistance between both terminals after sep...

Page 16: ...Error Code No 1 2 3 4 5 6 7 8 9 10 11 12 13 14 15 16 17 All Error Code reset when the relative parts turn into normal FUNCTIONS Error Display_Dispenser Models Display Error Code Remark F1 Freezer sen...

Page 17: ...or 5V disconnect change new one 4 d1 error Cause Defrost sensor disconnection or short Check point Measure the resistance between both terminals after separating CN15 of the Main PCB If sensor is dis...

Page 18: ...al 11 Eu error Cause Sensor which senses if ice is full or not is abnormal Control When drops the ice the motor rotates 90 degree 12 C1 error Cause When compressor works for over 3 hours although Defr...

Page 19: ...bnormal or room temperature is below 15 degree Heater is ON for 60minutes max limit time if Flow sensor is abnormal 4 Water supply stand by Condition When ice is full Operation Proceeds to ice making...

Page 20: ...omplete when ice sensor is abnormal 3 Ice separating drop mode 1 Time of each section is to verify level switch error 2 It senses the rotation in each section 3 When level switch is error ice separati...

Page 21: ...er flow pulse setting is 238 When controlled by the time maximum time limit is 15 seconds When the flow sensor is abnormal time limit is 5 5 seconds 5 Water supply check mode Verify water supply compl...

Page 22: ...n If display switch makes error during operation of a mode its icon is OFF 3 When Icemaker Lock button is ON the Lock LED turns ON and Cubed Ice Crushed Ice icon is OFF 4 When no operation in Cubed Cr...

Page 23: ...or and Dispenser Lamp Control 1 Refrigerator Lamp This lamp operates depending on Refrigerator door switch or Homebar door switch The lamp is automatically off when the switch Refrigerator or Homebar...

Page 24: ...erator sensor OFF point Normal sensor resistance 31 4kohm Cut the J18 and increase sensor resistance 33 4kohm Cut the J18 J19 and increase resistance 35 4kohm FUNCTIONS Cut Cut Cut 1 5C down 3 0C down...

Page 25: ...ss the Super Freezer Button 5 times while pushing the Freezer SET button 3 Push the Freezer SET button until display Fi Lt 4 Remaining time display when push the Dispenser button ex 40 12 means that 4...

Page 26: ...Z SET 5 times FUNCTIONS Summary Mode Forced Defrosting Pull Down How to enter FRZ SET REF SET 5 times REF SET Freezer door switch 5 times Mode How to enter Forced Defrosting FRZ SET REF SET 5 times Re...

Page 27: ...1 Basic Model 2 Dispenser Model WIRING DIAGRAM 26...

Page 28: ...T No No Pull Hose Ice Maker Tube As Remove Water Hose Heater s connector Pull Ice Maker Disassemble Guide Cab Water Tube A As Pull forward Ice Storage Case Unscrew to remove Cover Guide Cab 3 4 7 2 6...

Page 29: ...rew 6 points Remove 2 screws Pull the Bracket Geared Motor Check solenoid Valve and Motor Separate 6 pin connector of Geared Motor 3 6 Good 11 3 Ohm 10 10 8 12 7 Ohm Defective Change the part Good 145...

Page 30: ...th terminals Red circle with a Multi Tester Test Mode Resistance If defective Exchage new one No No Dispenser Button and pull up 2 Insert screw driver into bottom hole of 1 Pull out the Micro Switch B...

Page 31: ...dependent 3 6 2 Unscrew and remove Cover Ice Flap Unscrew to remove Box Dispenser Ice Shut 1 4 Procedure Procedure Disassemble the Cover dispenser Box As Disconnect 2 terminals and 2P Wire Good 215 Oh...

Page 32: ...5V to MICOM Voltage check of IC 6 Input 12V Output 5V Check input and output voltage of Fan 2 Input 5 Output Receive signal 5 V from the MICOM Deliver singal 12V each electric device Check input and...

Page 33: ...to MICOM Voltage check of IC 6 Input 12V Output 5V Check input and output voltage of Fan 2 Input 5 Output Receive signal 5 V from the MICOM Deliver singal 12V each electric device Check input and out...

Page 34: ...Unscrew 3 points Remove 2 screws Remove full ice sensor and level sensor Check if ice droping motor is normal or not 9 Separate Ice Maker from Frame Ice Maker Remove 2 Pin housing Ice sensor Unscrew F...

Page 35: ...OFF Open Disconnect No value 0 If defective Change the Switch Good Tact Switch Terminal Result ON Close Connect Some value OFF Open Disconnect No value 0 If defective Change the Switch Check resistanc...

Page 36: ...t power of SMPS is ON Main PCB Fuse is connected Voltage value on Main PCB is OK Wire connection of Front PCB is OK Check the plug connection from compressor room and to CN1 of Main PCB Change the fus...

Page 37: ...Temperature Fuse is OK Defrost Heater is OK Check the Relay wire OLP and PTC Change the relative Motor Change the Fuse Left up side of Evaporator Change the Defrost Heater 250W No Yes Yes No Yes No N...

Page 38: ...o close Watery or hot foods are stored in refrigerator compartment Remove the gap Wipe out dews on the louver surface and run again No Yes No No No No Gasket has a gap between cabinet Door hang down R...

Page 39: ...t Change the light bulb Connection of Freezer door switch is Ok Repair Door Switch No Yes Yes No Check the Door Switch connection and light socket Refrigerator light filament is disconnected or breaki...

Page 40: ...compartment Remove the gap Advise to cool down foods enough wrap or cover foods with much water before storing in the compartment No Yes No No No No Gasket has a gap between cabinet Door hang down Re...

Page 41: ...ge Yes No No Yes No Yes No Yes Fan Motor operate Wire is connected Change Main PCB Check lead wire No Yes Yes No Refrigerator gasket has gap Remove the gap of gasket No Gasket has any gap Door hang do...

Page 42: ...Valve operation is ok Any Refrigerator sensor Error Change to MIDDLE mdoe No Yes Yes Repair or change the new No Repair or change the new Sensor is ok Check sensor connection Check the connector to M...

Page 43: ...on the capillary tube No No Yes Apply a gum on the accumulator Yes No Fasten the evaporator tightly not to touch liner surfaces Yes Explain refrigerator work mechanism and sound to the user or custome...

Page 44: ...on the pipe TROUBLE SHOOTING Remarks Pipes are touching in the machine compressor compartment Start Separate the touching pipes if any Yes Tray drip makes noise by condenser shaking Apply cushion mat...

Page 45: ...assmbly No Door switch is soaked with water or there is water in the switch Change the door switch Yes Yes PCB input is OK Repair any disconnection of wires and defective door switch No Yes Connector...

Page 46: ...leak and cooling capacity Bombe mass cylinder refrigerant manifold gauge electronic scales punching off flier gas welding machine Weigh and control the bombe in a vacuum conditions with electronic sc...

Page 47: ...2 kg cm2 Nitrogen blowing welding Be sure to replace drier when repairing pipes and injecting refrigerant Replacement of drier 1 Remove retained refrigerant more than 5 minutes after turning off a ref...

Page 48: ...1 0 2kg cm2 to high pressure side after assembling a drier When replacing a compressor Weld 3 and 4 parts by blowing nitrogen to the low pressure side Note For other parts nitrogen blowing is not nece...

Page 49: ...and measure the weight Calculate the weight of refrigerant charged into the bombe by subtracting the weight of an evacuated bombe 4 Refrigerant charging Compresso Evaporato Drye Condense Vaccu m Hot B...

Page 50: ...k M C after completion of work 6 Pipe arrangement in each cycle 1 Observe the safety precautions for gas handling 2 Use JIG or wet towel in order to prevent electric wires from burning during welding...

Page 51: ...COOLING CYCLE HEAVY REPAIR Brzing Reference Drawings 50...

Page 52: ...Water System for Dispenser Model 51...

Page 53: ...IDE CAB W TUBE A AS L1525 x 1 16 3011444100 COVER GUIDE CAB W T A HIPS x 1 17 3011202000 CLAMP WATER TUBE A PA 66 5N x 2 18 3019974800 S PART FILTER WATER AS FR S660CW x 1 19 3012924004 HINGE U R AS P...

Page 54: ...5402330 VALVE WATER AS FRU 54QD x 1 44 3014461510 PIPE WICON AS TSW OD4 76XT0 7 1 1 45 3018500500 M BELL AS FRU 571I 1 1 45 1 3015916100 MOTOR C FAN D4612AAA22 1 1 45 2 3011834700 FAN ABS OD3 17XD150...

Page 55: ...L AS FR S580EG PP 1 2 74 3011109260 CASE VEGETB A AS FRU 54AD x 1 75 3012514612 GUIDE CASE A R AS FR S580EG PP 1 2 76 3017842921 SHELF INMOLDING R B AS FRAME PRINTED GLASS 1 x 77 3011114680 CASE VEGE...

Page 56: ...0 GUIDE G MOTR BRKT L ABS x 1 114 3012517900 GUIDE G MOTR BRKT R ABS x 1 3010671500 220 240V 50HZ x 1 3010671510 220V 60HZ x 1 116 3012520510 GUIDE ICE CRUSHER L ABS x 1 117 3012517710 GUIDE ICE CRUSH...

Page 57: ...95300 COVER I FLAP AS FRU 541D x 1 136 6 3012019700 FIXTURE I SHUT LUVR FR S650CD x 1 136 7 3015403000 VALVE SOL DISP x 1 136 8 3016306500 BUTTON DISPNS AS FRU 54AD x 1 136 9 3018125800 SWITCH MICRO V...

Page 58: ...R 3000099G10 FRU 54QF WHITE 161 1 3012318910 GASKET R DR AS PVC MAGNET 1 1 1 1 161 2 3012319300 GASKET H BAR B AS PVC x 1 x 1 161 3 3018125600 SWITCH H BAR DR AS SP101B 2D1 T x 1 x 1 161 4 3012319400...

Reviews: