background image

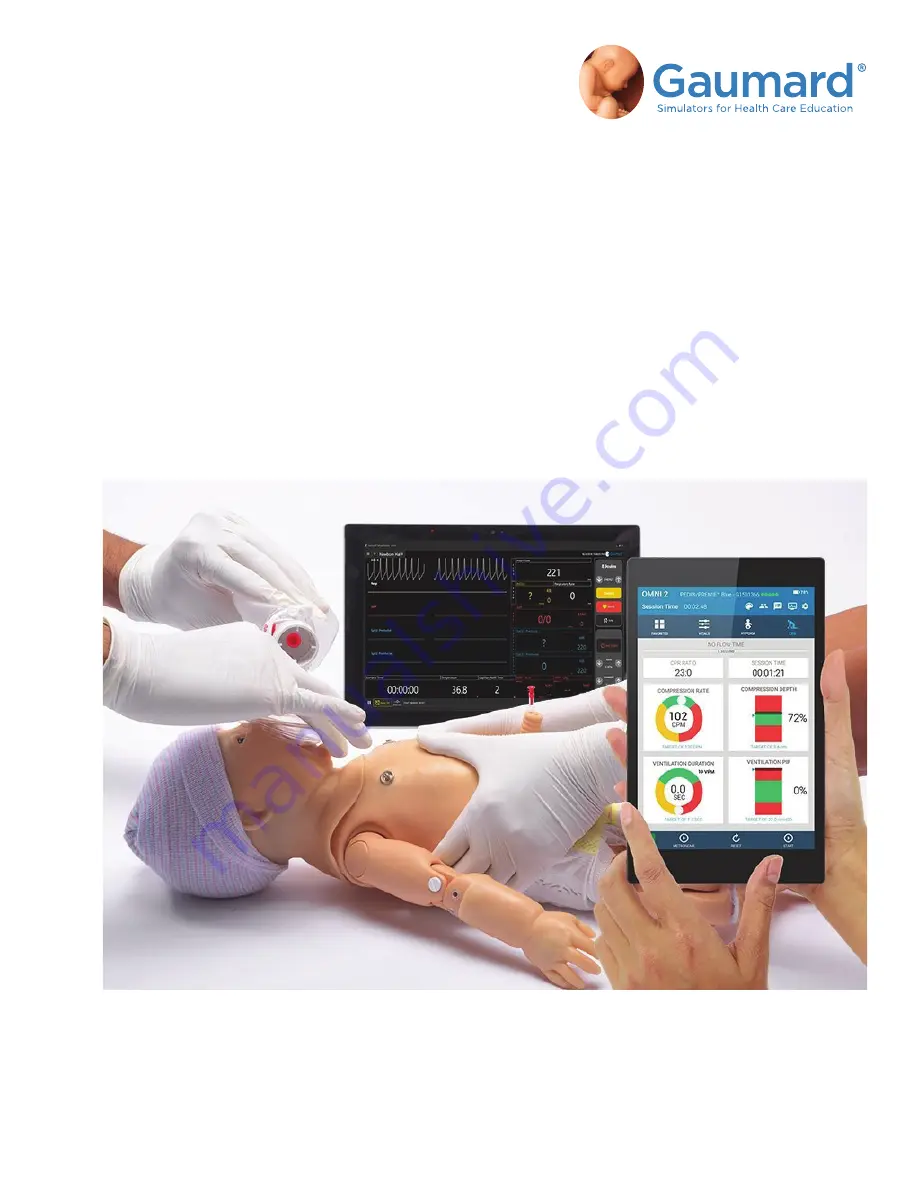
The Code Blue® III Newborn Simulator is an interactive educational system developed to assist a certified instructor. It is 
not a substitute for a comprehensive understanding of the subject matter and not intended for clinical decision making.

User Guide 18.5.4

©Gaumard Scientific Company, 2018

All Rights Reserved

www.gaumard.com

S300.110.250.PK

CODE BLUE® III NEWBORN

USER GUIDE

Summary of Contents for CODE BLUE III NEWBORN

Page 1: ...ssist a certified instructor It is not a substitute for a comprehensive understanding of the subject matter and not intended for clinical decision making User Guide 18 5 4 Gaumard Scientific Company 2018 All Rights Reserved www gaumard com S300 110 250 PK CODE BLUE III NEWBORN USER GUIDE ...

Page 2: ......

Page 3: ... 3 2 PACKAGE CONTENTS 11 3 3 CHARGE BATTERY 12 3 4 CONNECTING OMNI 2 13 3 5 FILLING THE AIR RESERVOIR 15 3 6 RECOMMENDED DEVICE SIZES 16 4 WORKING WITH THE SIMULATOR 17 4 1 AIRWAY 17 4 2 BREATHING 22 4 3 CARDIAC 30 4 4 CIRCULATION 33 5 WORKING WITH OMNI 2 49 5 1 MAIN SCREEN 49 5 2 CHANGING A VITAL SIGN 50 5 3 CPR 51 5 4 BLOOD PRESSURE 52 5 5 HYPOXIA 55 5 6 SCENARIOS 56 Table of Contents iii CODE B...

Page 4: ...ING THE SIMULATOR WITH THE OMNI LINK 65 7 3 CONNECT OMNI 2 TO THE SIMULATOR 67 7 4 CPR IS NOT DETECTED 68 7 5 BLOOD PRESSURE NOT DETECTED 68 8 APPENDIX 69 8 1 PARTS LIST 69 8 2 EXCLUSIVE ONE YEAR LIMITED WARRANTY 70 8 3 EXTENDED WARRANTY 70 8 4 CONTACT TECHNICAL SUPPORT 71 8 5 GENERAL INFORMATION 71 iv Table of Contents CODE BLUE III NEWBORN USER GUIDE ...

Page 5: ...workmanship Electronic transmission is warranted to be free from defects at the moment of transmission Your sole and exclusive remedy and Gaumard s sole liability is to replace the defective media or to repeat the electronic transmission provided that you notify Gaumard in writing of such defect or defective transmission and return the defective media if any during the 30 day warranty period B Exc...

Page 6: ... are not suitable for human use or medical treatment diagnosis and should never be used for such purposes Operating Conditions The simulator will only power on when connected to the AC power supply Operating temperature 50 95 F 10 35 C Humidity 5 95 non condensing Storage Conditions Store Simulator in a cool dry place Extended storage should be between 32 85 degrees Fahrenheit 0 29 Celsius Other t...

Page 7: ... per month to prolong the life of the vasculature When the arm skin and or veins require replacement refer to the Consumables section of the guide For more information regarding the replacement of veins and other consumable items please contact customer service ECG Monitoring It is good practice to remove gel residues after every use Failure to do so will leave behind a film of electrode gel that ...

Page 8: ...ble pulses Bilateral lung expansion and realistic chest rise during bag valve mask BVM ventilation Refillable internal air reservoir provides automatic chest rise and pulses after resuscitation for up to 30 45 seconds Connect real electrodes to the conductive skin sites and monitor ECG using real medical equipment Palpable umbilical brachial and radial pulse Programmable heart and lung sounds Prog...

Page 9: ... applied instantly or added to a queue CPR Page The CPR page includes feedback for compression rate and depth and ventilation duration and PIP Use the metronome on this page to coach the provider Blood Pressure Page The Blood Pressure page has a virtual manometer gauge that shows the simulator s blood pressure in real time The blood pressure is shown on the gauge in green Scenarios Page The Scenar...

Page 10: ...ol interface from OMNI 2 to the powerful UNI Simulator Control Software Beside Virtual Patient Monitor Touch Screen All in One PC Gaumard Vitals virtual monitor Mobile Virtual Patient Monitor Tablet PC Vitals virtual patient monitor Transport Case Soft carrying case for Code Blue III Newborn patient simulator ...

Page 11: ...d or clean flat surface for use Do not pull or drag the simulator across hard surfaces as this may cause the skin to tear 3 2 PACKAGE CONTENTS 1 Carrying Bag 2 Filling Kit 3 Charger with label 4 Newborn Leg Bone Cover Right 5 Newborn Lower IV Arm Right 6 Newborn Spare I O Bones 7 Oil Based Mineral Lubricant 8 Modified Blood Pressure Cuff 9 Tube with Squeeze Bulb 10 Diapers 11 OMNI 2 Tablet 12 OMNI...

Page 12: ...n the right side of the simulator 3 Allow the simulator s battery to charge until the LED light indicator turns green NOTE It approximately takes 2 hours to fully charge the simulator CAUTION Do not store the simulator with a discharged battery It is good practice to recharge the battery at the end of every simulation session In addition make sure the battery is recharged at least once every 2 mon...

Page 13: ...he simulator 3 Enable the bluetooth connection on the simulator by pressing the power icon on the OMNI 2 dongle as circled in green pictured here 4 Select Allow for turning on the tablet s Bluetooth The simulator will connect automatically to the tablet NOTE A startup screen is shown while OMNI 2 is detecting the simulator s features If the simulator does not automatically connect refer to section...

Page 14: ...ting the tutorial one time will avoid it from appearing at start up in the future To view the tutorial again tap on the Menu icon and select Show Tutorial 7 After the tutorial OMNI 2 will proceed automatically to the Favorites Page and establish a connection to the simulator WARNING Do not connect the simulator or OMNI 2 to a computer LAN network or unauthorized diagnostic equipment Doing so will ...

Page 15: ...lb After filling the air reservoir and activating features that consume air it may be necessary to refill the system during exercises NOTE It is recommended to put the simulator in an ECG rhythm of ventricular fibrillation prior to filling the air reservoir 1 Click the Vitals tab 2 Click Cardiac Rhythm 3 Select an ECG rhythm of ventricular fibrillation and click Apply Now in the OMNI 2 software CO...

Page 16: ...I Newborn to the desired vitals NOTE A full air reservoir will last up to 30 45 seconds depending on the vitals that are set for him 3 6 RECOMMENDED DEVICE SIZES Procedure Recommended Device Size Intubation Blade size Miller 0 LMA Size 1 Nasal Intubation 8 Fr catheter Oral Intubation ETT 3 0 no cuff Suction Umbilical 6 Fr catheter Umbilical Catheterization 6 Fr catheter CODE BLUE III NEWBORN USER ...

Page 17: ...ficult and will result in damage to the airway Do not apply silicone or mineral oil directly into the mouth and airway 1 To intubate under the Vitals tab click on Respiratory Rate to adjust to zero and click Apply Now 2 Lubricate the endotracheal tube with mineral oil prior to intubation 3 Intubate with the recommended blade size and endotracheal size as suggested in section 3 6 The recommended ET...

Page 18: ...ain stem intubation results in disabling the left lung automatically on the Newborn Once tubing position is corrected the left lung will be enabled and the OMNI 2 software will detect the correction NOTE Endotracheal tubes with a black colored end may interfere with intubation sensor detection An endotracheal tube with a clear end is recommended CODE BLUE III NEWBORN USER GUIDE 18 Working with the...

Page 19: ... Code Blue III Newborn can produce audible crying sounds 1 Click the Vitals tab 2 Under the Airway section click Crying 3 Select ON 4 Click Apply Now CODE BLUE III NEWBORN USER GUIDE Working with the Simulator 19 ...

Page 20: ...lue III Newborn has multiple throat sounds available 1 Click the Vitals tab 2 Under the Airway section click Throat Sound 3 Select the desired throat sound option CODE BLUE III NEWBORN USER GUIDE 20 Working with the Simulator ...

Page 21: ...4 Adjust the volume of the throat sound with the slide bar located at the bottom of the pop up 5 Click Apply Now CODE BLUE III NEWBORN USER GUIDE Working with the Simulator 21 ...

Page 22: ...ir to manually fill the internal air reservoir to demonstrate pneumatic features Respiratory Patterns 1 Under the Vitals tab select Respiratory Pattern 2 Select the desired option 3 Click Apply Now CODE BLUE III NEWBORN USER GUIDE 22 Working with the Simulator ...

Page 23: ...e Respiratory Rate 1 Under the Vitals tab select Respiratory Rate 2 Adjust the respiratory rate using the slide bar or the and signs 3 Click Apply Now CODE BLUE III NEWBORN USER GUIDE Working with the Simulator 23 ...

Page 24: ...g sounds independently for the left or right lung 1 Click the Vitals tab 2 Select the Right Lung Sounds or the Left Lung Sounds option to enable or disable the feature independently 3 Select the desired lung sound NOTE The options of lung sounds are the same for both the right and left lungs CODE BLUE III NEWBORN USER GUIDE 24 Working with the Simulator ...

Page 25: ...4 Adjust the lung sounds volume with the slide bar 5 Click Apply Now CODE BLUE III NEWBORN USER GUIDE Working with the Simulator 25 ...

Page 26: ...lateral lung expansion with proper intubation if utilizing an ET tube with realistic chest rise Assess and evaluate the ventilations delivered through the CPR tab with the tablet 1 Click the CPR tab 2 Deliver ventilations to the simulator to view live ventilation duration and PIP feedback CODE BLUE III NEWBORN USER GUIDE 26 Working with the Simulator ...

Page 27: ...ring CPR result in palpable umbilical pulses Assess and evaluate chest compressions delivered through the CPR tab on the tablet 1 Click the CPR tab 2 Deliver chest compressions to the simulator to view live chest compression rate and depth feedback NOTE Proper chest compressions during CPR will result in palpable umbilical pulses CODE BLUE III NEWBORN USER GUIDE Working with the Simulator 27 ...

Page 28: ...fore first time use to calibration the compressions on the simulator 1 Click the menu icon in the upper right hand corner of the OMNI screen 2 Select Calibration 3 Tap on Compression CODE BLUE III NEWBORN USER GUIDE 28 Working with the Simulator ...

Page 29: ...arget compression depth and click Start on the Compression Calibration pop up 5 Perform 5 compressions at the target depth 6 Click Save once finished CODE BLUE III NEWBORN USER GUIDE Working with the Simulator 29 ...

Page 30: ...III Newborn is equipped with realistic heart sounds which are tied to the heart rate and selectable ECG rhythms 1 To change the heart sounds select Heart Sound in the Vitals tab CODE BLUE III NEWBORN USER GUIDE 30 Working with the Simulator ...

Page 31: ...f Heart Sounds the desired sound 3 Adjust the volume of the heart sounds with the slide bar located at the bottom 4 Click Apply Now to apply the selected heart sound and volume CODE BLUE III NEWBORN USER GUIDE Working with the Simulator 31 ...

Page 32: ...the attachment of real ECG electrodes WARNING Do not physically pace or defibrillate the simulator 1 To change the ECG rhythm click the Vitals tab 2 Click Cardiac Rhythm 3 Select an ECG rhythm and click Apply Now CODE BLUE III NEWBORN USER GUIDE 32 Working with the Simulator ...

Page 33: ...sites will be active when the air reservoir is filled Refer to 3 5 Filling the Air Reservoir Palpable Pulses Programmable Blood Pressure Programmable blood pressure can be read using a Code Blue III Newborn modified cuff 1 Locate the Luer lock port on the Newborn s left posterior shoulder CODE BLUE III NEWBORN USER GUIDE Working with the Simulator 33 ...

Page 34: ...ood pressure cuff to the port 3 Place the blood pressure cuff on the Newborn as you would a real patient 4 On OMNI 2 click the Vitals tab 5 Click on Blood Pressure CODE BLUE III NEWBORN USER GUIDE 34 Working with the Simulator ...

Page 35: ...and diastolic pressures 7 Click Apply Now NOTE Click the Blood Pressure tab to view the virtual sphygmomanometer with the green highlighted blood pressure range CODE BLUE III NEWBORN USER GUIDE Working with the Simulator 35 ...

Page 36: ... process place the blood pressure cuff on the simulator as you would a real patient 1 Tap the menu icon in the upper right corner of the OMNI 2 screen 2 Select Calibration 3 Tap Left Blood Pressure CODE BLUE III NEWBORN USER GUIDE 36 Working with the Simulator ...

Page 37: ... the indicated pressure and click Set NOTE The calibration of the blood pressure cuff will ask for the sphygmomanometer to be set to 0 100 in increments of 20 200 then 300 mmHg 6 Once the calibration is finished click Save CODE BLUE III NEWBORN USER GUIDE Working with the Simulator 37 ...

Page 38: ...off sounds may be auscultated 1 To adjust the volume of these sounds click the Vitals tab 2 Select the Left Korotkoff Sounds Volume option 3 Use the slide bar to adjust the volume of the korotkoff sounds from a level of 0 to 5 4 Click Apply Now CODE BLUE III NEWBORN USER GUIDE 38 Working with the Simulator ...

Page 39: ...cyanosis through the use of the OMNI 2 software 1 To adjust the level of cyanosis click Cyanosis in the Vitals tab 2 Use the slide bar to adjust the level of cyanosis from a range of 0 to 100 3 Click Apply Now CODE BLUE III NEWBORN USER GUIDE Working with the Simulator 39 ...

Page 40: ...ports on the right arm 2 Connect the drainage hose to one port 3 Fill a syringe with the desired fluid and connect to the other port 4 Push fluid into the system until air bubbles are no longer exiting the drainage hose CODE BLUE III NEWBORN USER GUIDE 40 Working with the Simulator ...

Page 41: ...other simulated blood Any other simulated blood brand containing sugar or additives may cause blockage within the vasculature system 5 Clamp the drainage hose 7 Remove the luer lock connectors and connect a clear stopper to the ports 6 Disconnect the fluid syringe and drainage hose NOTE Leave drainage hose connected if running an IV line CODE BLUE III NEWBORN USER GUIDE Working with the Simulator ...

Page 42: ...luer lock adapter to the port 3 Connect the drainage hose NOTE If the drainage hose is already in place proceed to step 4 4 Remove the second clear stopper from the other port and connect the second luer lock adapter CODE BLUE III NEWBORN USER GUIDE 42 Working with the Simulator ...

Page 43: ...5 Connect the fluid syringe filled with air 6 Push air into the system to expel any remaining fluids CODE BLUE III NEWBORN USER GUIDE Working with the Simulator 43 ...

Page 44: ...d fill with a cleaning mixture of a 70 30 ratio of water to isopropyl alcohol 2 Connect the syringe to the available port 3 Push the cleaning fluid through the system until the fluid runs clear out of the drainage hose CODE BLUE III NEWBORN USER GUIDE 44 Working with the Simulator ...

Page 45: ...eous access site located in his right tibia Utilize the feature to simulate an intraosseous access line 1 Remove the right leg skin cover 2 Remove the tibia bone from its slot 3 Remove the black stopper from the bone CODE BLUE III NEWBORN USER GUIDE Working with the Simulator 45 ...

Page 46: ...Reinsert the bone back into the leg and replace the right leg skin cover 4 Fill the bone with desired fluid and recap the bone when finished CODE BLUE III NEWBORN USER GUIDE 46 Working with the Simulator ...

Page 47: ...n sites to be used for needle placement on both deltoids and both quadriceps Bilateral Deltoids Bilateral Quadriceps WARNING Do not inject fluids into the intramuscular IM sites The IM sites are for needle placement only CODE BLUE III NEWBORN USER GUIDE Working with the Simulator 47 ...

Page 48: ... the fill kit syringe inject the umbilical vein with 2 mL of fluid 3 Lubricate an umbilical catheter before catheterizing 4 Catheterize with the recommended size as suggested in section 3 6 The recommended size is 6 Fr Umbilical Catheter CODE BLUE III NEWBORN USER GUIDE 48 Working with the Simulator ...

Page 49: ...tors on the upper right corner of the screen One is for the OMNI 2 tablet and another is for the simulator Connection Status The communication indicator displays the status of the bluetooth link between the simulator and the tablet Connected Attempting Connection No Connection CODE BLUE III NEWBORN USER GUIDE Working with OMNI 2 49 ...

Page 50: ...tals page Follow the steps below to change one of the parameters 1 Tap on a vital sign 2 Adjust the vital sign by using the slider or the buttons 3 Select Apply Now NOTE Refer to the OMNI 2 User Guide for more information on changing vital signs CODE BLUE III NEWBORN USER GUIDE 50 Working with OMNI 2 ...

Page 51: ...essions and airway ventilations in real time WARNING Do not perform mouth to mouth ventilation since the simulator airway can be difficult to clean afterwards and will contaminate the airway CPR Feedback Monitor the CPR session in real time The CPR value ranges are AHA compliant CODE BLUE III NEWBORN USER GUIDE Working with OMNI 2 51 ...

Page 52: ...tone for training Virtually defibrillate the simulator 5 4 BLOOD PRESSURE The Blood Pressure page has a virtual manometer gauge that shows the simulator s blood pressure in real time The current blood pressure is shown on the gauge in green CODE BLUE III NEWBORN USER GUIDE 52 Working with OMNI 2 ...

Page 53: ...ltatory Gap 1 Click the Vitals tab 2 Select the Auscultatory Gap option 3 Turn ON the Auscultatory Gap feature 4 Adjust the auscultatory gap as desired CODE BLUE III NEWBORN USER GUIDE Working with OMNI 2 53 ...

Page 54: ...5 Click Apply Now NOTE Click the Blood Pressure tab to view the virtual sphygmomanometer with the gray highlighted auscultatory gap range CODE BLUE III NEWBORN USER GUIDE 54 Working with OMNI 2 ...

Page 55: ...s 1 To start a hypoxia session select the initial state of the simulator Choose from healthy partial or full cyanosis NOTE Code Blue will display central cyanosis of varying intensities 2 Change the deterioration and improvement rates using the slide bar or buttons so that the patient becomes more hypoxic if ventilations are not performed NOTE Increase or decrease the rate of improvement per round...

Page 56: ...ession 5 6 SCENARIOS 1 Tap the Scenario icon to access the Scenario Page Use this page to create load and run scenarios 2 Press New Scenario to the create a custom scenario CODE BLUE III NEWBORN USER GUIDE 56 Working with OMNI 2 ...

Page 57: ...mmed scenarios 4 Press the menu icon to open the options NOTE For more details refer to the OMNI 2 user guide Graphics Function Add a node Save a scenario Load a scenario Clear a scenario Actions CODE BLUE III NEWBORN USER GUIDE Working with OMNI 2 57 ...

Page 58: ...SER GUIDE 58 Options 6 OPTIONS 6 1 UNI TABLET 1 Remove the OMNI LINK from the communication port 2 Plug the RF module into the USB port of the tablet 3 Turn on the tablet 4 Double click the UNI icon to initialize the program ...

Page 59: ...BORN USER GUIDE Options 59 5 Select the Code Blue III Newborn and click the to add the correct serial number 6 Enter the serial number and click Set 7 Click Start NOTE Refer to the UNI user guide for further information ...

Page 60: ...tion to the Virtual Monitor Connecting the OMNI 2 Tablet to the Network 1 Connect the provided router to the wall Tap the menu icon on the top right corner of the OMNI 2 screen 2 Select Wi Fi Connection Setup 3 Connect to the desired wireless network NOTE The virtual monitor must be connected to the same wifi network that the OMNI 2 tablet is connected to ...

Page 61: ...nitor screen NOTE Verify the serial number corresponds to your simulator 2 The Virtual Monitor Wi Fi setup window will prompt you to input a valid activation code The activation code is found in the purchase order document attached to your shipment NOTE The activation code is case sensitive The code seen here is not a valid code 3 Take note of the OMNI IP and OMNI Port numbers and select Connect ...

Page 62: ...e Virtual Monitor and tap the Network Connectivity icon on the bottom right corner of the screen 2 Select the same wifi network the OMNI 2 tablet is connected to NOTE The network may say No Internet The network does not need internet to communicate between the software 3 Open the Gaumard Vitals software ...

Page 63: ...tap the WIFI icon in the top left 2 Verify the IP address in the Communication Setup window matches the OMNI IP and OMNI Port previously noted If the virtual monitor connection does not establish automatically once connected to the same wifi perform the following steps 3 Select Connect ...

Page 64: ...R GUIDE 64 Options NOTE The virtual monitor will show connected in green and on the OMNI tablet the virtual monitor icon will appear in the upper right corner NOTE For further information refer to the Gaumard Vitals user guide ...

Page 65: ...red Follow steps from the section 7 2 and 7 3 to ensure the manikin is paired Battery needs charging Connect the charger to the simulator and allow it to charge for approximately 2 hours or when the LED light indicator on the charger is green 7 2 PAIRING THE SIMULATOR WITH THE OMNI LINK OMNI 2 must be paired to a simulator to establish a connection with the OMNI Link If this notification does not ...

Page 66: ...Connection Setup 3 Select the simulator s serial number under Available Devices NOTE The device name will be Gaumard_ SimulatorSerialNumber where the Serial number is the numerical value assigned to your simulator 4 Wait for the device to pair with the OMNI 2 This can take up to 30 seconds ...

Page 67: ...instructions 1 Tap the menu icon on the main screen and select Select Simulator if available 2 Select the simulator profile you wish to connect to and tap Done at the bottom of the screen 3 Tap the menu icon on the main screen again and select Connect to Simulator 4 Select the name of the simulator and the serial number to connect to Click Connect and Save as Default ...

Page 68: ...he Compression Module After resetting the module follow the compressions calibration of section 4 2 Ventilations are not detected Tap the Menu icon on the main screen and select Calibration Reset the Ventilation Module Intubation sensor not detected Tap the Menu icon on the main screen and select Calibration Reset the Endotracheal Tube Module 7 5 BLOOD PRESSURE NOT DETECTED Probable Cause Solution...

Page 69: ...eg Skin Cover S300 110 029 Consumable I O Bones S300 110 031 Consumable Intramuscular Thigh Injection Site S300 110 043 Consumable Intramuscular Arm Injection Site S300 110 044 Consumable Lower Left Arm Skin Cover S300 110 123L Consumable Lower Right Arm Skin Cover S300 110 123R Consumable Mineral Oil S300 110 232 Consumable 8 1 PARTS LIST ...

Page 70: ...nd produced by Gaumard This limited warranty does not apply to any products provided along with the Gaumard product that are manufactured by third parties For example third party products such as computers desktop laptop tablet or handheld and monitors standard or touch screen are not covered by this limited warranty However third party products are covered by the warranties provided by the respec...

Page 71: ...ess to the simulator for possible troubleshooting as needed Technical Support Email support gaumard com USA 800 882 6655 INT 01 305 971 3790 8 5 GENERAL INFORMATION Sales and Customer Service E mail sales gaumard com USA 800 882 6655 INT 01 305 971 3790 Fax 305 252 0755 Post Gaumard Scientific 14700 SW 136 Street Miami FL 33196 5691 USA Office Hours Monday Friday 8 30am 7 30pm EST GMT 5 ...

Page 72: ......

Page 73: ...e Krash Kids Premie UNI Omni Omni 2 SmartSkin are trademarks of Gaumard Scientific Company Always dispose of this product and its components in compliance with local laws and regulations www gaumard com 800 882 6655 305 971 3790 Fax 305 252 0755 sales gaumard com 2018 Gaumard Scientific Company All rights reserved Patented other patents pending MADE IN THE U S A User Guide 18 5 3 UGS300 110 250 ...

Reviews: