Gateway M275, Service Manual
The Black & Decker M275 is a versatile and reliable electric lawnmower. Ensure its optimal performance with the Use And Care Book Manual, available for free download, packed with essential maintenance instructions and usage tips. Get your manual now from manualshive.com to maximize the lifespan of your M275 lawnmower.
Share
Download


Reviews:
No comments
Related manuals for M275

Aspire 5335 Series
Brand: Acer Pages: 154

Aspire 1420P Series
Brand: Acer Pages: 216

VERSA LX AGP VIDEO -
Brand: NEC Pages: 14

aspire Aspire 9300
Brand: Acer Pages: 143

Aspire 5820
Brand: Acer Pages: 326

Aspire 8943G Series
Brand: Acer Pages: 370

ASPIRE Aspire 7100
Brand: Acer Pages: 87

Aspire 7540 Series
Brand: Acer Pages: 186

Toughbook CF-50Y8KNUDM
Brand: Panasonic Pages: 40
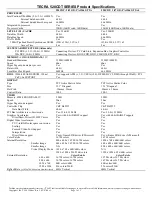
Tecra 520CDT series
Brand: Toshiba Pages: 3

Tecra 510CDT
Brand: Toshiba Pages: 3

Tecra 500CDT
Brand: Toshiba Pages: 3

TE2000
Brand: Toshiba Pages: 2

T235D-S1345
Brand: Toshiba Pages: 4

T235D-S1340
Brand: Toshiba Pages: 4

T235-S1370
Brand: Toshiba Pages: 4

T235-S1350
Brand: Toshiba Pages: 4

T215D-S1150
Brand: Toshiba Pages: 4


