background image

1

www.gateway.com

Replacing the AC Adapter

Replacing the AC Adapter

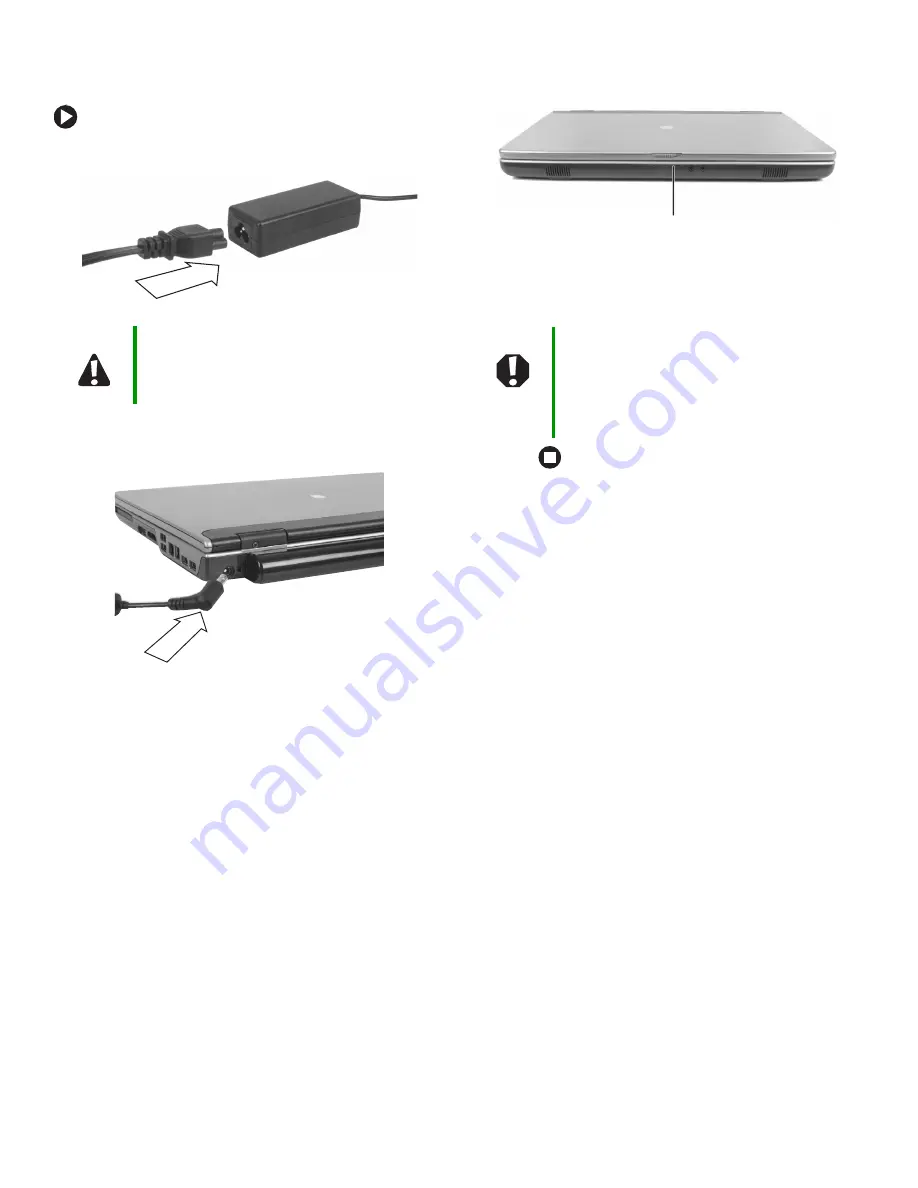
To connect the AC adapter:

1

Connect the power cord to the AC adapter.

2

Connect the AC adapter to your notebook’s 
power connector.

3

Plug the power cord into a wall outlet. The 
power indicator turns on.

If the power indicator does not turn on, unplug 
the adapter from your notebook, then plug it 
back in.

Technical Support

See the label on the bottom of the notebook for 
Customer Care information.

Safety, Regulatory, and Legal 

Information

See your user guide for important safety, regulatory, and 
legal information.

© 2005 Gateway, Inc. All rights reserved. Gateway, Gateway 
Country, the Gateway stylized logo, and the black-and-white 
spot design are trademarks or registered trademarks of Gateway, 
Inc. in the United States and other countries. All other brands 
and product names are trademarks or registered trademarks of 
their respective companies.

Caution

Replace the power cord if it becomes damaged. 
The replacement cord must be of the same type 
and voltage rating as the original cord or your 
notebook may be damaged.

Warning

Do not attempt to disassemble the AC adapter. 
The AC adapter has no user-replaceable or 
user-serviceable parts inside. The AC adapter 
has dangerous voltages that can cause serious 
injury or death. Contact Gateway about returning 
defective AC adapters.

Power indicator

Summary of Contents for 6010GZ - Celeron M 1.4 GHz

Page 1: ...on 2005 Gateway Inc All rights reserved Gateway Gateway Country the Gateway stylized logo and the black and white spot design are trademarks or registered trademarks of Gateway Inc in the United State...

Page 2: ...egulatory and Legal Information See your user guide for important safety regulatory and legal information 2005 Gateway Inc All rights reserved Gateway Gateway Country the Gateway stylized logo and the...

Page 3: ...ded connection Touch a bare metal surface on your workbench or other grounded object To replace the DVD drive 1 Follow the guidelines under Preventing static electricity discharge 2 Turn off your note...

Page 4: ...in Step 8 15 Replace the memory bay cover then tighten the six cover screws 16 Replace the keyboard screw 17 Insert the battery then turn your notebook over 18 Connect the power adapter modem cable a...

Page 5: ...ed object Replacing the hard drive kit To replace the hard drive kit 1 Back up any data you want to transfer to the new hard drive For more information see Backing up files in Using Your Computer whic...

Page 6: ...urn your notebook over 15 Connect the power adapter modem cable and network cable 16 Turn on your notebook 17 For instructions on installing Windows your drivers and your applications see the instruct...

Page 7: ...twork cable 4 Disconnect all peripheral devices and remove any PC Cards 5 Turn your notebook over so the bottom is facing up then remove the battery For more information see Changing Batteries in your...

Page 8: ...it is flat all the way across The keyboard should easily fall into place Be careful to not damage the LCD panel 6 Replace the keyboard cover Press down on the cover in several places until it clicks i...

Page 9: ...ttach it to a bare metal part of your workbench or other grounded connection Touch a bare metal surface on your workbench or other grounded object To replace memory modules 1 Follow the guidelines und...

Page 10: ...place the memory bay cover then tighten the cover screws 13 Replace the keyboard screw 14 Insert the battery then turn your notebook over 15 Connect the power adapter the modem cable and the network c...

Page 11: ...tion Touch a bare metal surface on your workbench or other grounded object To replace the wireless network card 1 Follow the guidelines under Preventing static electricity discharge 2 Turn off your no...

Page 12: ...or labelled MAIN or M then reattach the light gray antenna cable to the connector labelled AUX or A 13 Replace the wireless network bay cover then tighten the cover screw 14 Insert the battery then tu...

Reviews: