

• Write down your notebook model number and serial number
in case of theft or loss, and keep the information in a safe
place. Also, tape your business card or an address label to
your notebook and accessories.
• Use a startup password to restrict access to your notebook.
• Take your AC power adapter to recharge the battery. If you
are traveling internationally, take power plug adapters.
• Take a portable surge protector to protect your notebook
from power surges.
• To get the best performance from your notebook, avoid using
the battery whenever possible, monitor the battery charge,
and use the most efficient power management settings.
• If you plan to use several USB peripheral devices, take a
portable USB hub to provide additional USB ports.
• Take a network cable if you need to connect to a network.
Some hotels provide Internet connectivity only through their
networks.
Traveling with your notebook can be convenient and trouble-
free.
• Take a telephone cord to connect the modem to telephone
jacks. If you are traveling internationally, take telephone jack
adapters or an acoustic handset coupler.
• Take a telephone line protector.
• Copy your working files from your desktop computer to your
notebook before you travel.
• If you need to access your desktop computer files from your
notebook while traveling, set up your desktop computer for
remote access. Contact your network administrator for more
information about remote access.
• Get a locking cable for your notebook so that you can attach
a cable lock and leave your notebook in your hotel room
while you are away.
• Always keep your notebook with you while waiting in airports,
train stations, or bus terminals. Be ready to claim your
notebook as soon as it passes through the x-ray machine in
security checkpoints.
Travel tips
If you have problems, try these things first:
• Make sure that the AC power adapter is connected to your notebook and an AC outlet and
that the AC outlet is supplying power.
• If you use a power strip or surge protector, make sure that it is turned on.
• If a peripheral device (such as a keyboard or mouse) does not work, make sure that all
connections are secure.
• Make sure that your hard drive is not full.
• If an error message appears on the screen, write down the exact message. The message
may help Gateway Technical Support in diagnosing and fixing the problem.
• If you added or removed cards or peripheral devices, review the installation procedures you
performed and make sure that you followed each instruction.
• If an error occurs in a program, see the program's printed documentation or the online help.
Setting up your Gateway 400
Troubleshooting tips
Networking your Gateway 400
Power management for your Gateway 400
Did you know?
Your Gateway 400 notebook offers an
optional memory card reader for
transferring files quickly and conveniently!
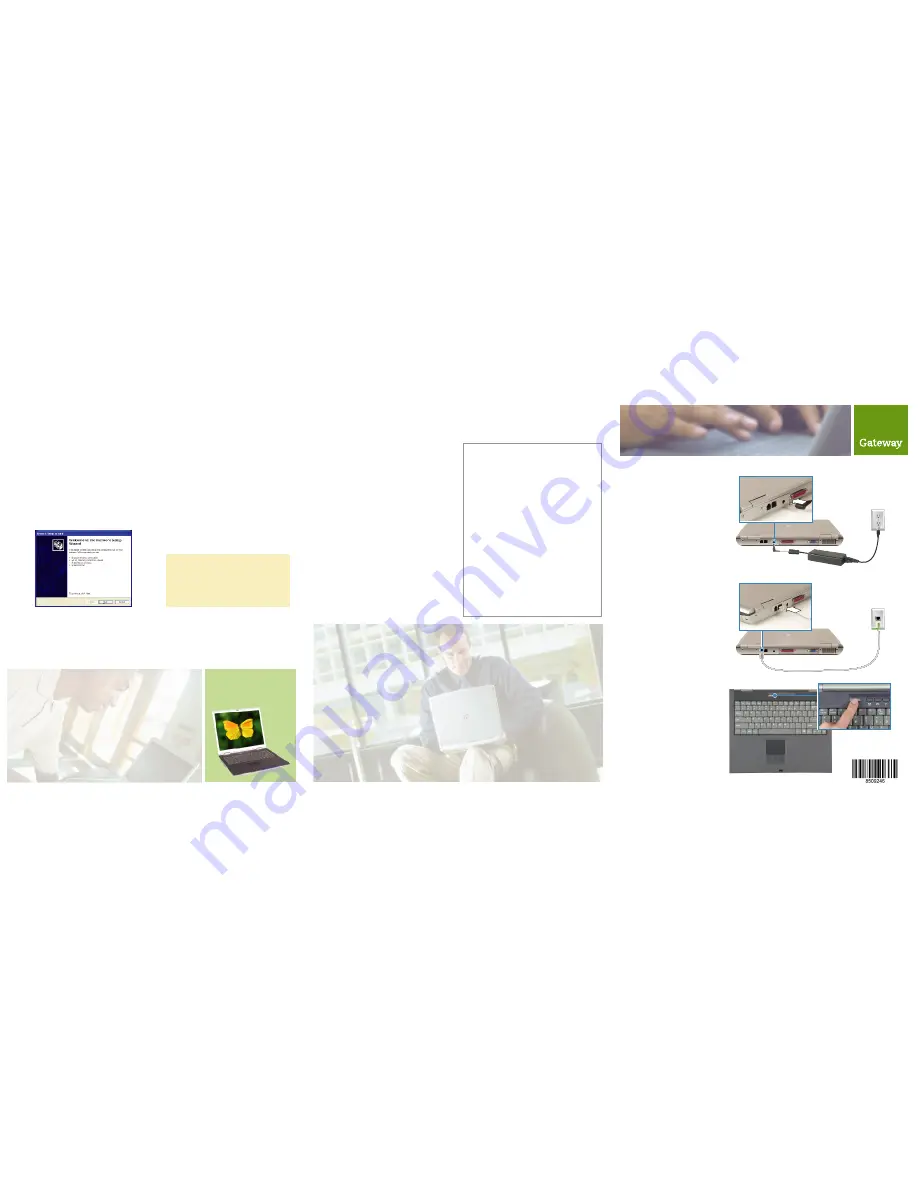
Connect to AC power
Connect the AC adapter to the
notebook, then connect the AC
adapter to the power cord and the
power cord to an electrical outlet.
You can use the notebook while
the adapter is connected to AC
power.
The first time you plug in the AC
adapter, leave it plugged in for at
least 24 hours to make sure that
the battery is fully charged. The
battery indicator will turn green.
1
2
Connect the modem
(optional)
Connect the modem by plugging
one end of the modem cable into
the modem jack on the back of
the notebook and the other end
into the telephone wall jack.
3
Start the notebook
Open the LCD panel and press
the power button located above
the keyboard. After the
notebook starts, follow the
on-screen instructions to
complete Windows setup.
To turn wireless Ethernet on or off:
1
Click
Start
, then click
Control Panel.
The
Control
Panel
window opens. If your Control Panel is in
Category View, click
Network and Internet
Connections
. The
Network and Internet
Connections
window opens.
2
Click/Double-click
Network Connections
. The
Network Connections
window opens.
3
Right-click
Wireless Network Connection
, then
click
Enable
to turn on wireless Ethernet or click
Disable
to turn off wireless Ethernet.
Connecting your home, small office, or home office computers lets you share drives, printers, and a
single Internet connection among connected computers. Use the Windows XP Network Setup Wizard to
connect quickly and easily.
Your Gateway 400 supports built-in wireless Ethernet, but there may be times, such as traveling on an
airplane, that you need to turn it off.
While your notebook is running on battery power, you should manage power consumption to get the most use
out of the battery.
Monitor the battery charge
When the battery charge gets low, change the
battery or connect to AC power immediately to
prevent losing any unsaved work.
Monitor the battery charge by:
• Double-clicking the power cord icon or battery
icon in the taskbar. The
Power Meter
dialog box
opens.
• Pressing
F
N
+ S
TATUS
to view the power status
box, which opens in the upper-left corner of the
screen. The power status box shows the current
power source, the battery charge level, and the
power management mode.
• Looking at the battery charge indicator:
LED green - battery is fully charged
LED orange - battery is charging
LED solid red - battery is malfunctioning
LED blinking red - battery is very low
Extend the life of your battery
• Dim the display as low as is comfortable
• Remove PC and memory Cards when you do
not need them. Many cards use a small amount
of power while inserted, even if they are not
being used.
• Modify the power management settings for
maximum power savings.
• Close the LCD panel to turn off the display while
you are not using your notebook.
• Use Hibernate mode for maximum power
savings while your notebook is not in use.
• Use the CD, DVD, or recordable CD drive only
when necessary. These drives use a large
amount of power.
• Recharge the battery often, take an extra
battery, and fully recharge the batteries before
traveling.
• Use alternate power sources, such as electrical
adapters, EmPower™ in-flight power
receptacles, automobile cigarette lighters, or AC
power outlets.
Travel tips
Traveling with your notebook can be convenient and trouble-
free.
• Take a telephone cord to connect the modem to telephone
jacks. If you are traveling internationally, take telephone jack
adapters or an acoustic handset coupler.
• Take a telephone line protector.
• Copy your working files from your desktop computer to your
notebook before you travel.
• If you need to access your desktop computer files from your
notebook while traveling, set up your desktop computer for
remote access. Contact your network administrator for more
information about remote access.
• Get a locking cable for your notebook so you can attach a
cable lock and leave your notebook in your hotel room while
you are away.
• Always keep your notebook with you while waiting in airports,
train stations, or bus terminals. Be ready to claim your
notebook as soon as it passes through the x-ray machine in
security checkpoints.
• Write down your notebook model number and serial number
in case of theft or loss, and keep the information in a safe
place. Also, tape your business card or an address label to
your notebook and accessories.
• Use a startup password to restrict access to your notebook.
• Take your AC power adapter to recharge the battery. If you
are traveling internationally, take power plug adapters.
• Take a portable surge protector to protect your notebook
from power surges.
• To get the best performance from your notebook, avoid using
the battery whenever possible, monitor the battery charge,
and use the most efficient power management settings.
• If you plan to use several USB peripheral devices, take a
portable USB hub to provide additional USB ports.
• Take a network cable if you need to connect to a network.
Some hotels provide Internet connectivity only through their
networks.
WARNING:
Radio frequency wireless communication
can interfere with equipment on commercial aircraft.
Current aviation regulations require wireless devices
to be turned off while traveling in an airplane. IEEE
802.11a and IEEE 802.11b communication devices
are examples of devices that provide wireless
communication.
To run the Windows XP Network Setup Wizard:
1
Click the Network Setup Wizard icon on the
Windows XP taskbar. The
Network Setup Wizard
opens.
- OR -
Click
Start
,
All Programs
,
Accessories
,
Communications
, then click
Network Setup
Wizard
. The
Network Setup Wizard
opens.
2
Click
Next
to continue through the wizard.
For more information about networking, click
Start
,
Gateway Documentation
, then click
Networking User's Guide
.
MAN SYS 400VTX SETUP PSTR R0 6/03


