Read all provided instructions before first usage!
Model and attachments are subject to change!
For domestic use only!
Art.- No. 62823 » Design Bread Maker Advanced «
OPERATING INSTRUCTIONS
DESIGN AUTOMATIC BREAD
MAKER ADVANCED
Page 1: ...provided instructions before first usage Model and attachments are subject to change For domestic use only Art No 62823 Design Bread Maker Advanced OPERATING INSTRUCTIONS DESIGN AUTOMATIC BREAD MAKER...
Page 2: ...fications 17 Properties of Your New Bread Maker 17 Environment 17 Functions of the Buttons 18 Programs of the Bread Maker 19 Program Phases 22 Keep Warm Function 22 Memory Function 22 Programming Your...
Page 3: ...can prepare even ice cream Try some new recipes to your individual taste For this use the various pre set programs or even set up your own program The Design Bread Maker Advanced will make your ideas...
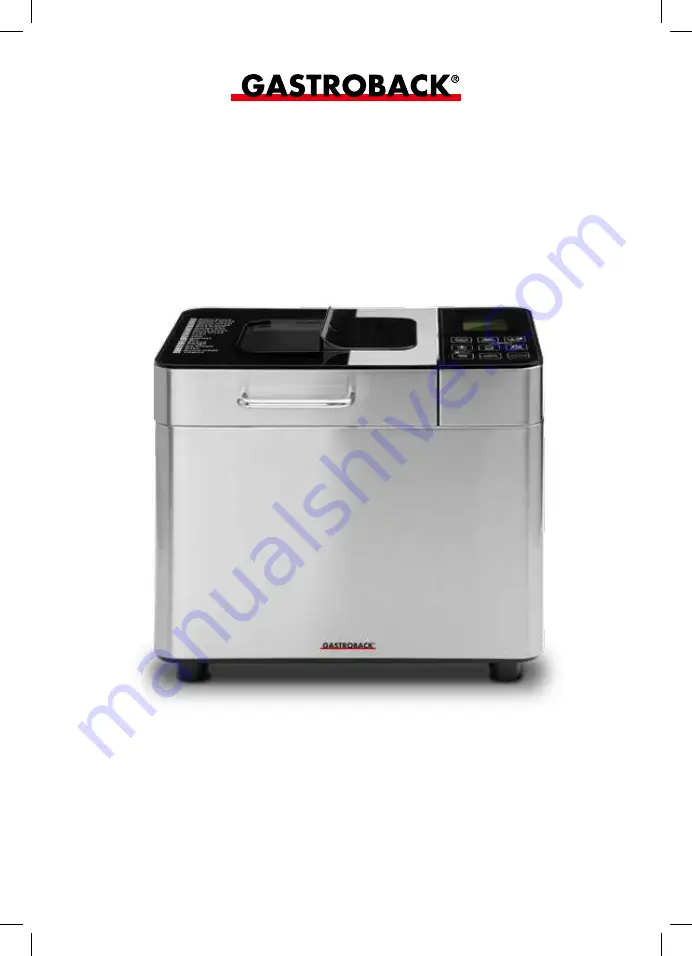
Page 4: ...2 Viewing Window 3 Ingredients Box will release the ingredients automatically during the pre programmed baking programs 1 9 4 Non Stick Coated Kneading Paddle Drive Shaft put on the kneading paddle h...
Page 5: ...heat bake keep warm completion m Key icon if the control panel is in locked mode Buttons only slightly touch with your finger A beep sounds on every input MENU to select the desired baking program WEI...
Page 6: ...mply with the relevant safety pre cautions Children must not play with the device Cleaning and user maintenance may not be performed by children unless they are older than 8 years of age and are super...
Page 7: ...liance to avoid damage due to heat and condensate and for unhindered access Do not operate the appliance under over hanging boards or drop lights Always keep the appliance and the table or counter cle...
Page 8: ...eam program Do not bring the ice bucket in contact with hot sur faces or hot liquids The coolant within the ice bucket would expand forcefully when heated thus bursting the ice bucket and causing risk...
Page 9: ...ked on foods see Care and Cleaning Always keep the appliance and its parts where it is clean IMPORTANT SAFEGUARDS FOR ELECTRICAL APPLIANCES The appliance is heated electrically Place the appliance nea...
Page 10: ...e bread pan is clean and dry before placing the bread pan in the heating compartment Otherwise liquid could run into the housing or on the heating element causing risk of electric shock or fire Do not...
Page 11: ...keep the lid closed during operation However even with the lid properly closed steam could escape from under the lid during operation and thereafter This holds especially for the ventilation slits in...
Page 12: ...tubborn residues can be removed via a soft sponge or soft nylon brush and warm dishwater CARE AND CLEANING WARNING Always ensure that the appliance is out of reach of young children Always switch OFF...
Page 13: ...f the ingredients box 5 Wipe the exterior of the appliance and power cord with a soft damp cloth The reafter wipe the appliance dry with a soft cloth 6 Take the kneading paddle out of the bread pan by...
Page 14: ...e heating compartment until it settles down on the coupling of the kneading works Then turn the bread pan clockwise to lock it onto the coupling Tip If you cannot push the bread pan down completely tu...
Page 15: ...he appliance is still hot Even the exterior of the appliance will get hot during operation Only touch the appliance by the operation elements and handles 10 You can terminate the baking program and wa...
Page 16: ...r sharp edged objects because this may lead to scratches on the non stick coating Do not cut the bread in the bread pan to avo id damage to the non stick coating Always take the bread out of the bread...
Page 17: ...ixtures or create your own recipes Also the Bread Maker can knead dough for noodles pizza or rolls Additionally you can make jam and ice For these purposes you can select among 17 different programs S...
Page 18: ...settings are deleted There is no way to continue the recently used program Thus only touch this button shortly if you wish to pause operation and add further ingredients Alternatively unplug the appl...
Page 19: ...ly touch this button an thereafter the START STOP button for selecting and starting program 16 IMPORTANT Timer operation is not available with the Bake program 16 Instead you may change the baking tim...
Page 20: ...of a normal wheat flour bread 6 Gluten free The ingredients to create gluten free breads are unique While this is a yeast bread the dough is generally wetter and more like a batter It is also crucial...
Page 21: ...a the TIME or TIME buttons you may select the processing time 20 25 or 30 minutes No Timer is operation available 16 Bake For additional baking of bread that is too light or not baked through In this...
Page 22: ...min Bake 0 30 medium BURNING COLOR 0 80 min light medium dark Keep warm 1 00 0 60 min Timer operation up to 15 hours KEEP WARM FUNCTION At the end of the baking programs 1 9 the appliance automatical...
Page 23: ...way in total the dough will be kneaded for a somewhat longer time duration PROGRAMMING YOUR OWN SETTINGS The program Homemade 17 is reserved for your own baking program For each program phase you can...
Page 24: ...ays the time dura tion until completion for the currently active baking program The maximum duration is 15 hours indicated via 15 00 The minimum is the processing time of the currently selected baking...
Page 25: ...for some minutes 3 Touch the START STOP button to start operation The hourglass icon and the dots of the time display will flash on the LCD screen and a count down will show the remaining time You wil...
Page 26: ...r or heap the food in the measuring vessel As this additional amount would influence the result considerably Essential for good results is the order for putting the ingredients into the bread pan Gene...
Page 27: ...rograms of the Bread Maker for the required processes or Applying Some Additional Baking Time Bread Ingredients Bread flour Bread flour has a high content of gluten and a high ability to keep the size...
Page 28: ...10 minutes Do not stir the water The froth should be up to 1 cup Otherwise the yeast is dead or inactive Salt Salt is necessary to improve bread flavour and crust colour But salt can also restrain yea...
Page 29: ...d in an automatic dishwasher Always ensure that the exterior of the bread pan and the heating compartment are clean and completely dry before inserting the bread pan The ice bucket may never come in c...
Page 30: ...ropriate distance at least 30 cm at each sides to the edges of the working space and any other objects Do not place any clothes or tissue or other foreign objects on or under the appliance during oper...
Page 31: ...new baking process 3 Check that the exterior of the bread pan and the interior of the heating compart ment are clean and dry and no ingredients are spilled into the heating compart ment to avoid a bur...
Page 32: ...edients like sesa me linseed or coarsely chopped nuts The appliance will open the inner flap of the ingredients box to leave the content fall into the bread pan Open the slider of the ingredients box...
Page 33: ...With the desired settings on the LCD screen start the baking program by tou ching the START STOP button The dots of the program time and the icon of the actual operating phase will flash The program...
Page 34: ...r browning or you have unin tentionally cancelled the baking program untimely you may apply some additional baking time of up to 1 hours For this leave the bread in the Bread Maker and close the lid T...
Page 35: ...y pour the pur ed fruits into the bread pan Tip When using fruits with only low content of fruit acids e g strawberries peaches sweet cherries you should add a little citric acid or a tablespoonful of...
Page 36: ...thus bursting the ice bucket and causing risk of severe inju ries and damage Additionally the plastic parts of the ice bucket gear box and stirring paddle are sensitive to heat and will get distorted...
Page 37: ...ring vigorously However do not pour the heated milk into the egg yolk all at once to avoid that the egg yolk will set and get lumpy 3 Heat the mixture until it slightly boils Then leave the mixture co...
Page 38: ...an select 20 25 or 30 minutes Touch the START STOP button to confirm your choice 13 Touch the START STOP button again shortly to start the program IMPORTANT Do not fill in hot ingredients All ingredie...
Page 39: ...ck 2 Close the lid of the appliance Use the MENU button to select program 18 Yoghurt Ensure not to select any other program 3 Using the buttons TIME and TIME select the desired processing time from 8...
Page 40: ...too fine ly ground Thus powder or moisture has been spilled into the heating compartment Unplug and leave the appliance cool down Then clean the heating compartment and exterior of the bread pan thor...
Page 41: ...an are not instal led properly Make sure that the kneading paddle and bread pan are posi tioned properly see Preparations The dough is too thick and or too large Check your recipe for the correct weig...
Page 42: ...ase water Too much fruit ingre dients or too much whole wheat flour Reduce the amount of the corresponding ingredients and or increase the amount of yeast The centre of the bread is hollow Excessive w...
Page 43: ...BURNING COLOR to unlock the control panel You have selected the Jam program With the Jam program 10 there are no further entries pos sible Only the buttons MENU and START STOP are active The time flas...
Page 44: ...the power cord loosely around the appliance Do not use any parts or accessories of the appliance for any other purpose than operating the appliance It is good advice to store the parts and accessories...
Page 45: ...ts to the following address Gastroback GmbH Gewerbestr 20 D 21279 Hollenstedt Germany Customers from other countries Please contact your dealer Please agree that we cannot bear the charge of receipt S...
Page 46: ...nd Rise phase When being familiar with the baking cycle you will easily be successful with your own individual bread and cake recipes BASIC WHITE BREAD INGREDIENTS Loaf size 1000 g 750 g 500 g Water 3...
Page 47: ...ox before starting the program Select program 1 Basic Bread WALNUT OR PINESEED BREAD INGREDIENTS Loaf size 1000 g 750 g 500 g Water 280 ml 230 ml 140 ml Egg 2 1 1 Salt 6 g 5 g 3 g Oil 36 ml 24 ml 18 m...
Page 48: ...the stated order Refine cooking oil is recommend Select program 2 French Bread CORN BREAD INGREDIENTS Loaf size 1000 g 750 g 500 g Water 320 ml 240 ml 160 ml Salt 6 g 5 g 3 g Oil 24 ml 18 ml 12 ml Sug...
Page 49: ...ll the ingredients into the bread pan in the stated order Select program 7 Quick Bread WHOLE WHEAT BREAD INGREDIENTS Loaf size 1000 g 750 g 500 g Water 340 ml 250 ml 170 ml Salt 10 g 8 g 5 g Oil 24 ml...
Page 50: ...d instead of water and milk pow der Select program 4 Sweet Bread CUSHAW BREAD INGREDIENTS Loaf size 1000 g 750 g 500 g Water 100 ml 80 ml 50 ml Salt 6 g 5 g 3 g Cushaw pumpkin 300 g 210 g 150 g Oil 30...
Page 51: ...an in the stated order The eggs may be stirred with water to get a somewhat lighter consistency Select program 4 Sweet Bread GREEN BREAD INGREDIENTS Loaf size 1000 g 750 g 500 g Water 260 ml 200 ml 13...
Page 52: ...produce a better loaf add the butter 10 minutes after the kneading process begins Select program 4 Sweet Bread COCONUT BREAD INGREDIENTS Loaf size 1000 g 750 g 500 g Water 280 ml 220 ml 140 ml Egg 2...
Page 53: ...of the appliance and leave the cake cool down within the bread pan for another hour This way you prevent that the cake will collapse Turn out the cake onto a cake rack and leave it cool down completel...
Page 54: ...nnel nutmeg allspice and possibly some pepper ORANGE CAKE 1 egg 100 ml milk 15 g marge pack vanilla sugar 1 vial orange flavour 70 80 g sugar 180 g wheat flour type 405 1 pack baking powder sifted Gla...
Page 55: ...h a little oil Then add the dough Select program 9 Cake DOUGH YEAST DOUGH INGREDIENTS 260 ml water 400 g bread flour 5 g yeast PREPARATION Fill the ingredients into the bread pan Water flour and yeast...
Page 56: ...cillus follow the instructions given on the pack Additionally ripe yoghurt obtained from dried lactobacillus powder may be used for initiating a new yoghurt preparation NOTE Typically your own yoghurt...
Page 57: ...and let the yoghurt rest for some additional time at room temperature until the whey accumula ted on top of the yoghurt Carefully pour off the whey You can use it for preparing a delightful drink see...
Page 58: ...ner For preparing jam in the bread maker an alternative method with corn starch is used This method is described in the following recipes However these jams are perishable The liquid separates easily...
Page 59: ...ves Cut the strawberries into small pieces or pur e them Then fill all ingredients in the bread pan Select program 10 Jam ORANGE JAM INGREDIENTS 900 g oranges 540 g sugar 30 g starch flour 15 ml lemon...
Page 60: ...l INGREDIENTS 200 ml cream 50 ml milk pulp of vanilla pod or teaspoon vanilla extract 2 egg yolks 40 g caster sugar PREPARATION The ice bucket should have been in the freezer for up to 16 hours in an...
Page 61: ...r and place it in the freezer until it has the desired consistency You may store the ice cream for approx 1 week in the freezer QUICK VANILLA ICE CREAM Amount approx 300 ml INGREDIENTS 100 ml cream 12...
Page 62: ...ing a wooden spoon heat on low heat until the mixture has thickened and coats the back of the spoon Leave the mixture cool down then refrigerate to 5 C Whip the chilled cream in a chilled bowl until i...
Page 63: ...until the mixture has thickened and coats the back of the spoon Leave the mixture cool down then refrigerate to 5 C Install the gearbox in the bread maker Then protect your hands with gloves and take...
Page 64: ...hen protect your hands with gloves and take the ice bucket out of the freezer Fix the ice bucket on the gearbox Push the stirring paddle onto the drive shaft in the centre of the ice bucket see Using...
Page 65: ...e gearbox in the bread maker Then protect your hands with gloves and take the ice bucket out of the freezer Fix the ice bucket on the gearbox Push the stirring paddle onto the drive shaft in the centr...
Page 66: ...66...