background image

GARNI ND5010  Desktop Weather Station  

Instruction Manual


Introduction 

This desktop weather station comes with barometric weather prediction, clock, calendar, 
indoor and outdoor temperature and humidity display. It is battery powered with AC 
charger. It is recommended to use the AC charger at all times. 
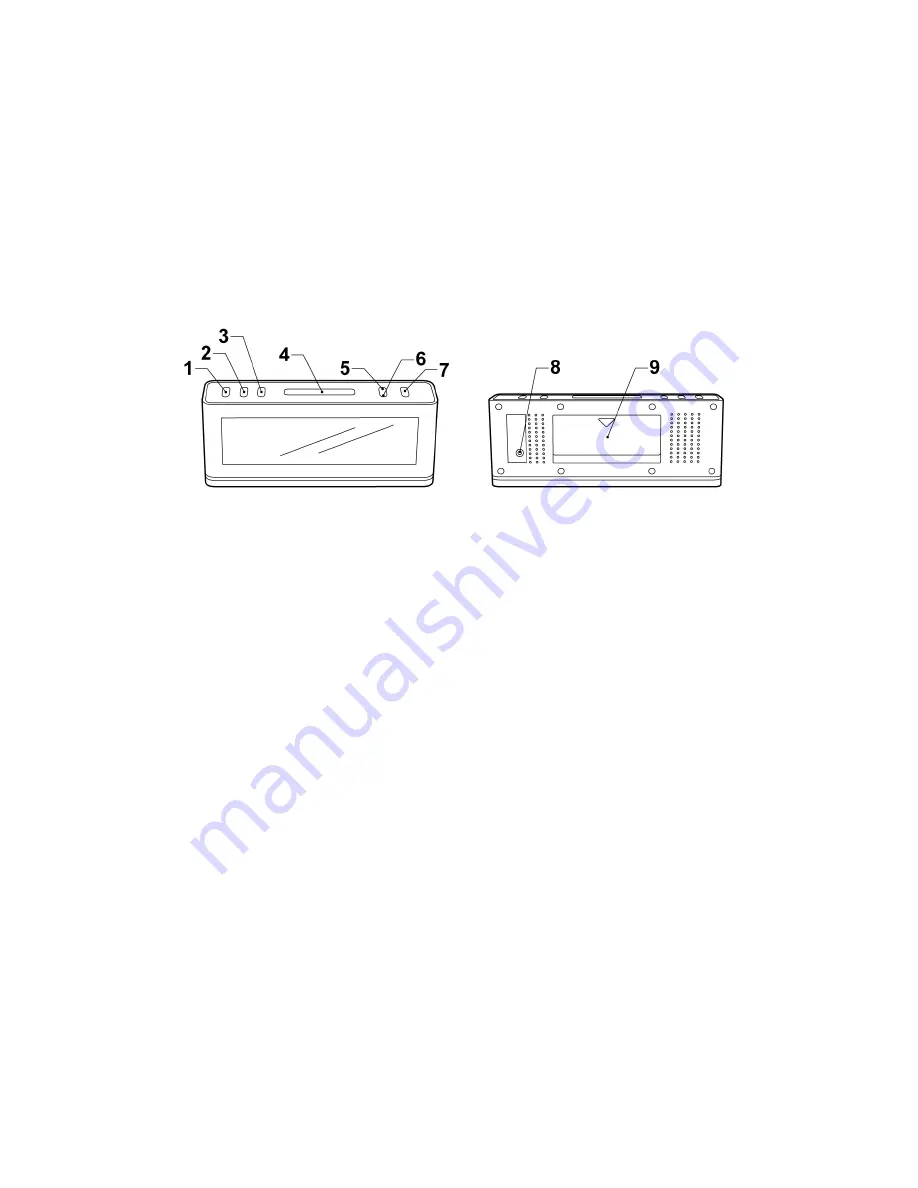


            Fig. 1 Front view 


Fig. 2 Back view 


1.  ‘MODE’ button  
2. ‘+ 

°

C / 

°

F’ button 

3. ‘- 

RCC’ 

button 

4.  ‘SNOOZE / LIGHT’ button 
5. ‘HISTORY’ 

button 

6. ‘CHANNEL’ 

button 

7.  ‘MAX / MIN’ button 
8.  DC line in jack 
9. Battery 

compartment 


General notes: 

1.  It is recommended to set up the remote temperature sensor before setting up the 

weather station / clock. See 

“Configuring Remote Temperature Sensor(s)”


for more information. Batteries and AC adapter should be used together. 


2. 

Please note all other clock / weather station settings seize to function when the 
clock is in RCC synchronization mode. See “

RCC Synchronization” 

for 

additional information.


3.  During initial installation, the temperature and humidity sensor may take up to an 

hour or more to acclimatize to current conditions. 


4.  Press ‘SNOOZE / LIGHT’ (4) to change LCD screen backlight brightness from 

‘OFF’, ‘LOW’, and ‘HIGH’. 


Getting started: 

Installing A/C adapter 

Summary of Contents for ND5010

Page 1: ...compartment General notes 1 It is recommended to set up the remote temperature sensor before setting up the weather station clock See Configuring Remote Temperature Sensor s for more information Batteries and AC adapter should be used together 2 Please note all other clock weather station settings seize to function when the clock is in RCC synchronization mode See RCC Synchronization for additiona...

Page 2: ...not in use 7 Do not recharge and do not dispose of batteries in fire as the batteries may explode 8 Ensure batteries are stored away from metal objects as contact may cause a short circuit 9 Avoid exposing batteries to temperature or humidity extremes or direct sunlight 10 Keep all batteries out of reach from children They are a choking hazard 11 Please retain packaging for future reference Settin...

Page 3: ...r agricultural planning 2 The weather forecast does not display the current weather It displays the weather for the future Adjusting the weather station 1 Press HISTORY button 5 for 3 seconds until a beep sound is heard 2 Press C F button 2 or RCC button 3 to toggle between atmospheric pressure units of Pascal hPa to inch of mercury inHg 3 Press HISTORY button 5 to confirm 4 Press C F button 2 or ...

Page 4: ...lowing the instructions below Press and hold down the RCC button 3 for approximately 3 seconds until is flashing When this signal is flashing the clock is attempting to synchronize with the radio control will flash when a strong signal is received and the clock will synchronize with the radio control This process can take up to 7 minutes will stop flashing and will be displayed once the signal is ...

Page 5: ...arm time Press MODE button 1 once and alarm time 1 will be shown as indicated by Press MODE button 1 again and the current time will be shown To set alarm time Press MODE button 1 once and alarm time 1 will be shown as indicated by Press and hold MODE button 1 for approximately 3 seconds until the digits flash Press C F button 2 or RCC button 3 to change the hour setting Press MODE button 1 again ...

Page 6: ...h Batteries installation 1 Open battery compartment on the back of the unit by removing the two small screws RTS 2 with a Philips head screwdriver see figure 4 2 Install replace with 2x AAA size batteries in the compartment It is recommended that only alkaline batteries are used Do not use rechargeable batteries 3 The weather station is capable of receiving up to 3 different channels Select the ch...

Page 7: ...w the above instructions to set up remote temperature sensor 2 Press and hold Channel button 6 on weather station for 3 seconds will flash This will reset all temperature memories 3 The weather station will begin scanning for signals for channel 1 As soon as signals are received for channel 1 the temperature will be displayed The weather station will automatically scans for the other channels It w...

Page 8: ...d 2 indicates the temperature is in a no change trend 3 indicates the temperature is in a decreasing trend Warnings Do not subject the unit to excessive force shock dust temperature or humidity Do not immerse the unit in water Dispose the complete unit when battery is no longer charging or when the unit is no longer displaying the temperature and or humidity Do not remove any screws Do not dispose...

Reviews: