Gaggia Milano RI8260, User Manual
The Gaggia Milano RI8260 is a premium coffee machine that delivers barista-quality espresso in the comfort of your home. Ensure optimal performance and customer satisfaction by downloading the comprehensive user manual completely free from manualshive.com. Experience the art of espresso-making with this exceptional product.
Share
Download


Reviews:
No comments
Related manuals for RI8260

9
Brand: LabelTac Pages: 28

ICE0250 Series
Brand: Ice-O-Matic Pages: 2

GEMU090 Series
Brand: Ice-O-Matic Pages: 25
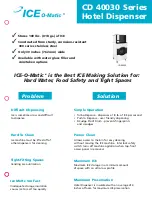
Hotel Dispenser CD 40030 Series
Brand: Ice-O-Matic Pages: 2

MICRA
Brand: La Marzocco Pages: 55

Linea PB
Brand: La Marzocco Pages: 3

S8 DSP
Brand: La Spaziale Pages: 12

S1 Vivaldi II
Brand: La Spaziale Pages: 30

S1 Vivaldi
Brand: La Spaziale Pages: 22

vulcano
Brand: La Marzocco Pages: 74

GS/3
Brand: La Marzocco Pages: 18

SWIFT EPSB
Brand: La Marzocco Pages: 32

GS/3
Brand: La Marzocco Pages: 16

STRADA MP
Brand: La Marzocco Pages: 2

Strada AV
Brand: La Marzocco Pages: 116

FB 70
Brand: La Marzocco Pages: 2

Q50
Brand: 1st-line Pages: 56

03510
Brand: Beem Pages: 72


