background image

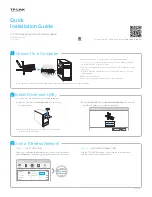
This getting started guide contains information 
on using your Bluetooth

TM


Modem Station hard-

ware and software with a Bluetooth PC Card. We 
strongly recommend that you read this guide 
before using the device, even if you are already 
familiar with Bluetooth technology and personal 
computers.

I N S T R U C T I O N S

Bluetooth

™ 

Modem Station

Getting Started Guide

F u j i t s u   P C   C o r p o r a t i o n

Summary of Contents for FMWT-401

Page 1: ...and software with a Bluetooth PC Card We strongly recommend that you read this guide before using the device even if you are already familiar with Bluetooth technology and personal computers I N S T R U C T I O N S Bluetooth Modem Station Getting Started Guide F u j i t s u P C C o r p o r a t i o n ...

Page 2: ...actories and other application specific low output radio stations not subject to a license In the event the Modem Station causes radio interference to an on premises radio station for identification of mobile units immediately change the frequency used or break off connection and consult FM Information Service about preventive measures against radio interference for example installation of partiti...

Page 3: ... generation Pull out the AC adapter immediately when you find any abnormality Do not use the Modem Station in the abnormal conditions e g the unit is damaged a foreign smell is given off a foreign substance is put in the unit smoke is emitted or the unit is heated excessively This may cause a fire or electric shock Do not cover or enclose the AC adapter in use The accumulated heat may cause a fire...

Page 4: ...so functions as a message phone However it cannot be used during communication using the Modem Station When multiple computers have been registered in one Modem Station only one personal computer can be used at a time for communications When a communications application can not be termi nated normally confirm that the status indicator lamps OFF HOOK and CONNECT of the Modem Station go off If they ...

Page 5: ...roceeding be sure to carefully review the important safety information starting on page page 2 Verification of Connector Type Before connecting the Modem Station verify the connector to which you will connect is one of the types shown below Figure 1 Jack Configurations Modular Jack Rosette 3 Terminal Jack 4 Terminal Jack Getting Started ...

Page 6: ...e line branch point with a modular jack or use a commercial conversion adapter for connection with a modular plug as shown below Figure 2 Conversion Adapter Using the Modem Station in conjunction with a Bluetooth PC Card you can browse Web pages or send and receive e mail by connecting wirelessly to the Internet You can also send or receive faxes using commercial fax software Using the Modem Stati...

Page 7: ...s can be performed via an analog line when a Bluetooth PC Card is used together with the Modem Station Figure 3 Connecting with an Analog line Analog Line Modem Station Computer containing Bluetooth Card Wireless Communication ...

Page 8: ...ms are contained in the package If any item is missing or damaged contact your reseller immediately Figure 4 Contents of Modem Station Package Modem Station AC Adapter Serial Cable Modem Setup Tool Disk Warranty Card Modular Cable Mounting Screws User s Guide Network List ...

Page 9: ...le power to this unit is on OFF HOOK Lights from the time that you start the connec tion you begin to call up a provider until you disconnect the line CONNECT Lights from the time you call up a provider until you disconnect the line while you are connecting the Status Indicators Power Switch DC Input Line Input Telephone Terminal Serial Connector Antenna internal for future use only ...

Page 10: ...e Modem Station power on or off DC IN port This terminal is connected with the DC plug of the supplied AC adapter LINE terminal This terminal is connected with a telephone line using a modular cable TEL terminal This terminal is connected with a telephone set using a modular cable Serial connector This connector is not currently used it is provided for future applications Antenna An internal anten...

Page 11: ...when you want to deaden a sound during line connection Switch 2 Set to ON when you want to turn off status indicator lamps Switch 3 Set to ON when you use a terminal adapter Switch 4 Used for system setting Usually set to OFF Flow of operation 1 Install the Modem Station Perform the Installation procedure on page TBD P O I N T Steps 1 through 3 below should be executed only the first time you oper...

Page 12: ...h module PC card at the communication destination For more information see the Bluetooth PC Card manual Set up the modem in accordance with Setting the modem on page TBD TBD P 25 4 Perform communications Turn on the power of the Modem Station in accordance with Turning on the power on page TBD P 24 Insert the Bluetooth PC card into your computer Connect your computer with the Modem Station wire le...

Page 13: ...lar cable of your telephone set from the jack of the telephone line Figure 7 Disconnecting the Modular Cable 2 Connect a telephone set telephone line and AC adapter Figure 8 Connect the disconnected modular cable to the TEL terminal Connect the LINE terminal and the jack of a telephone line using the supplied modular cable Connect the AC adapter Preparing for Communications ...

Page 14: ...n vertically in a stable place Note that the Modem Station can also be mounted on the wall For more information see Mounting on the Wall P 45 P O I N T The Modem Station can also be mounted to the wall For more information see Mounting on the Wall on page TBD TBD ...

Page 15: ...eet 2m away from other electric or electronic systems When you need to install your computer or Modem Station near a microwave oven for some reason keep it at least 10 feet 3m away from the microwave oven Be sure to place the Modem Station in the vertical direc tion If not the internal antenna will not function prop erly If you have trouble communicating using the Modem Station because there is a ...

Page 16: ...ck the OK button Change the drive of the floppy disk as required 5 Click the Next button 6 Confirm the directory in which the tool is installed Change the directory if necessary and click the Next button 7 Enter each item and click the Next button Enter the device address using half size numeric charac ters Delimit them two digits at a time by half size colons P O I N T Bluetooth PC Utility must b...

Page 17: ...Click the Start button and then click Settings and Control panel 11 Click Modem then click Add 13 Click Not detect to select modem from list for checking and then click the Next button 14 Click Have Disk 15 Confirm that Copy source of source file is A then click the OK button Change the drive name of the floppy disk according to your personal computer used 16 Click FUJITSU FMWT 401 then click the ...

Page 18: ...l is now complete Turning on the power 1 Push the power switch on the rear panel in the direction indicated by the arrow in Figure 9 When the power is turned on all status indicator lamps blink for a few seconds and then the POWER lamp lights green Figure 9 Turning on power P O I N T Depending on the setting of your personal computer COM3 may change to COM1 or COM2 ...

Page 19: ...the modem which browser mail software and FAX software use to FUJITSU FMWT 401 using your personal computer This modem is displayed when Bluetooth Modem Setup Tool is installed properly If this modem is not displayed execute Installing the Bluetooth Modem Setup Tool P 19 The operation or screen varies depending on the application used P O I N T If power is turned off during communication an error ...

Page 20: ... Bluetooth PC card into the personal computer For the way to insert the PC card see the manual of the personal computer 4 Click the Bluetooth Modem Setup Tool icon in a task tray P O I N T S If the Bluetooth Modem Setup Tool icon is not dis played in a task tray click the Start button Pro gram FUJITSU Bluetooth PC Utility and FUJITSU Bluetooth Modem Setup Tool Another way to perform the same opera...

Page 21: ...irm the setting of Bluetooth Modem Setup Tool and modify it as required 1 Right click the Bluetooth Modem Setup Tool in a task tray and then click Properties from the displayed menu 2 Confirm that there is no error in each entry item If not reenter properly P O I N T S Follow the procedure below when terminating communication 1 Terminate application 2 Right click the Bluetooth Modem Setup Tool ico...

Page 22: ...22 3 Click the Set button P O I N T A Bluetooth passkey PIN code is displayed for security with If you may have entered the Bluetooth passkey PIN code incorrectly delete the code once and reenter it ...

Page 23: ...up Tool P 30 and confirm proper setup Is the Modem Station too far away from the computer A sight distance of approximately 50 m is the range for communications to be possible The distance may be shortened depending on the building environment Bring the computer closer to the Modem Station Communications cannot be performed or stops Turn off the power of the modem and turn it on again Click Device...

Page 24: ...Setup Tool cannot be normally operated for some reason and terminated forcibly Restart the personal computer This error message is displayed when you try to connect from the Bluetooth Modem Setup Tool after the Bluetooth PC Utility has been terminated Start Bluetooth PC Utility and then reconnect Problem Possible Cause Solution ...

Page 25: ...unt of bell ringing required for a reply When the carrier of a destina tion modem is not detected within the time specified using S7 register after reply this command sends NO CARRIER back to your personal computer to disconnect a line and returns the current mode to command mode ATDx This command is used when dialing a telephone number You can specify a pulse dial or tone dial for dialing T Dials...

Page 26: ...g tone is detected for five seconds NO ANSWER is returned to the personal computer Stops for the time specified using S8 register before dialing the subsequent numbers Makes on hook temporarily for 0 5 seconds and then dials the subsequent numbers Used when you want to issue another command contin uously after dialing The command following is terminated using the Enter key The command issued after...

Page 27: ...nd echo Factory setting value E1 ATHn This command is used to disconnect a line when the modem is in the command state It is used for on hooking discon necting a line after executing escape sequence from the online state to put a modem into the command state or after setting ER signal from on to off in the D1 setting mode to put a modem into the command state with the line not disconnected H0 Sets...

Page 28: ... of the speaker This command is written in non volatile memory by W L0 Sets the volume of the speaker to low L1 Sets the volume of the speaker to low L2 Sets the volume of the speaker to middle L3 Sets the volume of the speaker to high Factory setting value L2 ATMn This command is used to turn on or off the speaker This command is written in non volatile memory by W M0 Sets the speaker to off at a...

Page 29: ...on Factory setting value M1 ATOn This command is used to return the modem to the online state again when the modem is put from the online state to the command state in the D1 mode using an escape sequence or ER signal 00 Returns the modem to the online mode ATP This command sets the current dial to a pulse dial Parameter P can be omitted using the subsequent dial command This command is written in...

Page 30: ...ster and 5 in S6 register ATSr This command is used to read the contents of S register The contents of the specified S register are sent to the personal computer r Number of S register 0 to 91 ATT This command sets the current dial to a tone dial Parameter T can be omitted using the subsequent dial command This command is written in non volatile memory by W Related parameters D P ...

Page 31: ...ure 11 Explanation of parameters VO Short Message V1 Long Message 0 1 2 3 4 OK CONNECT RING NO CARRIER ERROR 6 7 8 10 11 NO DIALTONE BUSY NO ANSWER CONNECT 2400 EC CONNECT 4800 EC 12 13 14 24 25 CONNECT 9600 EC CONNECT14400 EC CONNECT 19200 EC CONNECT 7200 EC CONNECT 12000 EC 86 40 55 56 57 CONNECT 16800 EC CONNECT 300 EC CONNECT 21600 EC CONNECT 24000 EC CONNECT 26400 EC ...

Page 32: ...ED CONNECT 32000 EC CONNECT 36000 EC CONNECT 40000 EC 76 78 80 82 100 CONNECT 44000 EC CONNECT 48000 EC CONNECT 52000 EC CONNECT 56000 EC CONNECT 28000 EC 101 102 103 104 105 CONNECT 29333 EC CONNECT 30666 EC CONNECT 33333 EC CONNECT 34666 EC CONNECT 37333 EC 106 107 108 109 110 CONNECT 38666 EC CONNECT 41333 EC CONNECT 42666 EC CONNECT 45333 EC CONNECT 46666 EC 111 112 113 114 CONNECT 49333 EC CO...

Page 33: ...ers v Symbol Description V42bis V 42 error correction and V 42bis data compression V42 V 42 error correction only MNP5 MNP class 4 error correction and MNP class 5 data compression MNP4 MNP class 4 error correction only NoEC No error correction ...

Page 34: ...volatile memory in a setting register Z0 Reads the contents of Profile 0 Z1 Reads the contents of profile 1 Cmd Dialing No DIal Tone Busy Code Result Code X0 After time speci fied by S6 register Not Returned Not Returned Connect X1 After time speci fied by S6 register Not Returned Not Returned Connect XXXXXX XXXXXX indicates transmission speed X2 After detecting dial tone returned Returned Not Ret...

Page 35: ...r This command is written in non volatile memory by W C0 Turns on a CD signal at all times irrespective of the carrier from the destination modem C1 Turns on a CD signal while the carrier from the desti nation modem is detected Factory setting value C1 P O I N T All commands that follow Z in the same command line are ignored P O I N T The A command is the only command that AT does not precede ...

Page 36: ... signal is set from on to off At that time automatic incoming is also inhibited The automatic incoming is enabled when ER signal is set to on again D3 The modem is put into the same initial state as during the power on sequence when ER signal is set from on to off Factory setting value D2 AT F This command reads the contents of ROM in a setting register As a result the modem is put into the factor...

Page 37: ...DR data set ready signal sent to the personal computer S0 A DR signal is always set to on S1 A DR signal is set to on after an answer tone is detected and off when no carrier is detected Related parameters S0 AT V This command displays the current setting value of a command and the value of an S register AT Wn This command writes the contents of a setting register in non volatile memory This value...

Page 38: ...reads this telephone number for dialing The character string of a telephone number is the same as how to describe the ATD command In n up to 34 charac ters can be memorized including parameters and telephone numbers This command shifts the current mode to command mode The character of the command is specified using S2 register It is not necessary to enter AT commands and carriage return characters...

Page 39: ...g times Rings 000 000 015 S3 Carriage return character CR ASCII 013 000 127 S4 Line feed character LF ASCII 010 000 127 S5 Back space character BS ASCII 008 000 255 S6 Standby time of dial tone 0 and 3 are invalid The setting value at that time is 4 sec 004 004 255 S7 Standby time of carrier The value exceeding 60 is set to 59 sec 059 035 059 S8 Pause time using com mand sec 002 002 065 S10 Time r...

Page 40: ...connector RS 232C D sub 9 pin Not cur rently used provided for future applications Power Require ments Input 12VDC AC adapter Input 100VAC 50Hz 60Hz Power Consumption Approximately 5W or less during communication Approximately 4W or less during non communication and power on sequence Approximately 3 5W or less dur ing power off sequence Outer dimensions W x D x H Approximately 134mm x 32 mm x 110m...

Page 41: ...mission speed Data Mode During reception 56000 54666 54000 53333 52000 50666 50000 49333 48000 46666 46000 45333 44000 42666 42000 41333 40000 38666 38000 37333 36000 34666 34000 33600 33333 32000 31200 30666 29333 28800 28000 26400 24000 21600 19200 16800 14400 12000 9600 7200 4800 2400 1200bps During transmission 33600 31200 28800 26400 24000 21600 19200 16800 14400 12000 9600 7200 4800 2400bps ...

Page 42: ...ection Conforms to ITU T V 42 MNP class 4 Modem command control AT command Supports Bluetooth Specifica tion Ver 1 oB DIAL_UPPROFILE and FAX PROFILE commands FAX command control EIA 578 class 1 Supported OS Windows Me Windows 2000 Windows 98 Operating conditions Fujitsu Bluetooth PC Utility must have been installed in your PC Modem ...

Page 43: ... screw holes on the right side panel of the Modem Station with the figure below as a reference Figure 13 Mounting Screw Locations P O I N T The screws that are supplied with the Modem Station are for use with wood Be sure to use proper screws if the attachment surface is not wood approximately 2 9 ...

Page 44: ...olaget LM Eric sson and Fujitsu is licensed to use it Fujitsu and the Fujitsu logo are registered trademarks Fujitsu Ltd and LifeBook is a trademark of Fujitsu PC Corporation WinDVD is a trademark of InterVideo Incorpo rated All other trademarks mentioned herein are the property of their respective owners We cannot guarantee the accuracy of the contents of this document We disclaim liability for e...

Reviews: