


FrSky Electronic Co., Ltd. www.frsky-rc.com Contact us: [email protected]
Add: F-4,Building C, Zhongxiu Technology Park, No.3 Yuanxi Road, Wuxi, 214125, Jiangsu, China Technical Support: [email protected]
01140171
Version
1.0
Instruction Manual for FrSky ARCHER SR6 Receiver
Conventional model
Layout
The available flight modes can be assigned to CH10 and CH11 with three-position switches.
CH10 SW-mid
Off
CH10 (3 pos SW)
CH11(3 pos SW)
Stabilization
CH10>M+H
(CH10 SW Down)
M-H<CH11<M+H
(CH11 SW Mid)
Automatic level
CH10>M+H
(CH10 SW Down)
CH11>M+H
(CH11 SW Down)
Hover
CH10>M+H
(CH10 SW Down)
CH11<M-H
(CH11 SW Up)
Knife-Edge
CH10<M-H
(CH10 SW Up)
M-H<CH11<M+H
(CH11 SW Mid)
Flight mode
Delta wing & Flying wing & V-tail
Layout of Delta wing / Flying wing
Layout of V-tail
The available flight modes can be assigned to CH10 with a three-position switch.
Flight mode
Stabilization
Auto Level
Off
CH10
CH10>M+H
(CH10 SW Down)
CH10<M-H
(CH10 SW Up)
CH10 SW-mid
When Delta wing/Flying wing/V-tail is selected, the signal produced by the transmitter should be without active mixes on the channels
related to AIL and ELE. SR6 will mix the AIL(CH1) and ELE(CH2) input signal with a fixed mix percentage automatically. Signals on
CH4~CH8 will behave as required by the user.
M:
represents a neutral signal period (1500μs)
H:
represents the time of required signal change to activate the mode (50μs). When the factory settings are selected, the switch position
shown above represents the required modes.
Off:
When the mode is activated, SR6 will transmit the received commands produced by the transmitter to the model without compen-
sating.
Stabilization:
When the model is activated, SR6 will compensate with external forces (wind) as soon as receiving commands from the
transmitter. This function is used to enhance the stability of the model on three axes (Pitch, Roll, Roll). CH9 could be used to adjust
gyro gain by assigning a knob or a slider, changing the sensitivity of the counteracting signal produced by the internal three-asis
gyroscope.
Automatic level:
When the mode is activated, SR6 will make the model return to level orientation with internal three-axis accelerome-
ter and three-axis gyroscope on AIL and ELE channels after the sticks being released to neutral. RUD channel works in stabilization
mode only.
Flight mode:
FrSky Electronic Co., Ltd. www.frsky-rc.com Contact us: [email protected]
Add: F-4,Building C, Zhongxiu Technology Park, No.3 Yuanxi Road, Wuxi, 214125, Jiangsu, China Technical Support: [email protected]
01140171
Version
1.0
Instruction Manual for FrSky ARCHER SR6 Receiver
Hover:
When the mode is activated, SR6 will make the nose of the model straight up with internal three-axis accelerometer and
three-axis gyroscope on RUD and ELE channels (ELE and RUD inputs are not required). Under this mode, AIL is used to control the
rotation of the model and THR adjust the altitude. AIL channel works in stabilization mode only.
Knife-egde mode:
When the mode is activated, SR6 will roll the plane on a certain side (wing points up) with internal three-axis
accelerometer and three-axis gyroscope on RUD and AIL channels.Thus, AIL inputs are not required. While the mode steering is done
with ELE, altitude will be maintained with THR/RUD. ELE channel operates in stabilization mode only.
FrSky Electronic Co., Ltd. www.frsky-rc.com Contact us: [email protected]
Add: F-4,Building C, Zhongxiu Technology Park, No.3 Yuanxi Road, Wuxi, 214125, Jiangsu, China Technical Support: [email protected]
01140171
Version
1.0
Instruction Manual for FrSky ARCHER SR6 Receiver
Note: CH9~CH12 are not marked on the diagram.
CH9 Edit — Setting CH9 at Weight 50 and offsetting 50, the assigned pot/slider will work normally.
Attentions
CH1~CH8 should be connected to the corresponding servos.
S.Port could be used to update, edit parameter settings via FrSky STK PC tool and connect with telemetry sensors.
The model types could be enabled via STAB RX.Lua/FreeLink APP/FreeLink.exe). If required, SR6 could be used as a standard 6
channel receiver.
Modes
Delta Wing
Flying Wing
V-tail
stabilization
automatic level
Stabilization
Automatic level
Hover
Knife-edge
Conventional Model
Set up your model and receiver
You need complete calibration of Accelerometer about the six positions via the STAB RX.Lua/FreeLink APP/FreeLink.exe firstly.
Step1: Connect your servos follow the channel list according to your model.
Step2: Set you radio follow the channel list.
Step3: Choose the Wing Type via the configuration tool (STAB RX.Lua/FreeLink APP/FreeLink.exe).
Step4: Choose the AUTO LEVEL mode, check the model servo feedback.
Step5: Choose the manual mode, check servo feedback via transmitter.
Quick Mode
It supports stabilization mode and manual (six-axis off) mode and configured through CH10. What’s more, an urgent mode is added to
configure automatic level mode default through CH12. The precise configuration is written below.
Channel
Position
Flight Mode
SW Down None
SW Mid
Stabilization Mode
SW Up
Automatical Level Mode
CH12
SW Down Urgent Mode (Automatic Level Mode)
CH10
Note: The default mode of SR6 is Quick Mode. When re-flashing firmware of SR6 or replacing with a new one, the preset
mode will be cleared out.
- If Quick mode is applied, there is no Knife Edge or (3D) Hover mode.
- CH11 is not used when using Quick Mode.
FrSky Electronic Co., Ltd. www.frsky-rc.com Contact us: [email protected]
Add: F-4,Building C, Zhongxiu Technology Park, No.3 Yuanxi Road, Wuxi, 214125, Jiangsu, China Technical Support: [email protected]
01140171
Version
1.0
Instruction Manual for FrSky ARCHER SR6 Receiver
Note: Once the receiver is registered, the button is not needed anymore in the binding process.
Registration & Automatic binding (Smart Match )
TM
Follow the step below to finish the Registration & binding procedure:
1. Put the transmitter/transmitter module into [Reg] status.
1.1 For Taranis X-Lite Pro as an example, turn on the transmitter, go to the MENU-MODEL SETUP-PAGE 2,choose Internal or External
RF, and select [Reg].
2. Connect the battery to the receiver while holding the button on the receiver. The RED LED and GREEN LED on the receiver will be
on, indicating into the [Reg] status. Select [ENTER] on the transmitter, The RED LED and GREEN LED on the receiver will flash, and
the transmitter displays [Registration ok].
3. Turn off the receiver.
4. Move the cursor to select the receiver 1 [Bind].
5.
Connect the battery to the receiver, the GREEN LED will flash, indicating into the [Bind] status. Select the RX, the GREEN will keep
lit, and the transmitter displays [Bind successful].
6. The transmitter exit [Bind], GREEN LED will keep lit, RED LED will be off, indicating Working normally.
Overview
Introduction
The Archer SR6 are gyro-stabilized receivers with a built-in 3-axis gyroscope and 3-axis accelerometer, they have 6 high-precision
PWM channel outputs and features multiple flight modes and configuration methods. They support full-range signal strength with dual
detachable antennas it guarantees optimal antenna-reception and maximum range. In addition to all this, the SR6 can also be used as
a redundancy receiver along with any other FrSky ACCESS capable receiver equipped with an SBUS port.
All of the Archer receivers are hyper-matched with the ACCESS protocol. They not only feature wireless firmware upgrades and
increased range and telemetry performance, the SR6 now supports more functions like configurable telemetry power, S.Port/F.Port
switching and FLR output. Additional valuable features are under development to unlock the true potential of the ACCESS protocol.
Specifications
● Dimension: 47.5*20.5*11mm (L*W*H)
● Weight: 13g
● 16 / 24 Configurable SBUS Channels
● 6 High-precision PWM Channels
● Operating Voltage Range: 3.5 -10V
● Operating Current:
<
60mA@5V
● Control Range: Full range* with telemetry
(*Full Range:
>
2km, range may vary based on local conditions.)
● Voltage Measurement Range via AIN2 (External device): 0-3.3V
● Compatibility: All FrSky ACCESS transmitters
Features
● ACCESS protocol with Over The Air (OTA)
● Built-in 3-axis gyroscope and 3-axis accelerometer sensor
● Multiple flight modes and configuration methods (LUA & Freelink)
● Full control range with telemetry
●
S.Port / F.Port / F.Port 2.0
● Supports signal redundancy (SBUS In)
* Different from ACCST SXR receivers, the SBUS IN signal
can be adjusted through the STAB module of SR6 when
the STAB function is enabled.
● External battery / device voltage detection
SBUS OUT
SBUS
IN
AIN2
6 / 2 4 C H T e l e m e t r y & S t a b i l i z a t i o n
A r c h e r S R 6
CH1
CH2
CH3
CH4
CH5
CH6
Working State
ON
OFF
Flashing
exceeding limits [0.9G, 1.1G]
within limits [0.9G, 1.1G]
completing
Yellow LED State (Calibration of Accelerometer)
Blue LED
ON
OFF
State (Self-check)
in process
completing
Status
Register
Register successfully
Bind
Work Normally
Failsafe
Red LED
On
Flash
Off
Off
On
Green LED
On
Flash
On
Flash
Off
Gyro gain adjustment of CH9: When the the value of CH9 is in the center, the gain is zero. The gain increases as the value gets bigger.
Until the value is ±100%, the gain reaches maximum.
Channels
Number of
Channel
CH1
CH2
CH3
CH4
CH5
CH6
Corresponding parts
on the model
AIL 1
ELE 1
THR
RUD
AIL 2
ELE 2
Full name
Aileron
Elevator
Throttle
Rudder
Aileron
Elevator
Number of
Channel
CH7
CH8
CH9
CH10&CH11
CH12
Corresponding parts
on the model
User-defined
User-defined
No mark
No mark
Full name
Gyro gain adjustment
Flight modes
Self-check activation switch
Configuration
Methods: APP configuration
FrSky radio configuration
PC configuration software (FrSky STK usb updater)
Configuration parameters: Wing type, mounting type, gain setting, offset angle setting, accelerometer calibration.
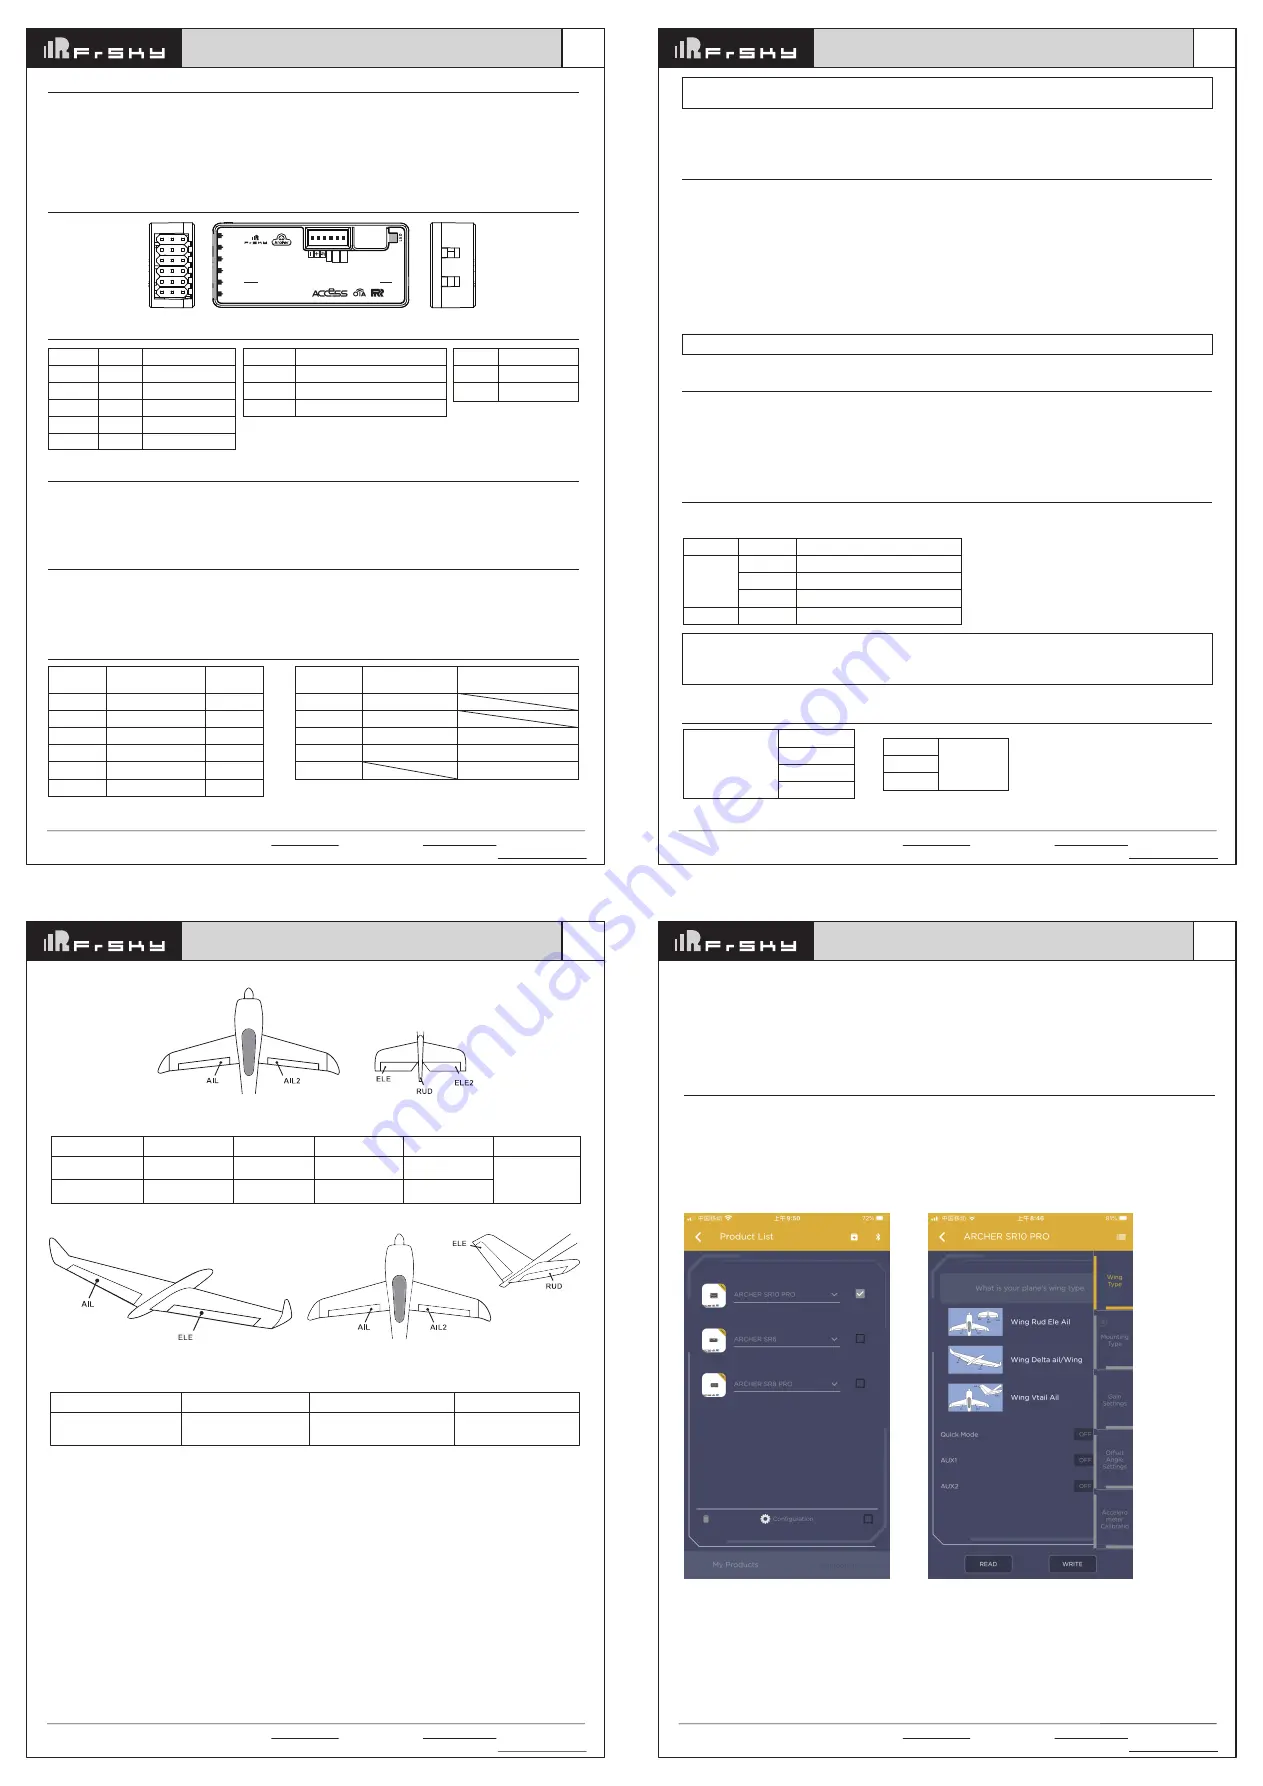
APP(IOS/Android) configuration
:
•
Connect the SR6 to the App with AirLink S.
The menu screen is displayed below (For SR10 PRO as an example):


