Frigidaire TEF303BWD, Инструкция по использованию и уходу
Frigidaire TEF303BWD - это электрическая варочная панель с пятью конфорками и поворотными переключателями. Для правильного использования устройства рекомендуется загрузить бесплатное руководство по эксплуатации на manualshive.com. Это поможет вам освоить все функции и настроить панель под ваши потребности.
Поделиться
Скачать


Отзывы:
Нет отзывов
Похожие инструкции для TEF303BWD

GH6
Бренд: Vulcan-Hart Страницы: 2

Waldorf RN8610GC
Бренд: Waldorf Страницы: 2

JES9860BAB
Бренд: Jenn-Air Страницы: 108

FGP325H
Бренд: Whirlpool Страницы: 16

FGS335E N
Бренд: Whirlpool Страницы: 112

DL 48 P6G
Бренд: DeLonghi Страницы: 28

RN8910GC
Бренд: Waldorf Страницы: 28
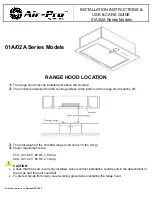
01A series
Бренд: Air-Pro Страницы: 18

Renaissance Series MRES30S
Бренд: Dacor Страницы: 16

JDS9860BD
Бренд: Jenn-Air Страницы: 2

JDS8850CDB
Бренд: Jenn-Air Страницы: 32

GS470LEMB3
Бренд: Inglis Страницы: 16

GS445LEMS0
Бренд: Inglis Страницы: 16

9761809
Бренд: Inglis Страницы: 20

1092 Continental Dual Fuel
Бренд: Falcon Страницы: 36

Classic Deluxe 110 Dual Fuel
Бренд: Falcon Страницы: 40

HIPR30S
Бренд: Dacor Страницы: 24

MCSRG24S
Бренд: Magic Chef Страницы: 44


