

Thank you for choosing our fontastic quality product.
Please read the manual carefully.
Package contents
Activity tracker | USB charging clip | Quick guide
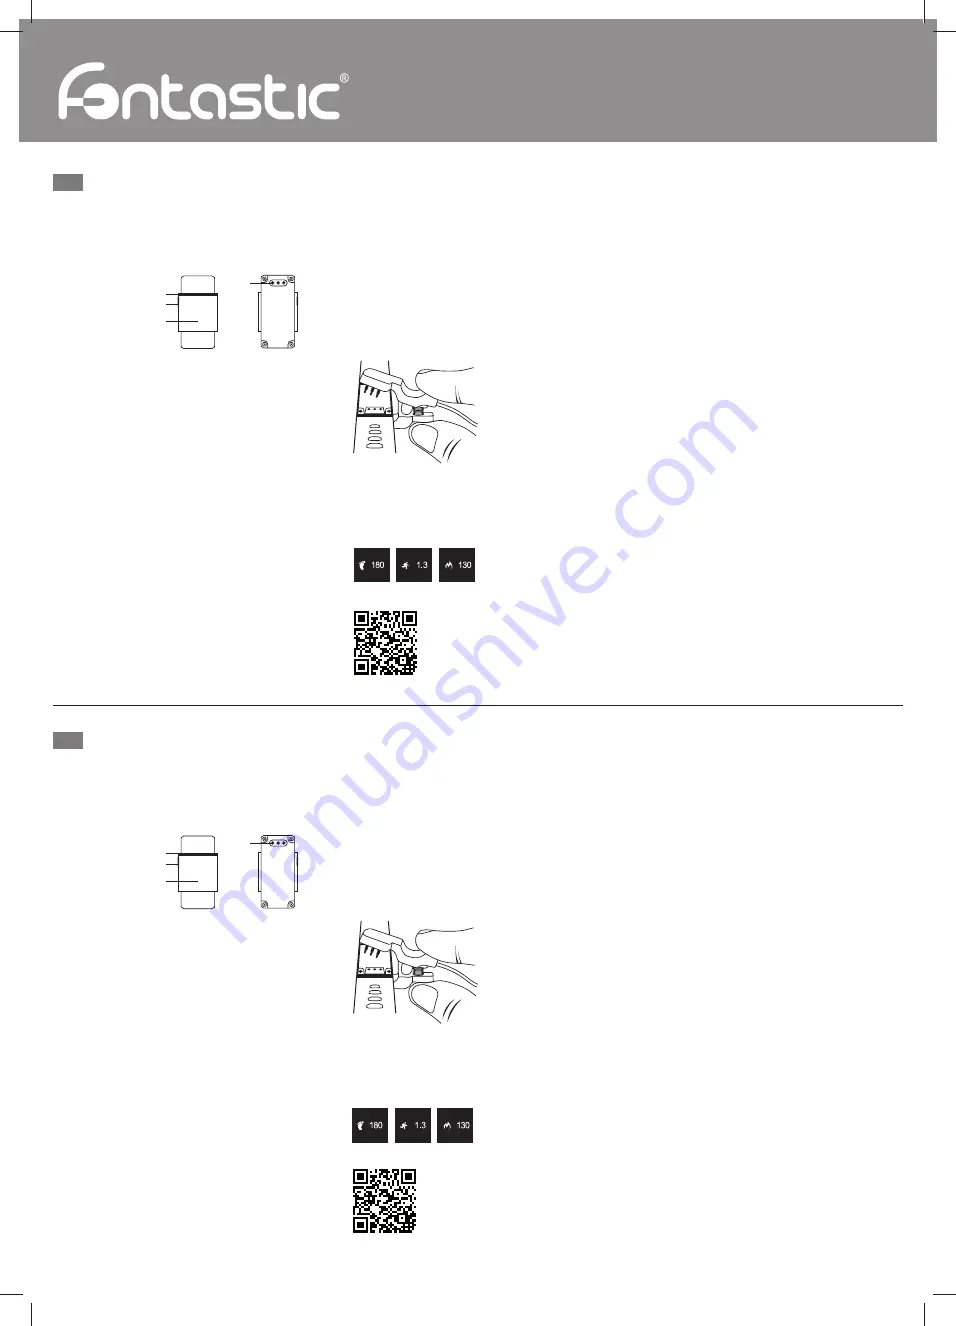
Overview
1.
Tracker housing
2.
Multifunction button
3.
OLED Display
4.
Charging connector
Getting Started
Charging the battery
The activity tracker is equipped with a rechargeable lithium polymer
battery. Fully charge the tracker prior to putting the device into operation
for the
fi
rst time. For this purpose, please connect the charging clip
included in the scope of delivery to the charging port on the back of
the tracker (Fig.1).
Connect the USB plug of the cable to a USB power source. The charging
clip can be connected to any charging device having a USB port or the
USB port of a computer. Once the device is fully charged and the charging
process has been concluded, disconnect the activity tracker from the
charging clip. The usual charging time is 1-2 hours.
Switching the device on and off
To switch it on, press and hold down the multifunction button until the tracker vibrates brie
fl
y and the
display switches on.
Repeat the process to switch off the activity tracker.
Display
The activity tracker has an in-built OLED display. The date/time, steps
walked, distance covered in km and calories consumed are shown on
the display. By pressing the multifunction button you can switch
between the individual functions. The display, showing the date and time,
is enabled by lifting the arm. Date and time are transferred from the
smartphone after synchronization.
Installing the app
Download and install the app for the activity tracker by scanning
the QR code.
Note:
The Android app requires Android 4.4 or later versions to be installed on your terminal. The iOS
app requires iOS 8 or later versions to be installed on your terminal. Please ensure that your smartpho-
ne is equipped with Bluetooth
®
Version 4 or later versions.
Establishing a Bluetooth
®
connection and using the app
Switch on the activity tracker, enable Bluetooth
®
on your smartphone and start the app. The setting to
connect to the tracker appears in the app. The tracker is shown there, and the connection is established
by clicking on the tracker icon.
In order to set up the connection manually, go to the “Settings” item in the app, select “Search for new
devices“ there, and the tracker is shown. The connection is established by clicking on the tracker icon.
A successfully established Bluetooth
®
connection is indicated by the Bluetooth
®
logo blinking on the
display.
Note:
Please note that the two devices to be connected need to be within range of each other.
When starting the app for the
fi
rst time, you will be asked to enter data, such as your sex, weight, height
and year of birth. This data serves to correctly calculate calorie consumption. Once the connection has
successfully been established, the tracker begins to record and analyse the data and send it to your
smartphone for graphic display. You have the option, in the app, to select further settings.
Further movement and sleeping data is shown by tapping on the large circle on the respective page.
You have the option of reading out the data there, or exporting it, for example, to social networks. In
order to record a route, tap on the corresponding icon in the top right-hand corner and click on “Start”.
In order to synchronise the data from the activity tracker with your smartphone manually, drag your
fi
nger downwards on the display on the “movement” or “sleep” screen.
Note:
To record a route, you need to enable the GPS function of your smartphone.
In case you need technical support, please contact our support-team by e-mail under
[email protected].
Technical data:
• Connection: Bluetooth
®
4.0
• Battery type: Lithium polymer
• Display: 0.49 inches OLED
• Operating temperature: -10°- +40° C
• Weight Tracker: 27g
• Material bracelet: Silicon
Technical changes could be made without prior notice
Vielen Dank dass Sie sich für dieses Fontastic Produkt entschieden haben.
Bitte lesen Sie vor Inbetriebnahme die Bedienungsanleitung sorgfältig.
Verpackungsinhalt:
Aktivitätstracker | USB Lade-Clip | Bedienungsanleitung
Übersicht
1.
Tracker-Gehäuse
2.
Multifunktionstaste
3.
OLED Display
4.
Ladeanschluss
Inbetriebnahme
Au
fl
aden
Der Aktivitätstracker ist mit einem wiederau
fl
adbaren Lithium-Polymer
Akku ausgestattet. Laden Sie den Tracker vor der ersten Inbetriebnahme
vollständig auf. Verbinden Sie hierzu den im Lieferumfang enthaltenen
Lade-Clip mit dem Ladeanschluss auf der Rückseite des Trackers (Abb.1).
Verbinden Sie sie den USB Stecker des Kabels mit einer USB
Stromquelle. Der Lade-Clips kann mit jedem Ladegerät mit USB
Ausgang oder dem USB Port eines Computers verbunden werden.
Trennen Sie den Aktivitätstracker vom Lade-Clip, sobald das Gerät
vollständig aufgeladen, und Ladevorgang abgeschlossen ist.
Die übliche Ladedauer beträgt 1-2 Stunden.
Ein-/Ausschalten
Zum Einschalten, drücken und halten Sie die Multifunktionstaste, bis der Tracker kurz vibriert und sich
das Display einschaltet.
Wiederholen Sie den Vorgang um den Aktivitätstracker auszuschalten.
Display-Anzeige
Der Aktivitätstracker verfügt über ein eingebautes OLED Display.
Über das Display werden Datum/Uhrzeit, gelaufene Schritte,
zurückgelegte Distanz in km und die verbrannten Kalorien angezeigt.
Durch Drücken der Multifunktionstaste wird zwischen den einzelnen
Funktionen gewechselt. Durch anheben des Arms wird das Display
mit der Datum/Uhrzeit Anzeige aktiviert. Datum und Uhrzeit werden
nach synchronisation vom Smartphone übernommen.
Installation der App
Downloaden und installieren Sie die App für den Aktivitätstracker
durch Scannen des QR-Codes.
Hinweis:
Die Android App setzt Android 4.4 oder höher voraus. Die iOS App setzt iOS 8 oder höher vor-
aus. Stellen Sie bitte sicher, dass Ihr Smartphone mit Bluetooth
®
Version 4 oder höher ausgestattet ist.
Bluetooth
®
Verbindung und Nutzung der App
Schalten Sie den Aktivitätstracker ein, aktivieren Sie Bluetooth
®
auf Ihrem Smartphone und starten Sie
die App. In der App erscheint die Einstellung zum verbinden des Trackers. Dort wird der Tracker ange-
zeigt, durch Klick auf das Tracker-Icon wird die Verbindung hergestellt.
Um die Verbindung manuell einzurichten, gehen Sie in der App auf den Punkt „Einstellungen“, dort
wählen Sie „Geräte suchen“, der Tracker wird angezeigt. Durch Klick auf das Tracker-Icon wird die Ver-
bindung hergestellt. Eine erfolgreiche Bluetooth
®
-Verbindung wird durch blinken des Bluetooth
®
-Logos
im Display signalisiert.
Hinweis:
Bitte beachten Sie, dass sich zum verbinden beide Geräte in Reichweite zueinander be
fi
nden.
Beim ersten Start der App werden Sie dazu aufgefordert Daten wie Geschlecht, Gewicht, Körpergröße
und Geburtsjahr anzugeben. Diese Daten dienen dazu, den Kalorienverbrauch korrekt zu berechnen.
Nach erfolgreicher Verbindung beginnt der Tracker die Daten aufzuzeichnen, zu analysieren und zur
gra
fi
schen ausgabe sie an das Smartphone zu senden. In der App haben Sie die Möglichkeit, weitere
Einstellungen zu vorzunehmen.
Weitere Bewegungs- und Schlaf-Daten werden durch tippen auf den großen Kreis auf der jeweiligen
Seite angezeigt. Dort haben Sie die Möglichkeit die Daten auszulesen, oder sie beispielsweise an so-
ziale Netzwerke zu Exportieren. Um eine Route aufzuzeichnen, tippen Sie auf das entsprechende Icon
oben rechts und klicken Sie auf „Start“.
Um die Daten manuell vom Aktivitätstracker auf das Smartphone zu synchronisieren ziehen Sie beim
„Bewegung-“ oder Schlaf-Bildschirm nach unten.
Hinweis:
Die Routenaufzeichnung erfordert Aktivierung der GPS-Funktion des Smartphones.
Falls Sie Technischen Support benötigen, kontaktieren Sie bitte unser Support-Team per E-Mail unter
der Adresse [email protected].
Technische Daten:
• Übertragung: Bluetooth
®
4.0
• Batterietyp: Lithium polymer
• Display: 0.49 Zoll OLED
• Betriebstemperatur: -10°- +40° C
• Gewicht Tracker: 27g
• Material Armband: Silikon
Technische Änderungen vorbehalten
Vorderseite
Rückseite
1.
2.
3.
4.
Abb.1
Schritte
Distanz
Kalorien
Activity Tracker FontaFit 110 / 120
Aktivitätstracker FontaFit 110 / 120
Quick Guide
GB
Bedienungsanleitung
D
Fontastic, by D-Parts Mobilphon & Zubehör GmbH
●
Birkenweiherstr, 16
●
63505 Langenselbold, Germany / V2_10_17
Front
Back
1.
2.
3.
4.
Fig.1
Steps
Distance
Calories
URL: http://www.d-parts.de/app/fonta
fi
t
URL: http://www.d-parts.de/app/fonta
fi
t


