background image

P2

EN

DE

FR

IT

ES

RU

P14

P27

P40

P52

P65

Summary of Contents for FJ3365

Page 1: ...P2 EN DE FR IT ES RU P14 P27 P40 P52 P65 ...

Page 2: ...ure alternatively in C or F Indoor temperature measurement ranges 15 F 9 9 C to 122 F 50 C Outdoor temperature measurement ranges 4 F 20 C to 140 F 60 C Outdoor thermometer and frost alert Humidity Indoor Outdoor measurable range 20 RH 95 RH Barometric pressure Barometric pressure measurement ranges 17 72 inHg 600 hPa mb to 32 50 inHg 1100 hPa mb Pressure alternatively in inHg or mb hPa mmHg Minim...

Page 3: ...FJ3365 Norcc Manual 1 3 Power Supply Weather Station Battery 2 x AA Not included or USB power cable Included Wireless Outdoor Sensor Battery 2 x AA Not included 3 ...

Page 4: ...utdoor Min Max Humidity A6 Outdoor Icon A16 Frost Alert Icon A7 Indoor Temperature A17 Outdoor Min Max Temperature A8 Indoor Min Max Temperature A18 Outdoor Temperature Alert Icon A9 Indoor Humidity A19 Outdoor Temperature A10 Indoor Min Max Humidity Part B Weather Station Back B1 SNOOZE LIGHT Button B6 MODE Button B2 ALERT Button B7 USB Cable input socket B3 RESET Button B8 Button B4 ALARM Button...

Page 5: ...FJ3365 Norcc Manual Part C Wireless Outdoor Sensor C1 LCD display Temperature C4 C F switch button C2 LCD display Humidity C5 TX reset button C3 Transmit signal LED C6 Battery compartment 5 ...

Page 6: ...eration takes about 3 minutes and is displayed by a flashing reception RF icon in the Remote Sensor display area on the receiver 2 2 Notes for Customer before Use If weather station failed to receive transmission from outdoor sensor display on the main station LCD press and hold button for 3 seconds to receive transmission manually RF icon flashes on t he LCD and the weather station to re receive ...

Page 7: ...ress MODE button to confirm your setting the Year display starts to flash Now use and buttons to set the correct year Press MODE button to confirm your setting the Month display starts to flash Now use and buttons to set the correct month Press MODE button to confirm your setting the Date display starts to flash Now use and buttons to set the correct date Press MODE button to confirm your setting ...

Page 8: ...ton to stop the alarm signal It is not necessary to reactivate the alarm It switches itself automatically to the alarm time which has already been set 4 3 Snooze Function Press the SNOOZE LIGHT button the alarm signal sounds to get to SNOOZE mode The alarm signal sounds again after approx 5 minutes 5 WEATHER FORECAST AND BAROMETRIC 5 1 Weather Forecast The weather station calculates a weather fore...

Page 9: ...its will be flashing display Use the and button to set the pressure unit to display in the hPa mb or inHg If the barometric pressure reading is below the minimum range then LLLL will be displayed If the barometric pressure reading is above the maximum range then HHHH will be displayed 5 3 Barometric Trend Display The weather station can display the barometric pressure trend You may see the followi...

Page 10: ...er an hour the temperature is more than 1 C higher than the value measured first then a positive course is displayed If after an hour the temperature is more than 1 C lower than the value measured first then a negative course is displayed If the temperature does not change within an hour then the upward or downward pointing arrow becomes a horizontal arrow The measured temperature is then taken as...

Page 11: ...t the same time temperature alarm in alarm icon flashes If the alarm activates the temperature that is currently displayed on the channel its temperature value and alarm upper limit icon or lower limit icon also flashes When the temperature of REMOTE SENSOR is 30 F to 37 F or 1 C to 3 C the frost alarm will be activated symbol flashing F Y I When the temperature is higher than the upper limit of t...

Page 12: ...lease check the Hi Lo data near the each unit F Y I If the temperature reading is below ranges the LL L will be displayed If the temperature reading is above ranges the HH H will be displayed 7 7 Remote Sensor Transmission The weather station automatically starts receiving transmission from outdoor thermo sensor for outdoor temperature humidity after batteries inserted The outdoor sensor will auto...

Page 13: ...ct is inserted into the USB power cable the battery will automatically disconnect the power supply and the backlight will always be bright Press the SNOOZE LIGHT button to adjust the brightness of the backlight Users can choose according to the personal preferences of different brightness backlight or turn off the backlight Turn off backlight when you can touch the SNOOZE LIGHT field to light the ...

Page 14: ...USB Netzkabel Die Trendanzeige von Temperatur Luftfeuchtigkeit und Luftdruck Temperatur Temperatur wahlweise in C oder F Innentemperaturmessbereiche 15 F 9 9 C bis 122 F 50 C Außentemperaturmessbereiche 4 F 20 C bis 140 F 60 C Außenthermometer und Frostalarm Luftfeuchtigkeit Messbereich für Innen und Außen 20 RH 95 RH Luftdruck Luftdruckmessbereiche 17 72 inHg 600 hPa mb bis 32 50 inHg 1100 hPa mb...

Page 15: ...Hz HF Sendefrequenz 200 Fuß Übertragungsreichweite in einem offenen Bereich 1 3 Stromversorgung Wetterstation Batterie 2 x AA nicht im Lieferumfang enthalten oder USB Stromkabel im Lieferumfang enthalten Drahtloser Außensensor Batterie 2 x AA nicht enthalten 15 ...

Page 16: ...ax Luftfeuchtigkeit im Freien A6 Outdoor Symbol A16 Frostwarnsymbol A7 Innentemperatur A17 Min Max Außentemperatur A8 Min Max Innentemperatur A18 Außentemperatur Alarmsymbol A9 Innenluftfeuchtigkeit A19 Außentemperatur A10 Indoor Min Max Luftfeuchtigkeit Part B Weather Station Back B1 SNOOZE LIGHT Taste B6 MODE Taste B2 ALERT Taste B7 USB Kabel Eingangsbuchse B3 RESET Taste B8 Taste B4 ALARM Taste...

Page 17: ...FJ3365 Norcc Manual Part C Wireless Outdoor Sensor C1 LCD Anzeige Temperatur C4 mschalttaste C F C2 LCD Anzeige Luftfeuchtigkeit C5 Reset Taste TX C3 Sendesignal LED C6 Batteriefach 17 ...

Page 18: ...kunden Minuten und wird durch ein blinkendes RF Empfangssymbol im Anzeigebereich Remote Sensor am Empfänger angezeigt 2 2 Hinweise für den Kunden vor Gebrauch Außensensor empfangen konnte Anzeige auf dem LCD Display der Hauptstation halten Sie die Taste 3 Sekunden lang gedrückt um die Übertragung manuell zu empfangen Das RF Symbol blinkt auf dem LCD und dem Wetterstation um die Daten vom Außensens...

Page 19: ...htige Minute ein Drücken Sie die Taste MODE um Ihre Einstellung zu bestätigen Das Symbol für Monat und Datum beginnt zu blinken Verwenden Sie jetzt und Tasten zum Einstellen der Datumsanzeige für Monat Datum oder Datum Monat Drücken Sie die Taste MODE um Ihre Einstellung zu bestätigen Die Jahresanzeige beginnt zu blinken Stellen Sie nun mit den Tasten und das richtige Jahr ein Drücken Sie die Tast...

Page 20: ...te ALARM 2 Sekunden lang gedrückt bis die Stundenanzeige der Alarmzeit zu blinken beginnt Stellen Sie mit den Tasten und die gewünschte Stunde ein Drücken Sie die Taste ALARM um Ihre Einstellung zu bestätigen Die Minutenanzeige beginnt zu blinken Stellen Sie mit den Tasten und die gewünschte Minute ein Drücken Sie die Taste ALARM um Ihre Einstellung zu bestätigen und den Einstellvorgang zu beenden...

Page 21: ... Sie die Wettervorhersage Ihres örtlichen Wetterdienstes sowie die Vorhersage Ihrer Wetterstation Wenn es Abweichungen zwischen den Informationen Ihres Geräts und denen des örtlichen Wettervorhersagedienstes gibt wenden Sie sich bitte an diesen Die Wetterstation zeigt das folgende Wettersymbol für die nächsten 8 Stunden an Wettervorhersage nicht aktuelles Wetter sunny slightly cloudy cloudy rainy ...

Page 22: ...eitenanzeige der Wetterstation zeigen außerdem 12 verschiedene Mondphasen und 3 Arten von Gezeitenphasen gemäß dem eingestellten Kalender an New moon Waxing half moon Half moon Waxing full moon Full moon Waning full moon Half moon Waning half moon 7 TEMPERATUR FEUCHTIGKEITS UND KOMFORTANZEIGE 7 1 C or F Temperaturanzeige Die Temperatur wird entweder in C oder F angezeigt Drücken Sie 3 Sekunden lan...

Page 23: ...gen Halten Sie die Taste ALERT 2 Sekunden lang gedrückt bis das Symbol für den Temperaturalarm zu blinken beginnt Das Symbol für die obere Grenze des Temperaturalarms beginnt zu blinken Stellen Sie mit den Tasten und die gewünschte Maximaltemperatur ein Drücken Sie ALERT um Ihre Einstellung zu bestätigen Das Symbol der Untergrenze des Temperaturalarms beginnt zu blinken Stellen Sie mit den Tasten ...

Page 24: ...r höher als die obere Grenze der Alarmtemperatureinstellung ist blinkt die Aktivierung des Alarms für die obere Grenze Symbol blinkt Wenn die Temperatur unter dem unteren Grenzwert der Alarmtemperatur liegt wird der Alarm für den unteren Grenzwert aktiviert und das Symbol blinkt 7 5 Aktuelle Anzeige von Luftfeuchtigkeit und Luftfeuchtigkeitstrend Nach dem Einlegen der Batterien misst die Wettersta...

Page 25: ... Temperaturmesswert über dem Bereich liegt wird HH H angezeigt 7 7 Fernsensorübertragung Die Wetterstation empfängt nach dem Einlegen der Batterien automatisch die Übertragung des Außenthermosensors für Außentemperatur und feuchtigkeit Der Außensensor sendet nach dem Einlegen der Batterien automatisch ein Temperatur und Feuchtigkeitssignal an die Wetterstation Wenn die Wetterstation keine Übertrag...

Page 26: ...ie Hintergrundbeleuchtung sind immer hell Drücken Sie die Taste SNOOZE LIGHT um die Helligkeit der Hintergrundbeleuchtung anzupassen Benutzer können je nach persönlichen Vorlieben unterschiedliche Helligkeit der Hintergrundbeleuchtung wählen oder ausschalten die Hintergrundbeleuchtung Schalten Sie die Hintergrundbeleuchtung aus wenn Sie das Feld SNOOZE LIGHT berühren um die Hintergrundbeleuchtung ...

Page 27: ...rature humidité et barométrie Température Température alternée en C ou F plages de mesure de la température intérieure 9 9 C 50 C à 122 F Plages de mesure de la température extérieure 20 C 60 C à 140 F Thermomètre d extérieur et alerte au gel Humidité plage mesurable pour l intérieur et l extérieur 20 RH 95 RH pression barométrique Plage de mesure de la pression barométrique 17 72 inHg 600 hPa mb ...

Page 28: ...Manual Portée de transmission de 200 pieds dans une zone dégagée 1 3 Alimentation Station météo Batterie 2 x AA non inclus ou câble d alimentation USB inclus Capteur extérieur sans fil Batterie 2 x AA non inclus 28 ...

Page 29: ...dité extérieure minimale extérieure A6 Icône outdoor A16 Icône alerte au gel A7 Température intérieure A17 Température extérieure A8 Température intérieure min Max A18 Alerte de température extérieure A9 Humidité intérieure A19 Température extérieure A10 Humidité intérieure minimale Part B Weather Station Back B1 Bouton SNOOZE LIGHT B6 Bouton MODE B2 bouton ALERT B7 prise d entrée de câble USB B3 ...

Page 30: ...FJ3365 Norcc Manual Part C Wireless Outdoor Sensor C1 LCD display Temperature C4 C F switch button C2 LCD display Humidity C5 TX reset button C3 Transmit signal LE C6 Battery compartment 30 ...

Page 31: ...s la zone d affichage Capteur distant du récepteur 2 2 Notes au client avant utilisation Si la station météo ne parvient pas à recevoir la transmission du capteur extérieur affichage sur l écran LCD de la station principale maintenez le bouton enfoncé pendant 3 secondes pour recevoir la transmission manuellement L icône RF clignote sur l écran LCD et sur la station météo pour recevoir à nouveau le...

Page 32: ... mois et dates commence à clignoter Utilisez maintenant les boutons et pour régler l affichage de la date sur Mois Date ou Date Mois Appuyez sur le bouton MODE pour confirmer votre réglage l affichage de l année commence à clignoter Maintenant utilisez les boutons et pour choisir la bonne année Appuyez sur le bouton MODE pour confirmer votre réglage l affichage du mois commence à clignoter Mainten...

Page 33: ...required hour Appuyez sur le bouton ALARM et maintenez le enfoncé pendant 2 secondes jusqu à ce que l affichage de l heure de l alarme commence à clignoter Utilisez les boutons et pour régler l heure souhaitée Appuyez sur le bouton ALARM pour confirmer votre réglage et mettre fin à la procédure de réglage F Y I Après 20 secondes sans appuyer sur aucune touche l horloge passe automatiquement du mod...

Page 34: ...logiques de votre service de prévisions météorologiques locales ainsi que les prévisions de votre station météo En cas de divergence entre les informations de votre appareil et celles du service de prévision météorologique local veuillez prendre l avis de ce dernier comme faisant autorité La station météo affiche l icône météo suivante pour les prochaines 8 heures Prévisions météo non actuelles su...

Page 35: ...PHASES LUNAIRES ET INDICATEUR DE MARÉE L icône de la lune et l indicateur de marée de la station météo afficheront également 12 phases de lune différentes et 3 types de phases de marée en fonction du calendrier défini New moon Waxing half moon Half moon Waxing full moon Full moon Waning full moon Half moon Waning half moon 7 AFFICHAGE DE LA TEMPÉRATURE DE L HUMIDITÉ ET DU CONFORT 7 1 C or F affich...

Page 36: ...puyez et maintenez enfoncé le bouton ALERT pendant 2 secondes jusqu à ce que l icône de l alerte de température se mette à clignoter L icône de limite supérieure de l alarme de température commence à clignoter Utilisez les boutons et pour définir la température maximale requise Appuyez sur ALERT pour confirmer votre réglage L icône de la limite inférieure de l alarme de température commence à clig...

Page 37: ...de la température de l alarme l activation de l alarme de limite supérieure symbole clignotant Lorsque la température est inférieure à la limite inférieure de la température d alarme l alarme de limite inférieure est activée et le symbole clignote 7 5 Affichage actuel des tendances d humidité et d humidité Une fois les piles insérées la station météorologique mesure l humidité relative actuelle L ...

Page 38: ...e extérieure pour la température et l humidité extérieures après l insertion des piles Le capteur extérieur transmettra automatiquement les signaux de température et d humidité à la station météo après l insertion des piles Si la station météo ne parvient pas à recevoir la transmission du capteur extérieur sur l écran LCD maintenez enfoncé pendant 3 secondes pour recevoir la transmission manuellem...

Page 39: ... de rétro éclairage de luminosité différente ou désactiver le rétro éclairage Eteignez le rétro éclairage lorsque vous pouvez toucher le champ SNOOZE LIGHT pour allumer le rétro éclairage 15 secondes 9 BATTERIE FAIBLE Si l icône de la pile apparaît les piles du capteur extérieur doivent être remplacées dès que possible 39 ...

Page 40: ...ura Temperatura alternativamente in C o F Intervalli di misurazione della temperatura interna da 15 F 9 9 C a 122 F 50 C Intervalli di misurazione della temperatura esterna da 20 C a 140 F 60 C Termometro esterno e avviso di gelo Umidità intervallo misurabile per interno ed esterno 20 RH 95 RH Pressione barometrica Intervalli di misurazione della pressione barometrica 17 72 inHg 600 hPa mb a 32 50...

Page 41: ...FJ3365 Norcc Manual 1 3 Alimentazione Stazione meteorologica Batteria 2 x AA non incluso o cavo di alimentazione USB incluso Sensore esterno wireless Batteria 2 x AA non inclusa 41 ...

Page 42: ... Icon A15 Umidità Min Max esterna A6 Icona esterna A16 icona di allarme gelo A7 Temperatura interna A17 Temperatura minima A8 Temperatura minima massima interna A18 Icona di avviso temperatura A9 Umidità interna A19 Temperatura esterna A10 Umidità Min Max indoor Part B Weather Station Back B1 Tasto SNOOZE LIGHT B6 Pulsante MODE B2 Pulsante ALERT B7 presa di ingresso cavo USB B3 RESET Pulsante B8 P...

Page 43: ...FJ3365 Norcc Manual Part C Wireless Outdoor Sensor C1 Display LCD Temperatura C4 Pulsante C F C2 display LCD Umidità C5 pulsante di ripristino TX C3 LED segnale di trasmissione C6 vano batteria 43 ...

Page 44: ...ll area di visualizzazione Remote Sensor sul ricevitore 2 2 Note per il cliente prima dell uso Se la stazione meteorologica non ha ricevuto la trasmissione dal sensore esterno display sul display LCD della stazione principale premere e tenere premuto il pulsante per 3 secondi per ricevere la trasmissione manualmente L icona RF lampeggia sul display LCD e sulla stazione meteo per ricevere nuovament...

Page 45: ... Data o Data Mese Premere il pulsante MODE per confermare le impostazioni il display Year inizia a lampeggiare Adesso usa i pulsanti e per impostare l anno corretto Premere il pulsante MODE per confermare le impostazioni il display Month inizia a lampeggiare Adesso usa i pulsanti e per impostare il mese corretto Premere il pulsante MODE per confermare le impostazioni il display della data inizia a...

Page 46: ...ra di impostazione F Y I Dopo 20 secondi senza premere alcun tasto l orologio passa automaticamente dalla modalità impostazione alla modalità orologio normale 4 2 Accensione spegnimento del segnale di allarme Quando suona l allarme premere qualsiasi pulsante tranne il pulsante SNOOZE LIGHT per interrompere il segnale di allarme Non è necessario riattivare l allarme Si attiva automaticamente sull o...

Page 47: ... del tempo meteo non attuale sunny slightly cloudy cloudy rainy Heavy rainy Snowy 5 2 Display della pressione barometrica L attuale pressione barometrica viene automaticamente mostrata sulla Stazione meteorologica quando inizia a ricevere le letture Premere e tenere premuto il pulsante MODE per 2 secondi per accedere alle impostazioni quindi seguirlo fino a che le unità di pressione non lampeggera...

Page 48: ...E DELLA TEMPERATURA DELL UMIDITÀ E DEL COMFORT 7 1 C or F visualizzazione della temperatura La temperatura viene visualizzata in C o F Premere MODE per 3 secondi per iniziare a impostare e seguirlo fino a quando il display in formato C o F inizia a lampeggiare ora usare i tasti e per selezionare 7 2 Visualizzazione dell andamento della temperatura e della temperatura corrente Dopo aver inserito le...

Page 49: ...fermare le impostazioni L icona dell allarme Limite della temperatura inizia a lampeggiare Utilizzare i pulsanti e per impostare la temperatura minima richiesta Premere il pulsante ALERT per confermare le impostazioni e terminare la procedura di impostazione F Y I Prima di entrare nella configurazione è necessario selezionare il canale remoto i diversi canali possono impostare diversi intervalli d...

Page 50: ... Dopo aver inserito le batterie la stazione meteorologica misura l umidità relativa corrente Il display di tendenza mostra un corso neutro di umidità relativa L ulteriore andamento del display di tendenza è determinato come segue Se dopo un ora l umidità relativa supera di oltre il 5 il valore misurato per primo allora è positivo corso viene visualizzato Se dopo un ora l umidità relativa è inferio...

Page 51: ... trasmissione manualmente L icona RF lampeggia sul display LCD The Weather Station per ricevere il sensore esterno 8 CONTROLUCE Se il prodotto è alimentato a batterie tocca il campo SNOOZE LIGHT La retroilluminazione si accese per 15 secondi Quando l alimentazione del prodotto viene inserita nel cavo di alimentazione USB la batteria si scollegherà automaticamente l alimentatore e la retroilluminaz...

Page 52: ...eratura Humedad y Barométrica Temperatura Temperatura alternativamente en C o F Rangos de medición de la temperatura interior 15 F 9 9 C a 122 F 50 C Rangos de medición de temperatura exterior 4 F 20 C a 140 F 60 C Termómetro exterior y alerta de heladas Humedad rango medible interior y exterior 20 RH 95 RH Presión barométrica Rangos de medición de presión barométrica 17 72 inHg 600 hPa mb a 32 50...

Page 53: ... de transmisión de 200 pies en un área abierta 1 3 Fuente de alimentación stación meteorológica Batería 2 x AA no incluidas o cable de alimentación USB incluidos Sensor inalámbrico para exteriores Batería 2 x AA no incluidas 53 ...

Page 54: ...ima máxima exterior A6 Icono al aire libr A16 Icono de alerta de escarcha A7 Temperatura interior A17 Temperatura mínima máxima A8 Temperatura mínima máxima interior A18 Icono de alerta de temperatura A9 Humedad interior A19 Temperatura exterior A10 Humedad interior mínima Part B Weather Station Back B1 Botón SNOOZE LIGHT B6 Botón MODE B2 Botón de ALERTA B7 Toma de entrada de cable USB B3 Botón RE...

Page 55: ...65 Norcc Manual Part C Wireless Outdoor Sensor C1 Pantalla LCD Temperatura C4 C F Botón de cambio C2 Pantalla LCD Humedad C5 TX Botón de reinicio C3 Señal de transmisión LED C6 Compartimiento de batería 55 ...

Page 56: ...onexión con el sensor remoto exterior Esta operación dura aproximadamente 3 minutos y se muestra mediante un ícono de RF de recepción parpadeante en el área de visualización del Sensor Remoto en el receptor 2 2 Notas para el cliente antes de su uso Si la estación meteorológica no pudo recibir la transmisión del sensor exterior pantalla en la pantalla LCD de la estación principal mantenga presionad...

Page 57: ...llar Ahora use los botones y para ajustar la hora correcta Presione MODE para confirmar su configuración las pantallas de minutos comienzan a parpadear Ahora use los botones y para ajustar los minutos correctos Pulse el botón MODE para confirmar su configuración la visualización de los iconos del mes y la fecha comenzará a parpadear Ahora use los botones y para configurar la fecha en Mes Fecha o F...

Page 58: ...ntenga presionado el botón ALARMA durante 2 segundos hasta que la hora de alarma comience a parpadear Utilice el y Botones para configurar la hora requerida Presione el botón ALARM para confirmar su configuración la pantalla de minutos comienza a parpadear Use los botones y para ajustar el minuto requerido Pulse el botón ALARMA para confirmar su configuración y para finalizar el procedimiento de c...

Page 59: ...alto rendimiento sino que simplemente proporciona una indicación aproximada de los desarrollos actuales Tenga en cuenta el pronóstico del tiempo de su servicio local de pronóstico del tiempo así como el pronóstico de su estación meteorológica Si hay discrepancias entre la información de su dispositivo y el servicio de pronóstico del clima local tome el consejo de este último como autoritario La es...

Page 60: ... de pronóstico del tiempo La presión barométrica aumentará La presión barométrica se mantendrá constante La presión barométrica caerá 6 LUNAR PHASES AND TIDE INDICATOR El icono de la Luna y el indicador de marea de la Estación Meteorológica también mostrarán 12 fases lunares diferentes y 3 tipos de fases de marea según el calendario establecido New moon Waxing half moon Half moon Waxing full moon ...

Page 61: ...toma como el valor neutro a partir del cual se obtienen más pronósticos hecho 7 3 Ajustes de temperatura exterior y alerta de heladas Mantenga presionado el botón ALERT durante 2 segundos hasta que el ícono de la alerta de temperatura comience a destellar El icono de límite alto de la alarma de temperatura comienza a parpadear Use los botones y para configurar los temperatura máxima Presione ALERT...

Page 62: ...ivará la alarma de escarcha el símbolo parpadea F Y I Cuando la temperatura es más alta que el límite superior de la configuración de la temperatura de la alarma la activación de la alarma del límite superior el símbolo parpadea Cuando la temperatura es más baja que el límite inferior de la temperatura de la alarma la alarma del límite inferior es activado y el símbolo parpadea 7 5 Visualización d...

Page 63: ...nsmisión del sensor remoto La estación meteorológica comienza a recibir automáticamente la transmisión desde el sensor térmico exterior para la temperatura y humedad exterior después de insertar las baterías El sensor exterior transmitirá automáticamente la señal de temperatura y humedad a la estación meteorológica después de insertar las baterías Si la estación meteorológica no pudo recibir la tr...

Page 64: ...mentación USB la batería se desconectará automáticamente La fuente de alimentación y la luz de fondo siempre será brillante Presione el botón SNOOZE LIGHT para ajustar el brillo de la luz de fondo Los usuarios pueden elegir de acuerdo con las preferencias personales de diferentes iluminaciones de fondo o apagar la luz de fondo Apague la luz de fondo cuando pueda tocar el campo SNOOZE LIGHT para en...

Page 65: ...упреждения об экстремальных температурах и обледенении Влажность Диапазон измерений внешним и внутренним датчиками 20 RH 95 RH Атмосферное давление Диапазон измерения атмосферного давления 17 72 inHg 600 hPa mb to 32 50 inHg 1100 hPa mb от 450 мм рт ст до 826 мм рт ст Давление показывается в inHg или mb hPa inHg mmHg мбар гПа дюйм рт ст мм рт ст Минимальные максимальные показания для влажности и т...

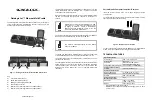
Page 66: ...FJ3365 RU Manual 1 4 Дисплей и органы управления 66 ...

Page 67: ...я Min Max температура A8 Комнатная Min Max температура A18 Предупреждение о внешней температуре A9 Комнатная влажность A19 Внешняя температура A10 Комнатная Min Max влажность Part B Тыльная сторона B1 Кнопка SNOOZE LIGHT B6 Кнопка MODE B2 Кнопка ALERT B7 Гнездо кабеля питания B3 Кнопка СБРОС B8 Кнопка B4 Кнопка ALARM B9 Крышка батарейного отсека B5 Кнопка Part C Беспроводной внешний модуль C1 LCD ...

Page 68: ...я между индикацией календаря секунд или времени будильника Нажмите и удерживайте кнопку MODE 3 секунды начнет мигать индикатор режима показа времени в 12 24 ч Используя кнопки и установите требуемый режим Нажмите MODE для подтверждения вашего выбора начнет мигать формат показа температуры в C или F Используя кнопки и установите требуемый режим Нажмите MODE для подтверждения вашего выбора начнет ми...

Page 69: ...будильника Когда будильник звонит нажмите любую кнопку кроме SNOOZE LIGHT для прекращения звукового сигнала Нет необходимости повторно настраивать будильник если не меняется время сигнала Будильник автоматически сработает в ранее установленное время 4 3 Функция отсрочки звонка Нажатие кнопки SNOOZE LIGHT во время звонка включает режим ОТСРОЧКИ Сигнал будильника будет повторенчерез 5 минут 5 ПРОГНО...

Page 70: ... индицируется HHHH 5 3 Barometric Trend Display Метеостанция может показывать тенденцию изменения атмосферного давления Вы можете видеть следующие значки в области прогноза погоды 6 ОТОБРАЖЕНИЕ ФАЗ ЛУНЫ И ПРИЛИВА Значок Луны и индикатор прилива метеостанции также будет отображать 12 различных фаз Луны и 3 вида фаз прилива в соответствии с установленным календарем 7 ТЕМПЕРАТУРА ВЛАЖНОСТЬ 7 1 Показ ...

Page 71: ...ждения вашего выбора Значок Lo предупреждения о минимальной температуре начнет мигать Используя кнопки и установите минимальную температуру о которой нужно предупреждение Нажмите кнопку ALERT дляподтверждения вашего выбора и завершения процедуры установки температурных предупреждений F Y I Перед входом в установку вы должны выбрать нужный внешний канал различные каналы можете установить на различн...

Page 72: ...отра комнатной наружной максимальной минимальной температуры и влажности смотрите соответствующие значения обозначенные как Hi макс и Lo мин возле соответствующих областей дисплея F Y I Если температура снижается ниже нижнего предела измерений индицируется LL L Если температура выше верхнего предела измерений индицируется HH H 7 7 Использование внешнего модуля Метеостанция начинает автоматически п...

Page 73: ...ботает непрерывно Нажатием на кнопку SNOOZE LIGHT можно регулировать уровень яркости подсветки вы можете выбрать три уровня яркости Потребитель может выбрать согласно личным предпочтениям различные уровни подсветки и вообще выключить ее Для выключения подсветки нажмите и удерживайте кнопку SNOOZE LIGHT в течении 15 секунд 9 НИЗКИЙ ЗАРЯД БАТАРЕИ Если на дисплее внешнего модуля появится значок батар...

Page 74: ...74 ...

Page 75: ...75 ...

Reviews: