1
IMPO
RTAN
T:
IMPO
RTAN
T:
Go to www
.extron.com f
or the complete
user guide
, installation instructions,
and
specifications bef
ore connecting the
product to the po
wer sour
ce.
NAVigator • Setup Guide
This guide provides instructions for an experienced installer to set up and operate the Extron NAVigator System Manager. The NAVigator
manages, configures, and controls an AV streaming system consisting of Extron NAV encoders, and decoders (endpoints). The NAVigator
also provides a centralized communication bridge between the control system and the endpoints. The NAVigator can support up to
16 endpoints as shipped and can be upgraded via a link license to support up to 240 endpoints.
NOTE:
For more information on any subject in this guide, see the
NAVigator User Guide
.
Installation
Step 1 — Mounting
Turn off or disconnect all equipment power sources and mount the NAVigator as required.
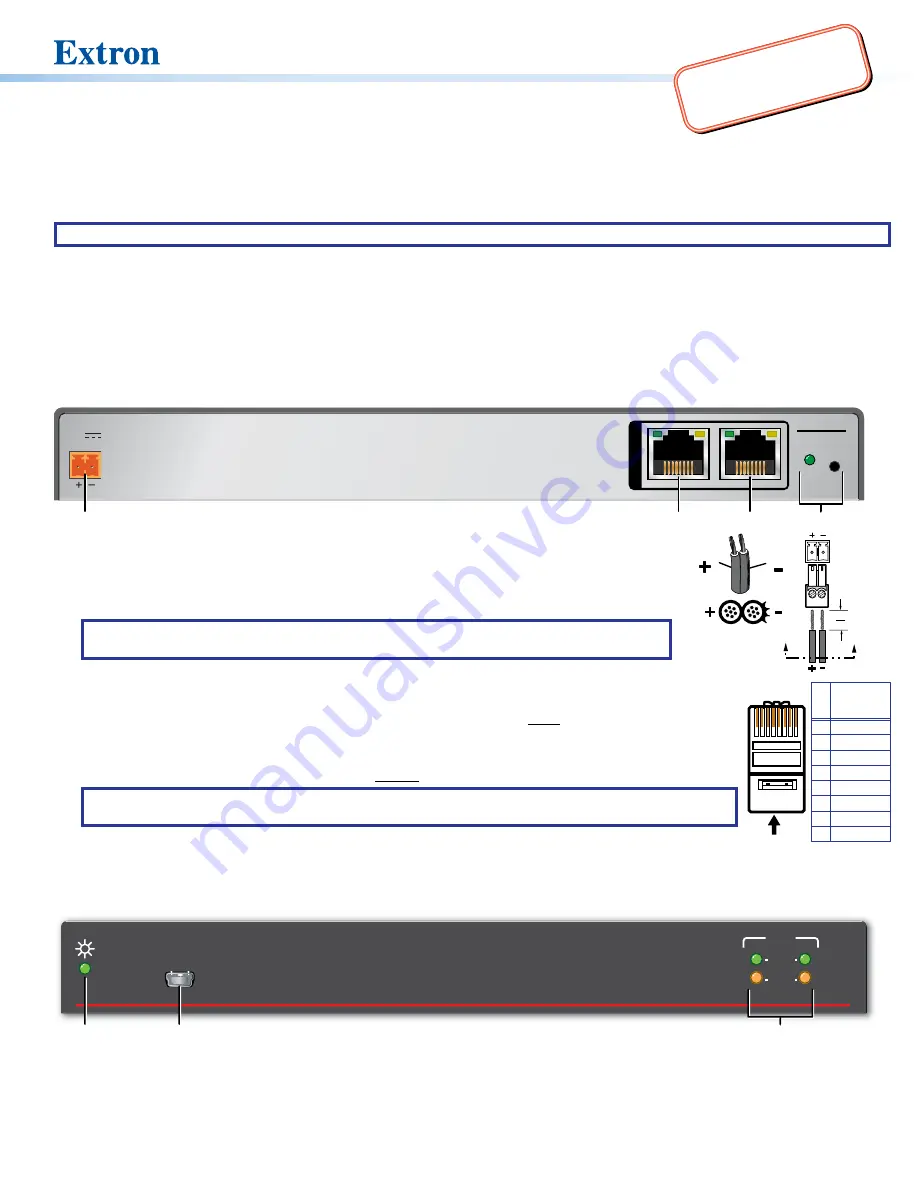
Step 2 — Connections
POWER
12V
-- A MAX
NAVigator
RESET
OOB
NAV/PoE
LA
N
B
B
B
C
C
C
A
A
A
D
D
D
Figure 1.
NAVigator Rear Panel Features
A
Power connector
(optional) — Plug the included external 12 VDC power supply into this 2-pole
connector for local power. See the drawing at right to wire the connector and
on page 2 for
power options.
NOTE:
Alternatively, the NAVigator can be powered via PoE, from the network switch or
using an optional PI 140 Power Injector.
B
NAV/PoE port
— Connect this port to your AV LAN network for connection to streaming endpoints
5
Pin
1
2
3
6
7
8
4
Wire color
White-green
Green
White-orange
White-blue
Orange
White-brown
Brown
Blue
TIA/EIA T
568B
TP Wires
12345678
Pins:
(NAV encoders and decoders), as well as management and control devices. This port can also receive
Power over Ethernet (PoE) to power the NAVigator.
Streaming endpoints must be on the same network
as the NAV/PoE port.
C
OOB (Out of Band) port
— Connect this port to the Out of Band network for remote management and
configuration of the NAV system.
The OOB port cannot receive PoE
.
NOTE:
The OOB network is a secure boundary from the in-band NAV network. The OOB port allows for
a secure web interface and secure control of the NAVigator.
D
Reset button and LED
— Press this button and observe the LED to initiate three modes of NAVigator reset
(see the
NAVigator User Guide
, available at
www.extron.com
).
Step 3 — Front Panel Configuration Port Connection
e
CONFIG
NAVigator
LAN
LNK
ACT
00 B
NAV
A
A
A
B
B
B
C
C
C
Figure 2.
NAVigator Front Panel Features
A
Configuration port
— Connect a PC or other controlling device into the NAVigator via this front panel mini-B USB connector for
configuration of the NAVigator and NAV system. The port uses IP over USB technology; the IP address is always 203.0.113.22 and
CANNOT
be changed.
Power Supply
Output Cord
Ridges
Smooth
Captive
Screw
Connector
3"
16 (5 mm) MAX
SECTION A–A
A
A