Extremis KOSMOS PARASOL, Assembly Instructions Manual
The Assembly Instructions Manual for the cutting-edge Extremis KOSMOS PARASOL is now available for free download on our website. Discover how to effortlessly assemble and fully utilize this extraordinary product, ensuring you maximize your outdoor experience. Get your manual from manualshive.com and unlock the potential of this exceptional parasol.
Share
Download


Reviews:
No comments
Related manuals for KOSMOS PARASOL
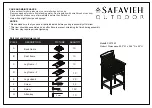
PAT7043
Brand: Safavieh Outdoor Pages: 2

TD-11670KL
Brand: Teamson Kids Pages: 11

TD-12302
Brand: Teamson Kids Pages: 18

Ida 98 1.0
Brand: KayserBetten Pages: 48

77735191
Brand: Uberhaus Pages: 6

8274BCC
Brand: Baby Trend Pages: 24

Sorelle 605
Brand: C&T International Pages: 8

PATIOBENCH 2-3 SEATER
Brand: Weltevree Pages: 7

Lights & Sounds Rainbow
Brand: Mamas & Papas Pages: 4

ROCKWELL
Brand: Contours Pages: 19

PERGOTENDA MAESTRO
Brand: Corradi Pages: 66

61SRR31CNT
Brand: Kohl's Pages: 3

ingenuity Wood Foldaway Rocking Bassinet Wallace 11913
Brand: Kids II Pages: 20

D71 M20177
Brand: GRAND RESORT Pages: 7

hudson M4223
Brand: Babyletto Pages: 54

biro fix
Brand: Baby auto Pages: 32

Princess Bouncer
Brand: Little Tikes Pages: 2

TC60-6072
Brand: Bell'O Pages: 22


