Extech Instruments EX310, User Manual
The Extech Instruments EX310 User Manual is a comprehensive and indispensable guide for using the EX310 Multimeter efficiently. Get acquainted with its features and functionalities, troubleshoot any issues, and unlock the device's full potential. Download this free manual from our website manualshive.com and stay empowered with the EX310.
Share
Download


Reviews:
No comments
Related manuals for EX310

INIA011
Brand: Velleman Pages: 28

Hotwire 8786
Brand: Paradyne Pages: 19

Unitest Hexagon 310
Brand: BEHA Pages: 80

EN300
Brand: Extech Instruments Pages: 9

411
Brand: Extech Instruments Pages: 18

2200
Brand: BGS technic Pages: 14

DMM3-Set
Brand: Gigahertz Solutions Pages: 2

97II
Brand: APPA Pages: 29

U1241B
Brand: Keysight Pages: 83
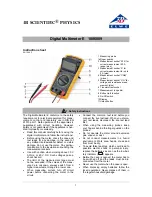
E 1006809
Brand: 3B SCIENTIFIC PHYSICS Pages: 4

1020
Brand: PeakTech Pages: 32

4090
Brand: PeakTech Pages: 40

35632 Series
Brand: Oakton Pages: 35

MS8301D
Brand: Mastech Pages: 10

EVM892
Brand: Velleman Pages: 80

DVM94
Brand: Velleman Pages: 93

DVM9915
Brand: Velleman Pages: 106

DVM903
Brand: Velleman Pages: 112


