The convenient
programming stick
Operating instructions and guarantee
Carefully read through this operating manual before using the
programming stick. Store the documents so you can consult them
later and pass them on when forwarding the appliance.
Scope of delivery
1x PROGmatic programming stick
1x operating instructions
Intended use
PROGmatic is used for the simple programming of the EUROtronic
energy-saving regulator with a programming port. The program-
ming stick is intended for use at the USB port of a PC. The data
is transferred to the energy saving regulator through the plug on
the Progmatic. The EUROtronic programming port at the energy
saving regulator is only intended for EUROtronic products. Do not
under any circumstance connect other devices with the Mini-USB
connection! Programatic Blue is not suitable as a transportable
storage media.
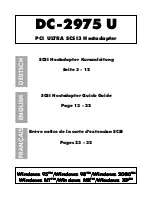
Operating and display elements
1 USB plug
2 plugs for the EUROtronic Programming-Port
3 LED red/green
2
1
3
PROGmatic function
PROGmatic enables the convenient stipulation of the heating and
saving times for the EUROtronic energy saving regulator at the PC.
After the storage of the space profi les they can be conveniently
be stored on all the EUROtronic energy saving regulators with the
programming port. In this case the energy saving controller also
assumes the current time and the date so that an initial installation
of the energy saving regulator ceases to apply.
Installation of the PROGmatic sofware (initial operation)
Loading the software for your PROGmatic programming stick on
www.eurotronic.org, then click on „Products“, select the „Progmatic
2014“ products and download the installation software on this site
and install it onto your computer. Once you have downloaded the
software by clicking on the link a window is automatically opened
which helps your during the installation of the programme.
1. Select your chosen language
2. Select a storage location
3. Click on “Install”
4. Click on “complete”
You launch the software by double clicking on the „PROGmatic-
start“ icon. The driver installation is performed automatically by
plugging in the stick.
Starting the PROGmatic
Plug the PROGmatic with the USB plug into a free USB port of your
PC. If the stick is connected correctly the green LED shines and
the red LED also shines upon its initial commissioning. In addition
the green strip at the lower edge of the programme changes to
green and reads „connected, PROGmatic is thus active. If the stick
has been connected to the computer the internal accumulator is
charged during this period. If the heating profi les were successfully
transferred to the Progmatic then they shall remain stored on the
Progmatic for approx. 1 hour. If you should additionally attempt to
transfer heating profi les to the controller then the date and time may
be lost. Check this by connecting Progmatic with your computer once
more. If the red LED fl ashes the profi les must be transferred once
more to update the date and time. If the transfer was successful the
red LED switches off.
Batteries are not necessary.
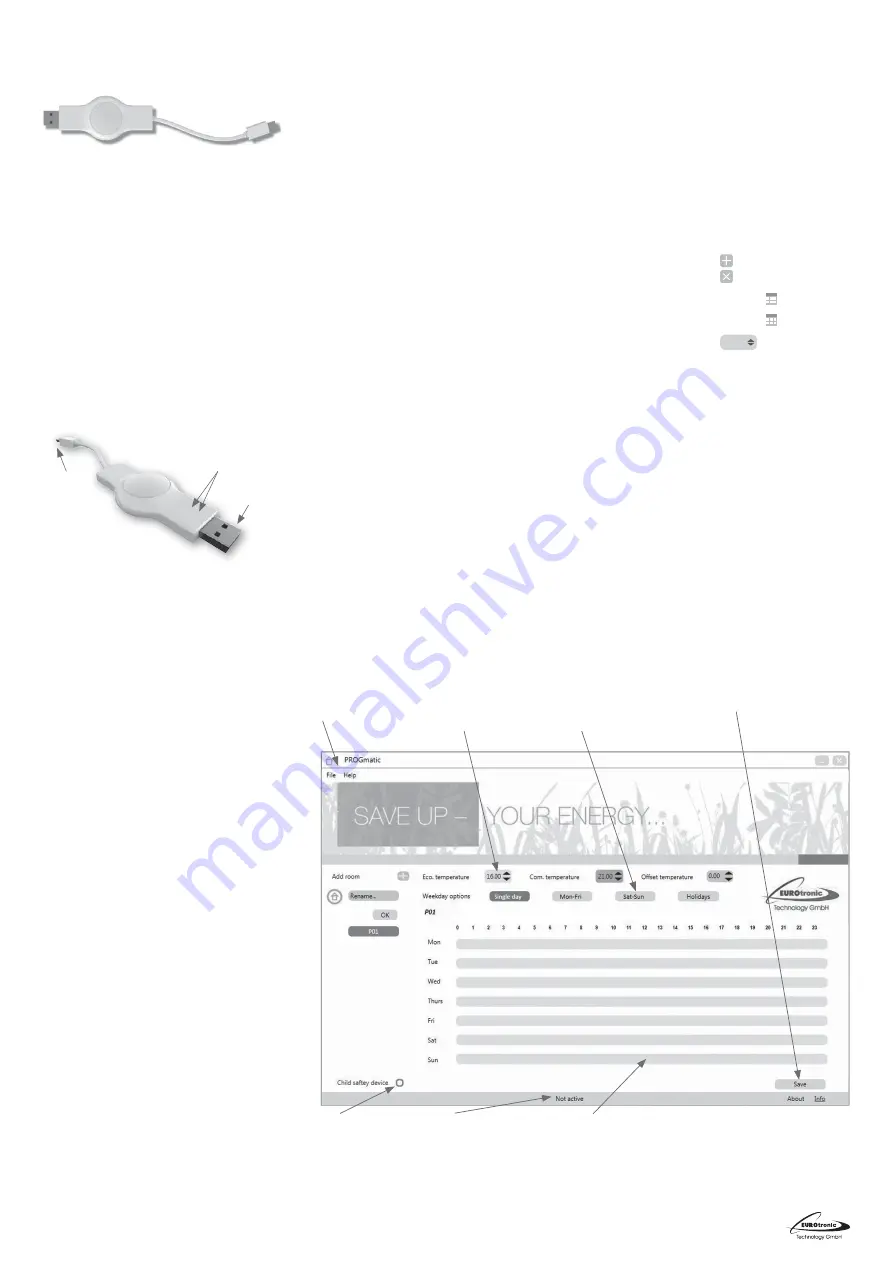
Creation of room profi les
During the fi rst launch of the programme the room profi le I „P01“ is
already set as the factory setting. The individual room profi les can
be issued with names to provide a better overview.
2)
Simply enter the desired name into the intended fi eld. You con-
fi rm your entry by pressing „OK“. The room that has been created
then appears on the left of the programme.
3)
Click on the „+“ symbol to add more rooms. A maximum of 10
rooms can be created. Now selected a room that has been created
and set an economy temperature, comfort temperature and offset
temperature.
4) Setting of the comfort and economy temperature
You can conveniently set the desired comfort and savings tempera-
ture into the corresponding fi elds above the room profi le range by
clicking on the cursor keys.
5) Setting of the offset temperature
Due to the fact the temperature is measured at the radiator it can
also differ at another place in the room. You can set the offset to
bring this in line. If for example you measure 19°C instead of the
21°C that was set, you then set the offset to 2°C.
Weekday option
Above the time bar you have the option with various buttons to
programme all the days individually or to arrange them in blocks:
Individual days - every day is assigned an individual heating/
savings profi le.
Monday to Friday
- The days Monday, Tuesday, Wednesday,
Thursday and Friday are assigned the same heating/saving profi le.
Saturday to Sunday
- The days Saturday and Sunday are assigned
the same heating/saving profi le.
Creation of a heating time
In insert a heating time (comfort time) simply move the mouse to the
desire starting time and move it from left to right whilst pressing the
left mouse button. The end of the heating time is set by releasing
the mouse button. This is optically represented by a dark green bar.
Proceed in just the same way to create an additional heating time.
Deletion and changing of a heating time
The deletion of a heating time works in a similar manner to the
setting of the heating time, keep the right mouse button pressed
for this and move it from left to right. If the desired area is selected
this area will be deleted by releasing the mouse button.
Saving of the room profi les
Following the completion of the programming of your room profi les
you save them with the „Save“ button or via the „Save“ selection
in the „File“ menu. A window is opened in which you can select
several options.
1. Save on the computer
to save your various heating profi les and to be able to access if
there are change requests.
2. Save on the Progmatic
to transfer your different heating profi les to your energy saving
regulator.
Other Functions
Child lock
The child lock can be switched on and off for the respective room
profi le.
Holiday function
Here you can enter the holiday times in advance. The energy saving
regulators set the temperature stipulated by you at these times.
Click on the „+“ symbol to add an additional holiday profi le.
A maximum number of 8 holiday profi les can be created.
7)
Click on the calendar symbol (start) to stipulate the date of the
holiday start. To stipulate a precise time of departure click directly
into the display „00.00 am“ with the mouse and change this value as
you please. The end of the holiday can be also be set by clicking on
the calendar symbol (end). You delete the entire holiday profi le by
clicking on the „x“ symbol.
Adding a holiday:
Holiday 1
Start
00:00
17-08-2014
7)
End
00:00
31-08-2014
7)
Savings temperature
16.0
Printing of an overview page of the profi les
You can print out an overview of the room profi les you create
by selecting „Print“ in the „File“ menu. Opening of stored room
profi les. You can open your stored room profi le and edit it as you
please by selecting „Open“ in the „File“ menu.
www.eurotronic.org
Child lock:
active/inactive display
Save:
Saving of the room profi les
Block building:
Optional summary of the days
with the same heating times
(e.g. week/weekend)
Controller setting:
Setting of the comfort and
saving temperatures and
the offset temperature
Room profi le range:
Graphical representation of the heating and saving times;
the individual weekdays are arranged one beneath the
other. Saving times are represented in bright green and
heating times are represented in dark green.
Menu line:
Storage of the time profi le,
printing of the room overview
Status bar:
Stick connected - green
Stick inactive - grey
prog
matic
2)
3)
4)
4)
5)