background image

Summary of Contents for Monster 3.0

Page 1: ...M o n s ter 3 0 ...

Page 2: ......

Page 3: ...publication This publication and any accompanying software may not in whole or in part be reproduced translated trans mitted or reduced to any machine readable form without prior consent from the vendor manufacturer or creators of this publication except for copies kept by the user for backup purposes Brand and product names mentioned in this publication may or may not be copyrights and or registe...

Page 4: ...um Liechtenstein Denmark Lux embourg Finland Netherlands France Norway Germany Portugal Greece Spain Iceland Sweden Ireland United Kingdom Cyprus Czech Republic Estonia Hungary Latvia Lithuania Malta Slovakia Poland Slov enia ErP Off Mode Power Consumption Statement The figures below note the power consumption of this computer in compliance with European Commission EC regulations on power consumpt...

Page 5: ...owed to sell his product in the European market This product conforms to the essential requirements of the R TTE directive 1999 5 EC in order to attain CE Marking A notified body has determined that this device has properly demonstrated that the requirements of the directive have been met and has issued a favorable certificate of expert opinion As such the device will bear the notified body number...

Page 6: ...o communications However there is no guarantee that interference will not occur in a particular installation If this equipment does cause harmful interference to radio or television reception which can be determined by turning the equipment off and on the user is encouraged to try to correct the interference by one or more of the following measures Re orient or relocate the receiving antenna Incre...

Page 7: ...o communications However there is no guarantee that interference will not occur in a particular installation If this equipment does cause harmful interference to radio or television reception which can be determined by turning the equipment off and on the user is encouraged to try to correct the interference by one or more of the following measures Re orient or relocate the receiving antenna Incre...

Page 8: ...the manufacturer for compliance with the above standards could void your authority to operate the equipment If your purchase option includes both Wireless LAN and 3G modules then the appropriate antennas will be installed Note that In order to comply with FCC RF exposure compliance requirements the antenna must not be co located or operate in conjunction with any other antenna or transmitter Impor...

Page 9: ...his equipment with a telephone line other than a cordless type during an electrical storm There may be a remote risk of electrical shock from lightning 3 Do not use the telephone to report a gas leak in the vicinity of the leak 4 Use only the power cord and batteries indicated in this manual Do not dispose of batteries in a fire They may explode Check with local codes for possible special disposal...

Page 10: ...kind of heating ele ment This is an electrical appliance If water or any other liquid gets into it the computer could be badly dam aged Do not expose the computer to any shock or vibration Do not place it on an unstable surface Do not place anything heavy on the computer Do not expose it to excessive heat or direct sunlight Do not leave it in a place where foreign matter or moisture may affect the...

Page 11: ...and don t forget to save your work Remember to periodically save your data as data may be lost if the battery is depleted 5 Take care when using peripheral devices Do not turn off the power until you properly shut down all pro grams Do not turn off any peripheral devices when the computer is on Do not disassemble the com puter by yourself Perform routine maintenance on your computer Use only appro...

Page 12: ...plug the power cord be sure to disconnect it by the plug head not by its wire Make sure the socket and any extension cord s you use can support the total current load of all the connected devices Before cleaning the computer make sure it is disconnected from any external power sup plies i e AC DC adapter or car adapter Do not plug in the power cord if you are wet Do not use the power cord if it is...

Page 13: ...tteries may experience a slight expansion or swelling however this is part of the battery s safety mecha nism and is not a cause for concern Use proper handling procedures when using polymer batteries Do not use polymer batteries in high ambient tempera ture environments and do not store unused batteries for extended periods See also the general battery precautionary information overleaf for furth...

Page 14: ...ntative or qual ified service personnel Keep children away from and promptly dispose of a damaged battery Always dispose of batteries carefully Batteries may explode or leak if exposed to fire or improperly handled or discarded Keep the battery away from metal appliances Affix tape to the battery contacts before disposing of the battery Do not touch the battery contacts with your hands or metal ob...

Page 15: ...r any of the following conditions When the power cord or AC DC adapter is damaged or frayed If the computer has been exposed to rain or other liquids If the computer does not work normally when you follow the operating instructions If the computer has been dropped or damaged do not touch the poisonous liquid if the LCD panel breaks If there is an unusual odor heat or smoke coming from your compute...

Page 16: ... adapters 6 Put the notebook in its carrying bag and secure it with the bag s straps 7 If you re taking any peripherals e g a printer mouse or digital camera pack them and those devices adapters and or cables 8 Anticipate customs Some jurisdictions may have import restrictions or require proof of ownership for both hard ware and software Make sure your papers are handy Power Off Before Traveling M...

Page 17: ...data Pass your computer and disks around the devices Ask security officials to hand inspect them you may be asked to turn it on Note Some airports also scan luggage with these devices Fly safely Most airlines have regulations about the use of computers and other electronic devices in flight These restrictions are for your safety follow them If you stow the notebook in an overhead compartment make ...

Page 18: ...arms wrists and hands in a relaxed position Your knees should be slightly higher than your hips Place your feet flat on the floor or on a footrest if necessary Use a chair with a back and adjust it to support your lower back comfortably Sit straight so that your knees hips and elbows form approximately 90 degree angles when you are working Take periodic breaks if you are using the computer for lon...

Page 19: ...e following precautions Set the Windows Power Plans to turn the screen off after a few minutes of screen idle time Use a rotating moving or blank screen saver this prevents an image from being displayed too long Rotate desktop background images every few days Turn the monitor off when the system is not in use LCD Electro Plated Logos Note that in computers featuring a raised LCD electro plated log...

Page 20: ...XVIII Preface ...

Page 21: ...t VI Instructions for Care and Operation VIII Power Safety X Polymer Battery Precautions XI General Battery Precautions XII Cleaning XIII Servicing XIII Travel Considerations XIV Quick Start Guide Overview 1 1 Advanced Users 1 2 Beginners and Not So Advanced Users 1 2 Warning Boxes 1 2 Not Included 1 3 System Software 1 4 System Startup 1 5 ...

Page 22: ...em Map Front Left Views 1 12 System Map Right Rear Views 1 13 System Map Bottom View 1 14 Windows Control Panel 1 15 Windows 8 Start Screen Desktop 1 16 Apps Tiles 1 17 Desktop Application 1 18 Windows 8 Charms Bar 1 20 Windows 8 Control Panel 1 22 Windows 8 Taskbar 1 25 Video Features 1 26 NVIDIA Optimus Technology 1 26 Power Options 1 30 Running Apps 1 31 ...

Page 23: ...and Buttons Mouse 2 6 Gestures and Device Settings 2 8 Power Management Overview 3 1 The Power Sources 3 2 AC DC Adapter 3 2 Battery 3 2 Turning On the Computer 3 3 Power Plans 3 4 Power Saving States 3 6 Sleep 3 6 Hibernate 3 7 Shut down 3 7 Configuring the Power Buttons 3 8 Resuming Operation 3 10 Power Conservation Modes 3 11 ...

Page 24: ...r 3 15 Proper handling of the Battery Pack 3 16 Battery FAQ 3 17 Drivers Utilities What to Install 4 1 Module Driver Installation 4 1 Driver Installation 4 2 Updating Reinstalling Individual Drivers 4 4 User Account Control 4 5 Windows Security Message 4 5 New Hardware Found 4 5 Driver Installation Procedure 4 6 Chipset 4 6 Video VGA 4 6 NVIDIA Video VGA 4 6 LAN 4 6 ...

Page 25: ...Index 4 8 Optional Drivers 4 9 BIOS Utilities Overview 5 1 The Power On Self Test POST 5 2 Failing the POST 5 3 Fatal Errors 5 3 Non Fatal Errors 5 3 The Setup Utility 5 4 Entering Setup 5 4 Setup Screens 5 5 Main Menu 5 6 System Time Date Main Menu 5 6 SATA Port Main Menu 5 7 System Extended Memory Main Menu 5 7 ...

Page 26: ...chnology Advanced Menu 5 9 Intel Anti Theft Technology Advanced Menu 5 10 SATA Mode Advanced Menu 5 10 Boot Logo Advanced Menu 5 11 Power On Boot Beep Advanced Menu 5 11 Battery Low Alarm Beep Advanced Menu 5 11 Security Menu 5 12 Set Supervisor Password Security Menu 5 12 Password on boot Security Menu 5 13 Secure Boot Security Menu 5 13 Boot Menu 5 14 Boot Option Priorities Boot Menu 5 15 UEFI B...

Page 27: ... 9 Upgrading the System Memory RAM 6 12 Modules Overview 7 1 Setting Up SATA RAID or AHCI Mode 7 2 AHCI Mode 7 2 RAID 7 2 Intel Rapid Storage Technology Application 7 2 SATA RAID Setup Procedure Windows 8 7 4 IRST Driver Installation 7 10 Deleting a RAID Windows 8 7 11 PC Camera Module 7 12 PC Camera Audio Setup 7 13 Camera App 7 14 Taking Pictures Capturing Video 7 16 Wireless LAN Module 7 19 ...

Page 28: ...lation 7 33 Sound Blaster Cinema EQ Activation 7 33 Sound Blaster Cinema Application 7 34 Sound Blaster Cinema Controls 7 36 Intel Rapid Storage Technology 7 38 IRST Driver Installation 7 38 Intel Rapid Storage Technology for RAID Systems 7 39 RAID Volume Data Verification and Repair 7 41 Replacing and Reverting Recovery and Master Volumes 7 41 Intel Smart Response Technology 7 43 Enabling Intel S...

Page 29: ...IN Code Power Saving 7 65 Troubleshooting Overview 8 1 Basic Hints and Tips 8 2 Backup and General Maintenance 8 3 Viruses 8 4 Upgrading and Adding New Hardware Software 8 5 Problems and Possible Solutions 8 7 Resolving the Insert a SIM issue with the 3G Module Windows 8 8 13 Interface Ports Jacks Overview A 1 Ports and Jacks A 2 Card Reader A 2 DC In Jack A 2 External Monitor Port A 2 HDMI Out Po...

Page 30: ...view B 1 Video Driver Controls Video Driver Installation C 1 Video VGA C 1 NVIDIA Video VGA C 1 NVIDIA Optimus Technology C 2 Intel Dynamic Video Memory Technology C 4 Intel Graphics Media Control Panel C 5 Display Devices Options C 20 Attaching Other Displays C 21 Attaching Other Displays Devices Charms Bar C 23 Configuring an External Display In Windows C 24 NVIDIA Control Panel C 26 ...

Page 31: ...onfiguration C 33 Specifications Processor D 2 Core Logic D 2 Display D 2 Memory D 2 Video Adapter Options D 2 Storage D 2 Audio D 2 Keyboard Pointing Device D 2 Interface D 3 Card Reader D 3 Slots D 3 Communication D 3 BIOS D 3 Security D 3 Operating System D 4 Features D 4 Indicators D 4 ...

Page 32: ...XXX Preface Power D 4 Power Management D 4 Environmental Spec D 4 Physical Dimensions Weight D 4 ...

Page 33: ...lities essential to the operation or improvement of some of the computer s subsystems Chapter 5 An outline of the computer s built in software or BIOS Basic Input Output System Chapter 6 Instructions for upgrading your computer Chapter 7 A quick guide to the computer s PC Camera Wireless LAN Fingerprint Bluetooth WLAN Combo Intel technology Sound Blaster Audio and 3G modules some of which may be o...

Page 34: ...gh all the documentation more detailed descriptions of the functions setup and system controls are covered in the remainder of the User s Manual but do not worry if you do not understand every thing the first time Keep this manual nearby and refer to it to learn as you go You may find it useful to refer to the notes marked with a as indicated in the margin For a more detailed description of any of...

Page 35: ...order listed in Table 4 1 on page 4 3 You will be unable to use most advanced controls until the necessary drivers and utilities are properly installed If your system hasn t been properly configured your service representative may have already done that for you refer to Drivers Utilities on page 4 1 for installation instructions You will need to attach an optical device drive to the computer in or...

Page 36: ...e Windows 8 operating system is sup ported Note In order to run Windows 8 without limitations or decreased performance your computer requires a mini mum 1GB of system memory RAM Windows 8 OS In order to run Windows 8 32 Bit without limitations or decreased performance your computer requires a minimum 1GB of system memory RAM however if you are running Windows 8 64 bit your computer requires a mini...

Page 37: ... the other hand as illustrated in Figure 1 1 below to support the base of the computer Note Never lift the computer by the lid LCD 5 Press the power button on the top right of the computer for about 2 3 seconds to turn the computer on note that the power LED on the front of the computer will turn from orange to green when the computer powers on Figure 1 1 Opening the Lid LCD Computer with AC DC Ad...

Page 38: ...rd 8 Touchpad Buttons 9 LED Indicators 3 5 1 7 8 4 2 6 Wireless Device Operation Aboard Aircraft The use of any portable electronic transmission devices aboard aircraft is usually prohibited Make sure the WLAN Bluetooth 3G modules are OFF if you are using the computer aboard air craft Use the Airplane Mode hot key combination to toggle Airplane Mode On Off and check the LED indicator for the power...

Page 39: ...k Blue Caps Lock is Activated press Caps Lock Blue Scroll Lock is Activated press Fn Scr Lk Icon Color Description Orange AC DC Power is Plugged In Green The Computer is On Blinking Green The Computer is in Sleep Mode Blinking Orange The Powered USB Port is On see Powered USB 3 0 Port on page 1 13 Orange The Battery is Charging Green The Battery is Fully Charged Blinking Orange The Battery Has Rea...

Page 40: ...nd enable it auto matically However spe cial functions hot keys unique to the system s regular keyboard may not work NumLk ScrLk Hold down the Fn Key and either NumLk or ScrLk to enable number or scroll lock and check the LED indicator for sta tus Numerical Play Pause Key Function Keys NumLk ScrLk Keys Fn Key Keypad Windows Logo Key Menu Application Key Special Characters Some software application...

Page 41: ...splay file Search I Open the Settings charm K Open the Connect charm L Lock the computer and display the Lock screen P Display the Second Screen menu see Figure 1 20 on page 1 26 R Switch to the Windows Desktop and display the Run dialog box Z Access the App Bar see Figure 1 12 on page 1 19 Windows Logo Keyboard Shortcut Use the Windows logo key D key com bination to switch be tween the Start scre...

Page 42: ...Pause in Audio Video Programs Fn F5 F6 Volume Decrease Increase Fn Esc Control Center Toggle see over Fn F7 Display Toggle Fn 1 Fan Control Toggle Toggle between Auto matic Fan Control Full Power Fn F8 F9 Brightness Decrease Increase Fn F1 Touchpad Toggle Fn F10 PC Camera Power Toggle Fn F2 Turn LCD Backlight Off Press a key to or use Touchpad to turn on Fn F11 Airplane Mode Toggle Fn F3 Mute Togg...

Page 43: ...f see Appendix B for full details Figure 1 4 Control Center Control Center Click on any button to turn any of the modules e g TouchPad Camera on off Click on the power conservation modes to switch be tween Performance Balanced or Energy Star modes see page 3 11 To remove the Power Conservation Modes screen just click in a blank area of the icon or press a key on the keyboard Click on the buttons o...

Page 44: ... order to get maximum audio per formance 2 4 1 3 5 6 2 2 Multi In 1 Card Reader The card reader allows you to use the most popular digital storage card formats MMC MultiMedia Card RS MMC SD Secure Digital Mini SD SDHC SDXC The card reader features a push in push out card insertion and ejection mechanism Sim ply push the card to insert and eject it however some cards may require an adapter Optical ...

Page 45: ...al display through an HDMI connection see page 7 37 1 3 6 4 5 8 7 USB 3 0 Port OR USB 2 0 Port This model includes 1 USB 2 0 port and 3 USB 3 0 ports including one AC DC powered USB 3 0 port USB 3 0 ports are denoted by their blue color USB 2 0 ports are colored black Powered USB 3 0 Port The powered USB 3 0 port can supply power for charging devices only not for op erating devices when the system...

Page 46: ...hen fully charge a new battery before using it Com pletely discharge and charge the battery at least once every 30 days or after about 20 partial discharges See Bat tery Information on page 3 12 for full in structions 2 1 CPU The CPU is not a user serviceable part Overheating To prevent your computer from overheating make sure nothing blocks the Vent Fan Intake while the computer is in use 3 2 2 3...

Page 47: ...o bring up the context menu or use the Windows Logo Key X key combination and select Control Panel Figure 1 8 Windows 8 Context Menu Charms Bar Settings from Desktop App Move the mouse to the and right click to access bottom left of the screen the menu Swipe a finger from the right of the Touchpad from the click Settings and click Control Panel Desktop not the Start screen to access the Charms Bar...

Page 48: ...lities and programs within Windows 8 are accessed from the Start screen and or Windows Desktop app The Desktop which runs as an app within the Start screen can be accessed by clicking the Desktop item in the Start screen or by using the Windows Logo Key D key combination Figure 1 9 Windows Start Screen Desktop App ...

Page 49: ...les for apps and control panels in the Start screen Right click on a blank area of the Start screen and you will see the All Apps icon Click the All Apps icon to display all the installed ap plications etc Right click any icon to bring up the menu at the bottom of the screen and you can then click the appropriate icon to pin the App to or unpin from the Start screen or to the taskbar in the Deskto...

Page 50: ...ft hot corner to switch between the Start screen and the Windows Desktop app To do so move your mouse to hover over the bottom left corner of the screen and click the pop up When you move to the lower left hot corner in the Start screen itself it will take you back to your most recently used app Figure 1 11 Desktop Move the mouse to the bottom left of the screen and click to switch back to the Sta...

Page 51: ...pt Device Man ager and Network Connections etc Figure 1 12 Advanced Context Menu Right Click lower left hot corner Display Most Recently Used Apps If you are in the Start screen Desktop or an app you can move your mouse to the upper left corner of the screen to get back to the most re cently used app To view all the most re cently used Apps hover over the top left of the screen and then move the m...

Page 52: ...ursor to the upper or lower right corners of the screen and then hover over one of the items in the Charms Bar to activate it the bar will be black when it is active or use the Windows Logo Key C key combination Figure 1 13 Start Screen with Charms Bar Move the mouse over a Charms Bar icon to activate the menu Move the mouse to the top lower right icons to activate the Charms Bar Move the mouse to...

Page 53: ...eft of the screen Devices Click this button to change connected peripheral device settings e g an external display Settings This button gives instant access to the computer settings such as Network Audio Notifica tions Power and Keyboard click Change PC Settings to activate the PC Settings menu Figure 1 14 Settings Menu Charms Bar TouchPad Access To quick access the Charms Bar using the TouchPad 1...

Page 54: ...r of ways in Windows 8 Click Search in the Windows Charms Bar see previous page and the search pane will pop out Type Control Panel and select it from the results to the left Figure 1 15 Search Control Panel Click on Computer you may need to pin Computer to the Start screen in the Start screen click on Computer in the top menu and select Open Control Panel from the ribbon Figure 1 16 Open Control ...

Page 55: ...k on Settings in the Windows Charms Bar and select Control Panel from the menu Figure 1 17 Settings Charms Bar Desktop App Only Right click on a blank area of the Start screen or swipe a finger from the top or bottom of the touch screen Click the All Apps icon and click Control Panel Figure 1 18 All Apps Control Panel ...

Page 56: ...19 Keyboard Shortcut to Control Panel You can also use keyboard shortcuts to access the Control Panel Press the Windows logo key and X to bring up the context menu and then press P to bring up the Control Panel Alternatively press the Windows logo key and R to bring up the Run dialog box and then type Control Panel and press Enter to access the Control Panel ...

Page 57: ...eed to click the Desktop app to switch to the Desktop The taskbar is displayed at the bottom of the desktop screen and you can see the notification area of the taskbar in the bottom right of the screen Some of the Control Panels and applications referred to during the course of this manual can be accessed from here Figure 1 19 Desktop Taskbar You can pin unpin apps to from the taskbar in much the ...

Page 58: ...ch display devices and configure display options from the Display control panel in Appearances and Personalization in Windows 8 when running the Desktop app see Desktop Application on page 1 18 and Appendix B In Windows 8 it is possible to quickly configure external displays from the Devices menu item in the Charms Bar see Windows 8 Charms Bar on page 1 20 To Configure Displays from Devices Charms...

Page 59: ...con In the Appearance and Personalization category 3 Adjust resolution Figure 1 21 Screen Resolution 1 3 2 Right Click Desktop App 1 You can right click the desktop and select Screen resolution Figure 1 21 2 Use the dropbox to select the screen Resolution Figure 1 21 3 Click Advanced settings Figure 1 21 to bring up the Advanced properties tabs 1 2 3 ...

Page 60: ...lution control panel in Win dows 2 Click the Intel R tab and click Graphics Properties button Figure 1 22 on page 1 28 OR 3 Right click the desktop and select Graphics Properties from the menu OR 4 Click the icon in the notification area of the Desktop taskbar and select Graphics Properties from the menu Figure 1 22 Intel HD Graphics Control Panel 3 4 4 ...

Page 61: ...Start Guide 1 To access the NVIDIA Control Panel 1 Right click the desktop and select NVIDIA Control Panel Figure 1 23 OR 2 Double click the icon Figure 1 23 in the Windows control panel Figure 1 23 NVIDIA Control Panel 5 6 5 6 ...

Page 62: ...Menu item in Set tings in the Charms Bar in Windows 8 may be used to Shut down or Restart you can also add Hibernate Sleep to the menu see Adding Hibernate Sleep to the Power Menu on page 3 9 Shut Down Restart or Sleep 1 Go to the Charms Bar and click Settings 2 Click Power 3 Select Sleep Shut Down or Restart Figure 1 24 Power Settings ...

Page 63: ...a of the Windows Desktop and select Screen Resolution Adjust the Resolution to make sure that it is at least 1024 768 although preferably 1366 768 or above see sidebar Figure 1 25 Screen Resolution Screen Resolution for Metro Style Apps Windows 8 The minimum resolution in which Metro style Apps will run is 1024x768 The minimum resolution required to support all the features of Windows 8 including ...

Page 64: ...e UAC is on or off follow the instructions below 1 Open the Control Panel 2 Click on User Accounts and then click on Change User Account Control settings or click System and Security and click Change User Account Control Settings under Action Center 3 If the slider is in the Never notify position then the UAC is disabled 4 To enable or turn on the UAC move the slider to Always notify or Notify me ...

Page 65: ...iew 2 1 2 Chapter 2 Storage Devices Audio Mouse Overview Read this chapter to learn more about the following main features and components of the computer Hard Disk Drive Multi in 1 Card Reader Audio Features TouchPad and Buttons Mouse ...

Page 66: ...r details on removing and inserting the hard disk are available in Upgrading the Hard Disk Drive s on page 6 9 Power Safety Before attempting to ac cess any of the internal components of your computer please ensure that the machine is not connected to the AC power and that the ma chine is turned off Also ensure that all peripher al cables including phone lines are discon nected from the comput er ...

Page 67: ...age 4 6 Note Some of these cards require PC adapters that are usually supplied with the cards Card Reader Cover Make sure you keep the cover in the card reader when not in use This will help prevent foreign objects and or dust get ting in to the card read er Push Push Card Reader The card reader fea tures a push in push out card insertion and ejec tion mechanism Simply push the card to insert and ...

Page 68: ...esktop or VIA HD Audio Deck control panel The volume may also be adjusted by means of the Fn F5 F6 key combination Sound Volume Adjustment The sound volume level is set using the volume control within Windows and the volume func tion keys on the comput er Click the volume icon in the taskbar to check the setting Figure 2 3 VIA HD Audio Deck Click Expert Mode to access the Advanced menus ...

Page 69: ...peaker in VIA HD Audio Deck in Expert Mode and click the Sync Left and Right volume button see left You can then adjust the volume slid ers independently this set ting also controls the Balance setting in the Win dows Sound control pan el Figure 2 4 VIA HD Audio Deck Expert Mode Note that to adjust the Left Right volume balance independently click the Sync Sound Blaster Cinema Audio Note that you ...

Page 70: ... mouse to your computer through one of the USB ports The TouchPad buttons function in much the same way as a two button mouse Mouse Driver If you are using an ex ternal mouse your op erating system may be able to auto configure your mouse during its installation or only en able its basic functions Be sure to check the device s user docu mentation for details ...

Page 71: ... scrolling pointer motion and sensitivity options to your preferences You will find further in formation at www synaptics com TouchPad Scrolling This computer model se ries may feature different TouchPad versions These TouchPads may differ in their vertical scrolling function in most scrollable windows Some TouchPads require sliding the finger up and down on the right of the TouchPad to scroll the...

Page 72: ...k Mouse Hardware and Sound 3 Click Device Settings tab and click Settings 4 Use the menu tree on the left to access the user configurable settings Show Video You can get a clearer view of the gestures in volved by clicking the Show Video option for each gesture item Select the gesture Pinch Zoom Rotating Three Fingers Down and Three Finger Flick in the Device Settings Set tings left tree menu and ...

Page 73: ... palms on it you can do so by using Fn F1 key combination You can also set the system to automatically disable the internal Touchpad when an external USB point device e g a USB mouse is attached 1 Go to the Mouse Properties control panel 2 Click to select Device Settings tab 3 Click to place a tick in the Disable internal pointing device when external USB pointing device is attached tickbox 4 Clic...

Page 74: ...face and slide both fingers in the direction required in a straight con tinuous motion Zooming The Pinch Zoom gesture can be used to perform the same function as a scroll wheel in Windows applications that support CTRL scroll wheel zoom functionality Place two fingers on the TouchPad for best results use the tips of the fingers and slide them apart to zoom in or closer together to zoom out Figure ...

Page 75: ...chPad and slide it in a circular motion around the stationary finger clockwise or counterclockwise to rotate the object Three Finger Flick Three Fingers Down Press The Three Finger Flick gesture may be used to enhance navigation with a variety of applications such as browsing the Internet or scrolling through a photo viewer The Three Fingers Down gesture may be used to launch user selectable appli...

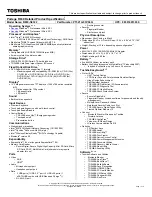
Page 76: ...Storage Devices Audio Mouse 2 12 2 ...

Page 77: ...r Plans Power Saving States Configuring the Power Buttons Battery Information The computer uses enhanced power saving techniques to give the operating system OS direct control over the power and thermal states of devices and processors For example this enables the OS to set devices into low power states based on user set tings and information from applications OS Note Power management functions wi...

Page 78: ...mfortable viewing angle 4 Press the power button to turn On Battery The battery allows you to use your computer while you are on the road or when an electrical outlet is unavailable Battery life varies depending on the applications and the configuration you re using To increase battery life let the battery discharge completely before recharging see Battery FAQ on page 3 17 We recommend that you do...

Page 79: ...ontrol panel to configure this feature Power Button as Stand by or Hibernate Button You can use the OS s Power Options control panel to set the power button to send the sys tem into Stand by or Hi bernate mode see your OS s documentation or Configuring the Pow er Buttons on page 3 8 for details Figure 3 1 Power Menu Settings Charms Bar Shut Down Note that you should always shut your com puter down...

Page 80: ...ified time and to send the computer into Sleep after a period of inactivity Click Change plan settings and then click Change advanced power settings to ac cess further configuration options in Advanced Settings Resuming Operation See Table 3 1 on page 3 10 for informa tion on how to resume from a power saving state Password It is recommended that you enable a password on system resume in or der to...

Page 81: ...ower Choose High performance you may need to click Show additional plans to view the High performance plan for maximum performance when the computer is pow ered from an AC power source Choose the Power saver bear in mind that this scheme may slow down the overall performance of the computer in order to save power for maximum power saving when the computer is battery DC power pow ered Figure 3 3 Po...

Page 82: ...left off what was on your desktop without reopening the application s and file s you last used If your mobile PC in Sleep is running on battery power the system will use only a minimum amount of power After an extended period the system will save all the information to the hard disk and shut the computer down before the battery becomes depleted To add Sleep to the Power Menu see Adding Hibernate S...

Page 83: ... within seconds You should put your mobile PC into Hibernate if you will not use the computer for a period of time and will not have the chance to charge the battery To add Hibernate to the Power Menu see Adding Hibernate Sleep to the Power Menu on page 3 9 Shut down You should Shut down the computer if you plan to install new hardware don t for get to remove the battery and follow all the safety ...

Page 84: ...r buttons do on the left menu in Power Options to bring up the menu Password Protection It is recommended that you enable a password on wake up in order to protect your data However you can dis able this setting from the Power Options menu by clicking Require a password on wakeup in the left menu and se lecting the options click Change settings that are currently unavail able Figure 3 5 Power Opti...

Page 85: ...to the Power Options Hardware and Sound control panel see page 1 23 2 Click Change settings that are currently unavailable 3 Click Choose what the power buttons do 4 Click to put a tick in the Hibernate Sleep box under Shutdown settings 5 Click Save Changes and close the control panel Figure 3 6 Power Options Define Power Buttons Shutdown Settings ...

Page 86: ...n F4 Key Combo Hibernate Off battery Press the Power Button Orange AC DC adapter Display Turned Off Green Press a Key or Move the Mouse Touchpad Table 3 1 Resuming Operation Closing the Lid If you have chosen to send the computer to Sleep when the lid is closed raising the lid will wake the system up Power Button When the computer is on you can use the power button as a Sleep Hibernate Shut Down h...

Page 87: ...o toggle the Control Center on off 2 Click either the Performance Balanced or Energy Star button 3 Click in a blank area of the icon or press a key on the keyboard to exit Power Conservation Mode without making any changes PowerConservation Modes The Energy Star setting will result in maximum power saving but with the possible loss of some performance Setting the mode to Bal ance will give power s...

Page 88: ...itch User Log off Change a password and Task Manager options If you click the Power icon in the lower right corner of the screen a power management option menu appears to display Sleep Shut down and Restart To fully control all the power options including Hibernate mode go to the Power Options control panel and configure the power button sleep button and lid to per form the function selected Figur...

Page 89: ...hut down Hibernate etc and set critical and low battery levels from power plan Change plan settings Change advanced power settings see Figure 3 3 on page 3 5 Click the battery icon in the notification area to see the current battery level and charge status Low Battery Warning When the battery is criti cally low immediately connect the AC DC adapter to the computer or save your work oth erwise the ...

Page 90: ...er when it is not powered by the AC DC adapter Reduce the amount of time before the display is turned off Close wireless Bluetooth modem or communication applications when they are not being used Disconnect remove any unnecessary external devices e g USB devices ExpressCards etc Windows Mobility Center The Windows Mobility Center control panel provides an easy point of access for information on ba...

Page 91: ... fully charge a new battery see Battery FAQ on page 3 17 for instructions on how to do this Recharging the Battery with the AC DC Adapter The battery pack automatically recharges when the AC DC adapter is attached and plugged into an electrical outlet If the computer is powered on and in use it will take several hours to fully recharge the battery When the computer is turned off but plugged into a...

Page 92: ... Discard used battery according to the manufacturer s in structions Damaged Battery Warning Should you notice any physical defects e g the battery is bent out of shape after being dropped or any unusual smells emanating from the notebook battery shut your computer down immediately and contact your distributor supplier If the battery has been dropped we do not recommend using it any further as even...

Page 93: ...s down due to a low battery Don t turn off the computer even if a message indicates the battery is critically low just let the computer use up all of the battery power and shut down on its own 1 Save and close all files and applications 2 Create a power plan for discharging the battery and set all the options to Never Figure 3 11 Power Plan Create ...

Page 94: ...anagement 3 18 Battery Information 3 3 Click Change plan settings after creating it and click Change plan settings Change advanced power settings Figure 3 12 Change Plan Settings Change Advanced Power Settings ...

Page 95: ... battery options 5 Choose the options below click Yes if a warning appears Low battery levels 0 Critical battery Levels 1 Low battery action Do Nothing Critical battery action On battery Shut Down Critical battery action Plugged in Do Nothing Figure 3 13 Power Options Advanced Settings Battery ...

Page 96: ...harge the battery When charging the battery don t stop until the LED charging indicator light changes from orange to green How do I maintain the battery Completely discharge and charge the battery at least once every 30 days or after about 20 partial discharges ...

Page 97: ... vice Drivers Utilities User s Manual disc Table 4 1 on page 4 3 lists what you need to install and it is very important that the drivers areinstalled in the or der indicated Module Driver Installation The procedures for installing drivers for the PC Camera WLAN and Combination Bluetooth WLAN modules you should also install the Sound Blaster Cinema Intel Technology drivers as instructed in Chapter...

Page 98: ... button to access the Optional driver menu Figure 4 1 Drivers Installer Screen 1 5 Check the driver installation order from Table 4 1 on page 4 3 the drivers must be installed in this order which is the same as that listed in the Drivers Installer menu below 6 Click to select the driver you wish to install you should note down the drivers as you install them 7 Follow the instructions for each indi...

Page 99: ... Mode Page 7 2 Video VGA Page 4 6 PC Camera Module No driver required Page 7 12 NVIDIA Video VGA Page 4 6 Wireless LAN Module Page 7 19 LAN Page 4 6 Bluetooth WLAN Combo Module Page 7 27 Card Reader Page 4 6 Sound Blaster Cinema EQ Page 7 33 TouchPad Page 4 6 Intel Rapid Storage Technology required for hard disks in AHCI mode Page 7 38 Airplane Page 4 7 Intel Rapid Start Technology Driver Page 7 4...

Page 100: ...o uninstall the original driver To do this go to the Control Panel in the Windows OS and double click the Programs and Features icon Pro grams Uninstall a program Click to select the driver if it is not listed see below and click Uninstall and then follow the on screen prompts it may be nec essary to restart the computer Reinstall the driver as outlined in this chapter If the driver is not listed ...

Page 101: ...ws New Hardware Found If you see the message New Hardware Found dur ing the installation procedure other than when out lined in the driver install procedure click Cancel to close the window and follow the installation proce dure Driver Installation General Guidelines The driver installation procedure outlined in this Chapter and in Chapter 7 Options Modules are accurate at the time of going to pre...

Page 102: ... 1 Click 3 Install NVIDIA VGA Driver Yes 2 Click AGREE AND CONTINUE button to accept the terms of the license agreement 3 Click Next 4 Click Close to complete the installation Note After installing the video driver go to the Dis play Display Settings control panel to adjust the vid eo settings to the highest resolution LAN 1 Click 4 Install LAN Driver Yes 2 Click Next Install 3 Click Finish Card R...

Page 103: ...lick Next Next Next 5 Click Finish to restart the computer After installing the audio driver the system will not re turn to the Drivers Installer screen To install any of the optional drivers eject the Device Drivers Utili ties User s Manual disc and then reinsert it or dou ble click the disc icon in My Computer and click Option Drivers button to access the optional driver menu It is recommended t...

Page 104: ...minutes to assess the system performance 5 Close the control panel Windows Update After installing all the drivers make sure you enable Win dows Update in order to get all the latest security up dates etc all updates will include the latest hotfixes from Microsoft To enable Windows Update make sure you are con nected to the internet 1 Go to the Control Panel 2 Click Windows Update System and Secur...

Page 105: ...indicated in Table 4 1 on page 4 3 for the driver installation procedures for any modules in cluded in your purchase option Figure 4 3 Optional Drivers Installer Screen Note that you need to install both the WLAN Bluetooth drivers for all the Bluetooth Combo modules Models A B ...

Page 106: ...Drivers Utilities 4 10 4 ...

Page 107: ...et tings you find and any changes you make This information could be useful if your system ever needs servicing There is one general rule Don t make any changes unless you are sure of what you are doing Many of the settings are required by the system and changing them could cause it to become unstable or worse If you have any doubts consult your service representative BIOS Screens Note that the BI...

Page 108: ...uct a POST including a quick test of the on board RAM memory As the POST proceeds the computer will tell you if there is anything wrong If there is a problem that prevents the system from booting it will display a system summary and prompt you to run Setup If there are no problems the Setup prompt will disappear and the system will load the operating system Once that starts you can t get into Setu...

Page 109: ...al Errors This kind of error still allows you to boot You will get a message identifying the problem make a note of this message and you can then press F7 the F7 on screen will be highlighted to illustrate that the system is processing the request for boot op tions Press F2 give the system a few seconds to enter Setup the F2 on screen will be highlighted to illustrate that the system is processing...

Page 110: ...ate that the system is processing the request during the POST or press F7 for boot options If you get a Keyboard Error usually because you pressed F2 too quickly just press F2 again If the computer is already on reboot using the Ctrl Alt Delete combination and then hold down F2 when prompted The Setup main menu will appear To see the boot options press F7 BIOS Settings Warning Incorrect settings c...

Page 111: ... are confusing press F1 to call up a General Help screen and then use the arrow keys to scroll up or down the page The Item Specific Helpon the upper right side of each screen explains the highlight ed item and has useful messages about its options If you see an arrow next to an item press Enter to go to a sub menu on that sub ject The sub menu screen that appears has a similar layout but the Ente...

Page 112: ...Menu The hour setting uses the 24 hour system i e ØØ midnight 13 1 pm If you can change the date and time settings in your operating system you will also change these settings Some applications may also alter data files to reflect these changes Figure 5 2 Main Menu ...

Page 113: ...uter s SATA Ports System Extended Memory Main Menu This item contains information on the system memory and is not user configurable The system will auto detect the amount of memory installed MB Series BIOS Revision KBC EC Firmware Revision Main Menu This item contains information on the BIOS version and video card etc and is not user configurable ...

Page 114: ...BIOS Utilities 5 8 Advanced Menu 5 Advanced Menu Advanced Chipset Control Advanced Menu The sub menu here allows you to adjust the Bluetooth Power Setting Figure 5 3 Advanced Menu ...

Page 115: ...el R Rapid Start Technology Advanced Menu Enable disable Intel R Rapid Start Technology from this menu The rapid start hibernation mode can resume power within 5 to 6 seconds and can remember your computer s state with zero power Intel R Rapid Storage Technology Advanced Menu Enable disable Intel R Rapid Storage Technology from this menu to provide high performance SATA RAID capabilities for Windo...

Page 116: ...anced Host Controller Interface or RAID Redundant Array of In dependent disks modes from this menu A RAID mode ma y be set if you have included 2 mSATA SSDs in your purchase configuration The SATA Mode should be set BEFORE installing an operatingsystem and after you have backed up all necessary files and data see sidebar See Setting Up SATA RAID or AHCI Mode on page 7 2 for details Make sure you i...

Page 117: ... while the boot screen is displayed to perform the Enter Setup or Boot Option functions When UEFI Boot is enabled then the prompts to press F2 or F7 will not appear However you can still press F2 to enter the setup or F7 to choose the preferred boot device if you press the key immediately the system boots up Power On Boot Beep Advanced Menu Use this menu item to enable disable the beep as the comp...

Page 118: ...is will not affect access to the computer OS only the Aptio Setup Utility Security Menu The changes you make here affect the access to the Setup utility itself and also access to your machine as it boots up after you turn it on These settings do not affect your machine or network passwords which will be set in your software OS Figure 5 4 Security Menu ...

Page 119: ...lt setting is Disabled Secure Boot Security Menu Secure Boot prevents unauthorized operating systems and software from loading during the startup process Secure Boot is available as a menu option if you have Windows 8 set as your operating system and have enabled UEFI Boot see Boot Menu on page 5 14 Enabling Secure Boot will bring up the Secure Boot Mode menu to enable you to configure Secure Boot...

Page 120: ...the next device in the order specified in the Boot Option Priorities Item specific help on the right is available to help you move devices up and down the order Figure 5 5 Boot Menu BIOS Screens Note that the BIOS screens pictured on these pages are intend ed for guidance in set ting up your system s BIOS BIOS versions are sub ject to constant change and revision therefore your computer s actual s...

Page 121: ...be highlighted in white UEFI Boot Boot Menu OS Select Enable disable UEFI Boot from this menu The Unified Extensible Firmware Inter face UEFI specification provides a clean interface between operating systems and platform firmware at boot time In contrast to BIOS UEFI defines a set of standard boot and runtime services The Network Stack item will be enabled as an option un der UEFI Boot ...

Page 122: ...osing to Discard Changes or Exit Discarding Changes will wipe out any changes you have made to the Setup You can also choose to restore the original Setup defaults that will re turn the Setup to its original state and erase any previous changes you have made in a previous session Figure 5 6 Exit Menu ...

Page 123: ...lar slotted flathead screwdriver An antistatic wrist strap Before working with the internal components you will need to wear an antistatic wrist strap to ground yourself because static electricity may damage the compo nents The chapter includes Removing the Battery Removing the Component Bay Cover Upgrading the Hard Disk Drive s Upgrading the System Memory RAM Please make sure that you review each...

Page 124: ...e the component s Power Safety Warning Before you undertake any upgrade proce dures make sure that you have turned off the power and disconnect ed all peripherals and cables including tele phone lines You must also remove your battery in order to prevent accidentally turning the machine on Before removing the battery disconnect the AC DC adapter from the computer Removal Warning When removing any ...

Page 125: ...want to upgrade your computer by replacing the existing processor with a fast er new one you will need to contact your customer service representative We rec ommend that you do not do this yourself since if it is done incorrectly you may damage the processor or mainboard ...

Page 126: ... computer first 1 Turn the computer off remove the AC DC adapter and turn it over 2 Slide the latch in the direction of the arrow 3 Slide the latch in the direction of the arrow and hold it in place 4 While holding latch slide the battery out of the compartment Warranty Warning Please check with your service representative before undertaking any upgrade procedures to find out if this will VOID you...

Page 127: ...lide the battery straight into the compartment note that there are grooves on the side of the battery which should align up with the battery compartment 2 Lock the battery in place by sliding the latches in the direction of arrows Figure 6 2 Battery Insertion Lock 1 2 3 1 2 3 ...

Page 128: ...emoving the Component Bay Cover 6 Removing the Component Bay Cover 1 Turn off the computer and turn it over and remove the battery 2 Locate the component bay cover and remove screws Figure 6 3 Component Bay Cover Screws 1 3 1 2 3 ...

Page 129: ...ver Removal 4 5 6 4 5 6 Removal Warning When removing any cover s and screw s for the purposes of device upgrade remember to replace the cover s and screw s before turning restoring power to the system Also note the following when the cover is removed Hazardous moving parts Keep away from moving fan blades Do not touch the heat sink area as the parts may be hot ...

Page 130: ...t on the bottom case assembly and aligning the three pins with the slots in the case 2 Angle the cover up to make sure that the cover pins fit in the slots and then place the cover down onto the computer and ensure that the fit is tight before replacing the screws Figure 6 3 on page 6 6 Figure 6 5 Component Bay Cover Replacement 1 3 1 3 1 2 3 ...

Page 131: ...nstall all necessary drivers and utilities as outlined in Drivers Utilities on page 4 1 when setting up a new hard disk HDD System Warning New HDD s are blank Be fore you begin make sure You have backed up any data you want to keep from your old HDD You have all the CD ROMs and FDDs required to in stall your operating system and programs If you have access to the in ternet download the latest appl...

Page 132: ...e Hard Disk 1 Turn off the computer and turn it over and remove the battery and component bay covers see pages 6 4 6 6 2 Slide the HDD cover in the direction of arrow and lift it out of the bay 3 Remove screws and the cover Figure 6 6 Primary HDD Removal 1 2 3 4 5 2 1 3 4 5 ...

Page 133: ...Reverse the process to install a new disk and do not forget to reinstall the cover and screws see Figure 6 6 on page 6 10 2 Place the hard disk assembly into the bay and slide it in the direction of arrow 3 Replace the component bay cover see page 6 8 Figure 6 7 Inserting the Hard Disk 1 5 1 ...

Page 134: ... Upgrading the System Memory RAM The computer has two memory sockets for 204 pin Small Outline Dual In line SO DIMM DDR3L type memory modules see Memory on page D 2 The total memory size is automatically detected by the POST routine once you turn on your computer ...

Page 135: ...ible at point on the mainboard 3 Gently pull the two release latches on the sides of the memory sockets in the direction indicated below Figure 6 8 RAM Module Location Contact Warning Be careful not to touch the metal pins on the module s connecting edge Even the cleanest hands have oils which can attract particles and degrade the module s performance Figure 6 9 RAM Module Release Latches 1 1 2 3 ...

Page 136: ...e it should fit without much pressure 8 Press the module in and down towards the mainboard until the socket levers click into place to secure the module 9 Replace the component bay cover see page 6 8 Figure 6 10 RAM Module Removal Contact Warning Be careful not to touch the metal pins on the module s connecting edge Even the cleanest hands have oils which can attract particles and degrade the modu...

Page 137: ...tative The chapter includes information on the following Setting Up SATA RAID or AHCI Mode PC Camera Module Wireless LAN Module Bluetooth WLAN Combo Module Intel Rapid Storage Technology Intel Smart Response Technology Intel Rapid Start Technology Driver Intel Wireless Display Application Sound Blaster Cinema EQ 3G Module You will need to attach an optical device drive to the computer in order to ...

Page 138: ...l require at least two identical see sidebar mSATA solid state drives SSDs Note that you will need to install a driver from the Device Drivers Utili ties User s Manual disc at OS installation see page 7 4 Intel Rapid Storage Technology Application Make sure you install the Intel Rapid Storage Technology application if you have set up your hard disk in AHCI mode or mSATA SSD s in RAID mode see Inte...

Page 139: ...how data is copied between the master and recovery drives fast volume updates and the ability to view the data in Windows Explorer Table 7 1 RAID Levels Array Types A Mirrored Array RAID 1 provides full data protection as data can simply be copied from a healthy disk to a replacement for any failed disk A Striped Array RAID 0 is NOT fault tolerant The failure of one drive will result in the loss o...

Page 140: ...es installed note that hard disk drive will be used for data storage only in a mSATA SSD RAID configuration 3 You will need to attach an external DVD drive to install the drivers from the Device Drivers Utilities User s Manual disc 4 The Device Drivers Utilities User s Manual disc 5 A USB flash drive 6 An operable computer to copy files from the Device Drivers Utilities User s Manual disc to the U...

Page 141: ...tions RAID f6flpy x86 For Windows 8 64bit D Options RAID f6flpy x64 4 Start up your notebook computer and press F2 to enter the BIOS 5 Go to the Boot menu select UEFI Setting and press Enter see page 5 14 6 Set UEFI Boot to Enabled 7 Press Esc to exit the menu and go to the Advanced menu 8 Select SATA Mode see page 5 10 press Enter and select RAID Mode 9 Press F4 and Yes to Save Changes and Reset ...

Page 142: ... Mode 7 13 You can now setup your RAID volume using any installed SSDs 14 Go to Name and press Enter 15 Type a name of your choice for your RAID volume and press Enter Figure 7 2 Name the RAID Volume Advanced Intel R Rapid Storage Technology ...

Page 143: ...ny of the disks listed under Select Disks and select a drive name and press Enter 19 Move the cursor down use the arrow keys onto to X o select the SSD drives required and press Enter If you have selected a Recovery level RAID then you need to select one drive to be Master disk M and one disk to be the Recovery disk R Figure 7 3 Select Disks Advanced Intel R Rapid Storage Technology For Recovery F...

Page 144: ... Size to your requirements 22 If you have selected Recovery then you can adjust the Synchronization to On Request or Continuous 23 Go to Create Volume and press Enter 24 The RAID volume will then be created and the RAID information will be displayed under Intel R Rapid Storage Technology in the Advanced menu Figure 7 4 Created RAID Information Advanced Intel R Rapid Storage Technology ...

Page 145: ...will be prompted to press a key to boot from the DVD Make sure your USB Flash drive or external USB hard disk is attached to one of the USB ports on the computer 28 Press F7 as the computer starts up to bring up the boot device menu 29 Select the DVD drive containing the Windows 8 OS DVD and press Enter 30 Press a key at system startup to begin installing Windows from your Microsoft Windows 8 disc...

Page 146: ... Manual disc as per Table 4 1 on page 4 3 make sure you install the Intel Rapid Storage Technology driver see overleaf 37 Run the Intel Rapid Storage Technology application to manage your RAID volume as instructed in Intel Rapid Storage Technology for RAID Systems on page 7 39 IRST Driver Installation 1 Insert the Device Drivers Utilities User s Manual disc into an attached DVD drive 2 Click Optio...

Page 147: ...so will result in the loss of all data on the RAID volumes 1 Start up your notebook computer and press F2 to enter the BIOS 2 Go to Intel R Rapid Storage Technology in the Advanced menu and press Enter 3 Go to the RAID listed under RAID Volumes and press Enter 4 Select Delete and press Enter 5 Select Yes note that al the data on the volumes will be lost and press Enter Figure 7 6 Delete RAID Advan...

Page 148: ...dicator to the left of the camera will be illuminated in red see Figure 1 2 on page 1 6 Note that you need to use the Camera app in Windows 8 to take pictures and capture video Use the Fn F10 key combination see Function Keys Visual Indicators on page 1 10 to toggle power to the PC Camera module 2 ...

Page 149: ...d Hardware and Sound and click Recording tab 3 Right click hold and release Microphone VIA High Definition Audio and make sure the item is not disabled 4 Double click Microphone or select Properties from the right click menu 5 Click Levels tab and adjust the Microphone and Microphone Boost sliders to the level required 6 Click OK and close the control panels Figure 7 7 Audio Setup for PC Camera Ri...

Page 150: ...he Start screen to run the Camera app 3 The camera interface is a translucent app bar with three buttons Camera options Click this button to open a window with three main options Figure 7 8 Camera App Bar Figure 7 9 Camera Options Camera Options Resolution determined by the camera spec Audio device select micro phone to use Video Stabilization a toggle based on spec of the camera ...

Page 151: ...tton will start a three second countdown before the system takes a still photo or video recording starts Video Mode This button toggles between still photo mode transparent button and video recording mode highlighted white button Eliminating Screen Flicker If you find that the video screen in the camera pro gram is flickering you can try to adjust the setting in Flicker under More Op tions Figure ...

Page 152: ...to select the timer if you require a countdown before capture 4 Click to select either photo or video modes 5 Click in the main window to take a picture or start video capture if video capture begins a timer will appear in the bottom right corner of the screen 6 To stop video capture click the main window again 7 Captured photos and videos will be saved to a Camera Roll folder within the Picture f...

Page 153: ... bar with Crop and Delete buttons 11 Use the handles to Crop any captured picture and click OK to save the changes made 12 Click Delete to delete any captured photo note that no prompt will appear to confirm the delete 13 Right click any captured video to bring up app bar with Trim and Delete buttons 14 Use the buttons at either end of the slider to adjust the video length and click OK to save the...

Page 154: ...video file to a removable medium e g CD DVD or USB Flash drive Note that the Windows 8 system requires a minimum of 16GB 32 bit or 20GB 64 bit of free space on the C drive system partition In order to prevent system prob lems it is recommended that you move any large sized captured video file to a loca tion other than the C drive or reduce video resolution see below To Reduce Video Resolution Outp...

Page 155: ...e drivers in the order indicated in Table 4 1 on page 4 3 Note that you need to install both the WLAN Bluetooth drivers for the WLAN Bluetooth Combo modules Wireless Device Operation Aboard Aircraft The use of any portable electronic transmission devices aboard aircraft is usually prohibited Make sure the WLAN Bluetooth and 3G module s are OFF if you are using the com puter aboard aircraft by putt...

Page 156: ...uter 6 The operating system is the default setting for Wireless LAN control in Windows see page 7 21 Intel WLAN Driver Installation 1 Make sure the system is not in Airplane Mode and then insert the Device Drivers Utilities User s Manual disc into an attached DVD drive 2 Click Option Drivers button 3 Click 1 Install WLAN Driver Yes 4 Click in the tickbox to agree to the End User License Agreement ...

Page 157: ...er make sure the Wireless LAN module is turned on and not in Airplane Mode before configuration begins Charms Bar 1 Go to the Charms Bar 2 Select Settings and then click the WiFi icon it should read Available under the icon and Airplane mode should be Off 3 A list of available access points will appear Figure 7 14 WiFi Settings Charms Bar Networks ...

Page 158: ...ot 7 When you are connected to the network access point it will display the Connected icon 8 Select any connected network and click Disconnect to disconnect from a connected access point 9 You can click the Airplane Mode button to turn the mode On or Off 10 If you click on Change PC Settings at the bottom of Settings in the Charms Bar you can turn Wireless or Airplane Mode On Off see over Figure 7...

Page 159: ...Modules Wireless LAN Module 7 23 7 11 You need to either use Airplane Mode or to turn the WLAN module off aboard aircraft Figure 7 16 PC Settings Wireless ...

Page 160: ...A list of available access points will appear 4 Double click an access point to connect to it or click it and click Connect 5 Enter a network security key password if required and click Next 6 You can choose to share or connect to devices or not 7 Select any connected network and click Disconnect to disconnect from a connected access point Figure 7 17 Windows Desktop TaskbarNotification Area WLAN ...

Page 161: ...t to a network 4 A list of available access points will appear 5 Double click an access point to connect to it or click it and click Connect 6 Enter a network security key password if required and click Next 7 You can choose to share or connect to devices or not 8 Select any connected network and click Disconnect to disconnect from a connected access point Figure 7 18 Network and Internet Control ...

Page 162: ... list of available access points will appear 6 Double click an access point to connect to it or click it and click Connect 7 Enter a network security key password if required and click Next 8 You can choose to share or connect to devices or not 9 Select any connected network and click Disconnect to disconnect from a connected access point Figure 7 19 Network and Sharing Center Control Panel ...

Page 163: ...ot in Airplane Mode before in stalling the driver Bluetooth Data Transfer Note that the transfer of data between the computer and a Bluetooth enabled device is supported in one direction only simultaneous data transfer is not supported Therefore if you are copying a file from your computer to a Bluetooth enabled device you will not be able to copy a file from the Bluetooth enabled device to your c...

Page 164: ...t the Device Drivers Utilities User s Manual disc into an attached DVD drive 2 Click Option Drivers button 3 Click 2 Install Combo BT Driver Yes 4 Click Next Next 5 Click in the tickbox to accept the license and click Next 6 Click Next Finish 7 See Bluetooth Configuration in Windows 8 on page 7 29 for configu ration instructions High Speed Bluetooth Data Transfer The Combination Wire less LAN Blue...

Page 165: ...he Windows Desktop click the App or use the Windows logo key D key combination 2 Click the notification area of the taskbar and double click the Bluetooth icon or click and select Show Bluetooth Devices 3 The Devices item in PC Settings will appear OR Charms Bar 1 Go to the Charms Bar 2 Select Settings and then click Change PC Settings 3 The Devices item in PC Settings will appear Figure 7 20 Blue...

Page 166: ...air with the computer 6 On first connection the computer will provide you with a pairing code to be entered onto the device 7 Enter the code into your Bluetooth enabled device and click Yes on the computer to complete the pairing Figure 7 21 PC Settings Devices Add A Device Figure 7 22 Enter the Passcode ...

Page 167: ...Modules Bluetooth WLAN Combo Module 7 31 7 8 You need to either use Airplane Mode or to turn the Bluetooth module off aboard aircraft Figure 7 23 PC Settings Wireless ...

Page 168: ...tion area of the taskbar click the Bluetooth icon and click Open Settings 3 Click Options and make sure that Allow Bluetooth devices to find this computer check box Discovery has a tick inside it 4 Make sure that the Alert me when a new Bluetooth device wants to connect check box Connections has a tick inside it if you want to be notified when a Bluetooth device wants to connect Figure 7 24 Blueto...

Page 169: ...tton 7 Click Next Finish to restart the computer Sound Blaster Cinema EQ Activation On the first run of Sound Blaster Cinema EQ you will may to activate the applica tion 1 To activate the application you will need to be connected to the internet 2 Double click the Activate icon on the desktop and click the Activate button 3 The program will connect to the internet to verify the activation key 4 Cl...

Page 170: ...n area of the task bar or from the item in the Start menu Click on the tabs to access the any of the control panel menus Sound Blaster Cinema HDMI Note that the Sound Blaster Cinema audio effects do not apply to audio generated through an HDMI con nection Figure 7 25 Sound Blaster Cinema Taskbar Notification Area Icon Menu Power On Off ...

Page 171: ... sound quality issues when using headphones To adjust the settings for headphones do the following 1 Run the Sound Blaster Cinema application 2 Select Settings from the menu 3 Select Headphones from the drop down menu you can adjust the slider for crossover frequency 4 Click OK and close the application Figure 7 26 Sound Blaster Cinema Select Headphones Settings ...

Page 172: ...o control the level of immersion Crystalizer Enhances audio to make it sound livelier Bass Enhances the bass level of the sound system Smart Volume Minimizes sudden volume changes to avoid the need for con stant adjustment Dialog Plus Enhances dialogue levels for movies etc Settings You can use the drop down menu to use pre sets for Music Movie or Games Alternatively you can use a Custom set ting ...

Page 173: ...ma controls will be disabled 2 A warning box will pop up and will prompt Do you want to select another audio device now 3 Click No to continue using the HDMI audio output from your external display do not attempt to select another audio device when connected to the external HDMI display Figure 7 28 Sound Blaster Cinema HDMI Display Warning Menu ...

Page 174: ...set up in AHCI mode in the BIOS see SATA Mode Advanced Menu on page 5 10 See Intel Smart Response Technology on page 7 43 for further information on setting up Smart Response IRST Driver Installation 1 Insert the Device Drivers Utilities User s Manual disc into an attached DVD drive 2 Click Option Drivers button 3 Click 4 Install IRST Driver Yes 4 Click Next 5 Click the tickbox to accept the licen...

Page 175: ...on Run the Intel Rapid Storage Technology application from the item in the Start menu When the Intel Rapid Storage Technology application is launched the system will open the Status window Here you can view the general health of the storage system Various volume creation and management options are available depending on the system s status Figure 7 29 Intel Rapid Storage Technology Status ...

Page 176: ...e the data from a back up Click the Help menu or press F1 for instructions on how to recover or recreate RAID Vol umes Help Click the Help or press F1 menu button at the top of the Intel Rapid Storage Technology application Click Contents to view the general list of sub jects covered click In dex or Search for a more specific help top ics on a particular item Click More help on this page at the bo...

Page 177: ... the state of the previous volume update For details on how to do this see the help file Intel Rapid Storage Technology Help on page 7 40 See over for details on how to verify and repair RAID volume data Verification will identify and repair data inconsistencies on the volume RAID Level Verify Verify Repair RAID 0 Bad blocks are identified N A RAID 1 Bad blocks are identified Data on the mirrored ...

Page 178: ...pplication 2 Click to select the RAID in the pane on the right side of the window 3 Click Manage and click Advanced 4 Click Verify then click Verify button to begin the process 5 The completion percentage will be listed under Status Verifying 6 Click Close to complete the process Figure 7 31 Intel Rapid Storage Technology Verify ...

Page 179: ... see SATA Mode Advanced Menu on page 5 8 Intel Rapid Storage Technology software installed A Solid State Drive SSD with a minimum capacity of 18 6GB or with a parti tion on the drive formatted to more than 18 6GB e g a 20GB partition set on the SSD Note that the SSD requires at least 5MB of free unpartitioned and unallo cated space if you have used all the disk space for the partition you will nee...

Page 180: ...B of free unpartitioned and unallocated space on the SSD otherwise the Smart Response Technology item will not appear 3 Select the SSD to be used as a cache device 4 Select the size from the SSD to be allocated for the cache memory any remaining space on the SSD can be used for data storage using the simple data single disk RAID 0 volume that is automatically created Figure 7 33 Intel Rapid Storag...

Page 181: ... accelerate the system volume or system disk for maximum performance 6 Select the acceleration mode and then click OK Enhanced mode is selected by default Note Enhanced mode default Acceleration optimized for data protection Maximized mode Acceleration optimized for input output performance Figure 7 34 Enable Acceleration Options ...

Page 182: ...ntel Rapid Storage Technology 7 7 The page will refresh and report the new configuration in under Performance Smart Response Technology Figure 7 35 Intel Rapid Storage Technology Performance Smart Response Technology ...

Page 183: ...r computer s previous state with zero power System Requirements to support Intel Rapid Start Technology Rapid Start Technology should be enabled in the BIOS see Intel R Rapid Start Technology Advanced Menu on page 5 9 Intel Rapid Storage Technology software installed A Solid State Drive SSD with a minimum capacity of 18 6GB See overleaf for instructions on enabling Intel Rapid Start Technology ...

Page 184: ...ology from the BIOS see Intel R Rapid Start Technology Advanced Menu on page 5 9 2 Go the Windows control panel and double click Administrative Tools System and Security Computer Management Storage Disk Management 3 Right click the SSD and select Shrink Volume from the menu Figure 7 36 Computer Management Shrink SSD Volume Shrink Volume ...

Page 185: ...y Size Amount of Space to Shrink The figure entered in the Enter the amount of space to shrink in MB field above should be equal to the amount of system memory in your computer In the example above the system memory is 4GB 1024MB 4 4096GB If you are unsure of your total system memory RAM then go to System control panel System and Security and check Installed memory RAM The memory size will be dis ...

Page 186: ... the Desktop app and right click the lower left hot corner or use the Windows Logo Key X key combination and select Command Prompt Admin 7 Type DISKPART 8 At the DISKPART command type list disk Figure 7 38 Search for CMD Prompt Figure 7 39 Diskpart List Disk ...

Page 187: ...partition so refer to the results obtained from list disk for exact disk number 10 The message Disk is now the selected disk will appear 11 Type create partition primary 12 A DiskPart succeeded in creating the specified partition message should appear Figure 7 40 Diskpart Select Disk Figure 7 41 Diskpart Create Partition ...

Page 188: ... disk 14 Type select Volume is volume of your storage partition so refer to results obtained from detail disk for the exact volume number 15 The message Volume is now the selected volume will appear Figure 7 42 Diskpart Detail Disk Figure 7 43 Diskpart Select Volume ...

Page 189: ... on the format of the SSD For MBR formatted SSD s set id 84 override the id must be set to 84 For GPT formatted SSD s set id D3BFE2DE 3DAF 11DF BA40 E3A556D89593 17 The message DiskPart successfully set the partition ID will appear 18 Close the CMD window Figure 7 44 Diskpart Set id ...

Page 190: ...ion Partition 21 Restart the computer 22 Install the driver see below Intel Rapid Start Technology Driver Installation 1 Insert the Device Drivers Utilities User s Manual disc into an attached DVD drive 2 Click Option Drivers button 3 Click 5 Install Rapid Start Driver Yes 4 Click Next Next Yes Next Next 5 Click Finish to restart the computer Figure 7 45 Computer Management Healthy Hibernation Par...

Page 191: ...photo slide shows on your TV external display without using HDMI or A V cables Before configuring the Intel WiDi application you will need to set up your com patible adapter with your display speakers Connect the adapter using an HDMI or A V cable and turn on the display or in the case of speakers connect them to the wireless speaker adapter with the cables provided with the adapter and then set t...

Page 192: ...i Application Installation 1 Insert the Device Drivers Utilities User s Manual disc into an attached DVD drive 2 Click Option Drivers button 3 Click 6 Install Intel WiDi AP Yes 4 Click Next 5 Click the button to accept the license and click Next 6 Click Finish ...

Page 193: ...1 Run Intel R Wireless Display from the Start screen 2 Click I agree to the terms of this license button 3 The application will scan for any connected compatible adapters or you can click the Scan for available adapters button to enable Intel My WiFi Technology Figure 7 46 Intel WiDi Scan ...

Page 194: ...ck Connect 5 The system will then prompt you to enter the 4 digit security code which will be displayed on the external TV Screen or press the connect button on the wireless speaker adapter 6 Enter the code for the video adapter and click Continue Figure 7 47 Intel WiDi Connect Enter Security Code ...

Page 195: ...lick Finished to complete the setup Test Audio Adapter To verify a successful audio connection for In tel Wireless Music select the Test your audio connection link or select Finished to bypass the test You can select Play Sample to play an au dio test sample from your adapter to the con nected speaker set Figure 7 48 Intel WiDi Connected ...

Page 196: ...tant Notice If your purchase option includes both Wireless LAN and 3G modules then the appropriate antennas will be installed Note that In order to comply with FCC RF exposure compliance requirements the antenna must not be co located or operate in conjunction with any other antenna or transmitter Important Notice 3G Bluetooth Wireless LAN Modules In order to comply with FCC regulations you should...

Page 197: ...illustrated below until it clicks fully into position and replace the battery Power Safety Warning Before you undertake any installation procedures make sure that you have turned off the power and disconnected all peripher als and cables including telephone lines It is advis able to also remove your battery in order to prevent accidentally turning the ma chine on USIM Card Orientation Note that th...

Page 198: ...tem is not in Airplane Mode before configuration begins Charms Bar 1 Go to the Charms Bar 2 Select Settings and then click the WiFi icon it should read Available under the icon and Airplane mode should be Off 3 A list of available access points will appear Figure 7 50 WiFi Settings Charms Bar Networks with Mobile Broadband ...

Page 199: ...ble click any connection icon under Mobile Broadband or click and click Connect 6 The system will connect to your network 7 A Connected will appear alongside the 3G connection click the connection to view the timer which indicates your connected time for the current session Figure 7 51 Mobile Broadband Connect Figure 7 52 Mobile Broadband Disconnect ...

Page 200: ...k Disconnect 10 You need to either use Airplane Mode or to turn the Mobile Broadband module off aboard aircraft Wireless Device Operation Aboard Aircraft The use of any portable electronic transmission devices aboard aircraft is usually prohibited Make sure the system is in Airplane Mode if you are using the computer aboard aircraft Figure 7 53 PC Settings Wireless ...

Page 201: ...es itis recommended that you sim ply do not enable a PIN for the EM820W 3G module The following provides in structions for disabling the PIN code for specific instructions on resolving the issue where Insert a SIM appears in the connection see Resolving the Insert a SIM issue with the 3G Module Windows 8 on page 8 19 Disabling a PIN code for a 3G Module 1 Go to the Charms Bar 2 Select Settings and...

Page 202: ...IN Code Power Saving 7 4 Click Security tab and click Disable PIN 5 Enter the PIN number and click Disable PIN and click OK to confirm 6 It is recommended that you do not Enable a PIN for the EM820W 3G module Figure 7 55 Disable PIN ...

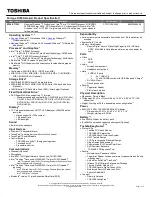
Page 203: ...Modules 7 67 7 ...

Page 204: ...ges make sure you have followed the instructions carefully and observed the safety precautions in the preface If all else fails talk to your service representative You should also make a record of what happened and what remedies you tried Of course if something goes wrong it will happen at the most inconvenient time possible so you should preview this section just in case If after you ve tried eve...

Page 205: ...ngs Make sure that the system is not in Hibernate or Sleep mode by pressing the keys config ured in your Power Options see Configuring the Power Buttons on page 3 8 the Fn F4 key combi nation or power button to wake up the system Brightness Check the brightness of the screen by pressing the Fn F8 and F9 keys to adjust the bright ness see Table 1 4 on page 1 10 Display Choice Press Fn F7 to make su...

Page 206: ...ro grams to run at times when you are not using your computer You can use those that are provided free with your OS or buy the more powerful dedicated programs to do so Write down your passwords and keep them safe away from your computer This is especially important if you choose to use a Boot password for the SCU see Security Menu on page 5 12 Keep copies of vital settings files such as network d...

Page 207: ...ow Viruses are often triggered from within e mail attachments so take care when opening any attached file You can configure most Anti Virus pro grams to check all e mail attachments Note You should also beware of files from people you know as the virus may have infected an address book and been automatically forwarded without the person s knowl edge Keep a Bootable CD ROM DVD ROM USB storage devic...

Page 208: ...are caused by the installation of new hardware and or software Always refer to the documentation of any new hardware and or software and pay particular attention to files entitled READ ME or READ ME FIRST When installing a new device always make sure the device is powered on and in many cases you will need to restart the computer Always check that all the cables are correctly connected Make sure y...

Page 209: ...er has many devices plugged into its ports and a number of programs running then it will be difficult to determine the cause of a problem Try disconnecting all of the devices and restarting the computer with all the peripheral devices unplugged A process of elimination adding and removing devices and restarting where necessary will often find the source of a problem although this may be time consu...

Page 210: ...mmediately turn it off then on again You are losing battery power too quickly The system is using too much power If your OS has a Power Options scheme see Power Plans on page 3 4 check its settings You may also be using a peripheral device USB device that is drawing a lot of power Actual battery operating time is shorter than expected The battery has not been fully discharged before being recharge...

Page 211: ...n a power saving mode Toggle the sleep resume key combination Fn F4 see Configuring the Power Buttons on page 3 8 The screen controls need to be adjusted Toggle the screen control key combinations Fn F8 F9 If you re connected to an external monitor make sure it s plugged in and turned on You should also check the monitor s own brightness and contrast controls The computer is set for a different di...

Page 212: ...tors on page 1 10 to adjust Unwelcome numbers appear when typing Num Lock is turned ON see LED Indicators on page 1 7 Problem Possible Cause Solution Password Warning If you choose to set a boot password NEVER forget your password The consequences of this could be serious If you cannot remember your boot password you must contact your vendor and you may lose all of the information on your hard dis...

Page 213: ... off as the computer is in Airplane Mode Check the LED indicator to see if it is in Airplane Mode see LED Indicators on page 1 7 Use the Fn F11 key combination to toggle Airplane Mode on off see Table 1 4 on page 1 10 The PC Camera module cannot be detected The module is off Press the Fn F10 key combination in order to enable the module see Function Keys Visual Indicators on page 1 10 Run the came...

Page 214: ...ng to Check your Bluetooth compatible device s documentation to confirm it supports high speed data transfer and for configuration information The computer is off or in Sleep Mode but powered by the AC DC adapter plugged in to a working outlet or by battery with a capacity above 20 I have plugged a device into the powered USB port in order to charge it but the device is not charging The port is no...

Page 215: ...rols don t work when the system is connected to an external display through an HDMI cable Note that Sound Blaster Audio will be disabled when you are connecting to an external display through an HDMI connection See Sound Blaster Audio HDMI on page C 28 Problem Possible Cause Solution ...

Page 216: ...and off or put the system in Airplane Mode under Wireless in PC Settings and the system has just resumed from a power saving state the following error may occur Figure 8 1 PC Settings Charms Bar Wireless Mobile Broadband Off 2 On resuming from the power saving state the standard procedure would be to go to PC Settings in the Charms Bar and turn on Mobile broadband under Wireless Wireless Devices ...

Page 217: ...and enter the PIN number to unlock the connection 6 In this instance you will note that the Mobile broadband connection will read Insert a SIM Figure 8 2 Mobile Broadband Insert a SIM 7 In this case you will need to restart the computer 8 After system restart you can then connect to the Mobile Broadband as normal 9 To fully resolve this issue it is recommended that you do not Enable a PIN for the ...

Page 218: ...rface Ports Jacks A 1 A Appendix A Interface Ports Jacks Overview The following chapter will give a quick description of the ports jacks which allow your computer to commu nicate with external devices connect to the internet etc ...

Page 219: ...al video or simultaneous display on the LCD and external monitor FPD HDMI Out Port The HDMI Out High Definition Multimedia Interface port is an audio video connector interface for transmitting uncompressed digital streams This allows you to connect an external monitor TV or Flat Panel Display etc as a display device by means of a HDMI cable Note that HDMI carries both audio and video signals see H...

Page 220: ...the system off if the power rating of your USB device is 500mA or above make sure you use the power supply which comes with the device The USB 3 0 ports are denoted by their blue color and is not operational under DOS USB 2 0 ports are colored black USB 3 0 will transfer data much faster than USB 2 0 and is backwards compatible with USB 2 0 Note The powered USB 3 0 port see Figure 1 13 on page 1 2...

Page 221: ...Interface Ports Jacks A 4 A ...

Page 222: ...used controls power management features and enables you to quickly turn mod ules on off Click the Control Center icons to toggle the appropriate function or hold the mouse button down and move the slider where applicable Certain functions will automatically be adjusted when a power mode is selected The Control Center in Windows 8 works under the Desktop app and not under the Start screen Figure B ...

Page 223: ...ter icon to set an overall power mode and then click individual icons in the Control Center to power on off the Touchpad and PC camera Table B 1 Power Modes Modes Power Saving Entertainment Quiet Performance User Defined Icon Power Plan Power Saver Power Saving Power Saving High Performance User Defined Power Conservation Mode Energy Star Energy Star Energy Star Performance Brightness 10 100 40 10...

Page 224: ...ination to turn off the LED backlight press any key to turn it on again Note that screen brightness is also effected by the Power Mode selected see Table B 1 on page B 2 Volume The Volume icon will show the current volume level You can use the slider to adjust the Volume or the Fn F5 F6 key combinations or use the Fn F3 key combination to mute the volume Power Conservation This system supports Ene...

Page 225: ...s the Date and Time Windows control panel Desktop Background Clicking the Desktop Background button will allow you to change the desktop background picture TouchPad PC Camera Click either of these buttons to toggle the TouchPad or camera module s power status A crossed out icon will appear over the top left of the icon when it is off Note that the power status of the camera module is also effected...

Page 226: ...l Drivers button Video VGA 1 Click 2 Install VGA Driver Yes 2 Click Next Yes Next Next 3 Click Finish to restart the computer NVIDIA Video VGA 1 Click 3 Install NVIDIA VGA Driver Yes 2 Click AGREE AND CONTINUE button to accept the terms of the license agreement 3 Click Next 4 Click Close to complete the installation Video Card Options Note that card types specifications and driv ers are subject to...

Page 227: ...p save power consumption and allow for longer battery life However computers with integrated graphics solutions will not usually run games HD video or GPU based applications without severe limitations Nvidia Optimus technology is a seamless technology designed to get best per formance from the graphics system while allowing longer battery life without hav ing to manually change settings Thus when ...

Page 228: ... required Customization Options Although Optimus is completely seamless to the user NVIDIA also allow customization op tions within the control panel see Optimus Customization Op tions on page C 28 UMA Mode Performance UMA Mode is designed for maximum power saving however this does have an affect on the system s overall video performance as it is based on the Power saver power plan If you require ...

Page 229: ... Dynamic Video Memory Technology Intel DVMT automatically and dynamically allocates as much up to 1748MB system memory RAM as needed to the integrated video system the video driver must be installed DVMT returns whatever memory is no longer needed to the op erating system ...

Page 230: ...Control Panel Advanced video configuration options are provided by the Intel HD Graphics Control Panel To access the control panel see below and overleaf 1 Click the Intel Graphics and Media Control Panel icon in the Start screen see over Figure C 1 Start Screen Intel G M Control Panel ...

Page 231: ...roperties from the menu OR 3 Click Advanced settings in the Screen Resolution control panel in Windows 4 Click the Intel R HD Graphics Control Panel tab and click Graphics Properties button 5 Double click the Intel R HD Graphics control panel in the Windows Control Panel Figure C 2 Intel HD Graphics Control Panel ...

Page 232: ...ls Intel Graphics Media Control Panel C 7 C You may make changes to any of the graphics properties by clicking the appropriate menu panel and adjusting the settings on the right Figure C 3 Intel HD Graphics Control Panel ...

Page 233: ...aphics Media Control Panel C Sub Menus Some of the menu panels will also have sub menus in the top left corner of the menu alongside the icon to display further configuration options Figure C 4 Intel HD Graphics Control Panel Sub Menus ...

Page 234: ...isplay Settings or Color to make display adjustments including con figuration for any attached external displays Multiple Display At least one other dis play must be attached in order to view multiple display selection op tions Figure C 5 Intel HD Graphics Control Panel Display Settings ...

Page 235: ...enus The Mul tiple Displays menu allows you to configure the display mode of any attached dis plays see Attaching Other Displays on page C 21 Multiple Display At least one other dis play must be attached in order to view multiple display selection op tions Figure C 6 Intel HD Graphics Control Panel Display Settings Multiple Displays ...

Page 236: ...lows you to configure the capability mode of any attached displays if applicable i e the attached display supports audio Enable A udio Without Video to keep audio on when the display blanks out for power saving pur poses Figure C 7 Intel HD Graphics Control Panel Display Settings Audio ...

Page 237: ...ges are displayed Quality displays the most detail Balanced provides better computer performance with good quality and Custom allows you to configure the Anisotropic Filtering Vertical Sync and Anti Aliasing features to your preferences Click Apply to save changes Figure C 8 Intel HD Graphics Control Panel 3D ...

Page 238: ...s Media Control Panel C 13 C Options Options allows you to Customize Hot Keys for opening the application rotating the display scaling etc to your preferences Click Apply to save changes Figure C 9 Intel HD Graphics Control Panel Options ...

Page 239: ...m Information the Built In Display and any attached displays Preferences Go to the Preferences sub menu in Options to configure the preferenc es for the Intel HD Graphics Control Panel Make sure you turn Tray Icon On to display the Intel HD Graphics Control Panel icon in the notification area of the taskbar as below Figure C 10 Intel HD Graphics Control Panel Options Information Center ...

Page 240: ...ors Click Basic or Advanced to adjust the video settings based on the Ap plication Settingsor Driver Settings The Preview image will display a sample im age using the current settings You can Save Profile and name the Profile to recall the settings at any time Click Apply to save changes Figure C 11 Intel HD Graphics Control Panel Video Basic Driver Settings ...

Page 241: ...the Video menu at the top of the screen to display the sub menus The Image Enhancement menu allows you to adjust the Sharpness Skin Tone Enhance ment Noise Reduction etc Click Apply to save changes Figure C 12 Intel HD Graphics Control Panel Video Image Enhancement Basic ...

Page 242: ...river Controls Intel Graphics Media Control Panel C 17 C The Image Scaling and Gamut Mapping menus allow you to adjust these items Figure C 13 Intel HD Graphics Control Panel Video Image Scaling Gamut Mapping ...

Page 243: ... is Plugged in or On battery When turned on the Display Power Saving Technology which adjusts the backlight in tensity battery settings may be adjusted by means of the slider towards Maximum Quality or Maximum Battery Click on Apply to save changes Figure C 14 Intel HD Graphics ControlPanelPower Battery Settings ...

Page 244: ...ontrol Panel C 19 C Support Click Support and select an item from the menus to bring up the help and support topics You will need to be connected to the Internet to access the key resource links Figure C 15 Intel HD Graphics Control Panel Support ...

Page 245: ...the display device PC screen only or Second screen only Clone Duplicate Both connected displays output the same view and may be configured independently Extended Extend Both connected displays are treated as separate devices and act as a virtual desktop Table C 1 Display Modes Attaching Displays When you first attach an external display you may find that the desktop does not occupy the full screen...

Page 246: ... Control Panel control panel and click Display Multiple Displays sub menu 3 Click Clone from the Select Multiple Display Mode menu 4 Click Apply and OK to confirm the settings change 5 You can select the displays to be used from the Select Active Displays menu Multiple Display At least one other dis play must be attached in order to view Multiple Display selection op tions Figure C 16 Display Mult...

Page 247: ...lay Settings Extended Desktop You can have different Colors Screen Area and Monitor Refresh Rates for each display device provided your monitor can support them You can drag the moni tor icons to match the physical layout of your displays Icons and pro grams may also be dragged between the displays Figure C 17 Display Multiple Displays Extended Click the appropri ate monitor icon and drag it to ma...

Page 248: ...ck Second Screen 4 Click on any one of the options from the menu to select Duplicate Extend or a Single PC Screen only or Second Screen only display Windows Logo Key P Key Combination You can use the P key combination to quickly bring up the Sec ond Screen menu You can also use the Display Switch but ton in the Control Cen ter to access the menu and select the appropri ate attached display mode Yo...

Page 249: ... In Windows 1 Attach your external display to the external monitor port HDMI Out port and turn it on 2 Go to the Screen resolution control panel see page 1 32 in the Desktop app 3 Click the Detect button 4 The computer will then detect any attached displays Figure C 19 Screen Resolution Multiple Displays ...

Page 250: ...m the Multiple Displays menu Duplicate these displays Shows an exact copy of the main display desktop on the other display s Extend these displays Treats both connected displays as separate devices Show desktop only on 1 2 Only one of your displays is used Figure C 20 Screen Resolution Multiple Display Options ...

Page 251: ... Control Panel tab 1 Go to the Control Panel 2 Double click NVIDIA Control Panel click to view the control panel in either Large icons or Small icons if you are in Category view NVIDIA Control Panel To access the Ge Force control panel from the desktop right click the desktop then click NVIDIA Control Panel Figure C 21 NVIDIA Control Panel ...

Page 252: ... features such as image settings 3D Settings and video configuration Navigating the Control Panel Navigate through the control panels in much the same way as you would a web page Click on the sub head ing tasks in the left menu and on the high lighted links for infor mation Use the buttons on the top left to go back forward etc Figure C 22 NVIDIA Control Panel ...

Page 253: ... their own parameters for GPU usage Context Menu One of the quickest ways to choose which GPU to use for a particular application is by using the Run with graphics processor in the context menu 1 Go to the NVIDIA Control Panel see page C 26 2 Click Desktop from the top menu and select Add Run with graphics processor to Context Menu it should have a tick alongside it Display GPU Activity Icon Click...

Page 254: ...ssor from the context menu 6 Select either High performance NVIDIA processor dGPU or Integrated graphics iGPU to run the program with the selected GPU iGPU or dGPU Note the NVIDIA con trol panel refers to High performance NVIDIA processor which is the discrete GPU and Integrated graphics which is the integrated GPU Figure C 24 Context Menu with Run with graphics processor Right click the applicati...

Page 255: ...y life but this can be set to the dGPU if pre ferred 1 Go to the NVIDIA Control Panel see page C 26 2 Click Manage 3D Settings 3D Settings and select Global Settings tab 3 Select either Integrated graphics iGPU or High performance NVIDIA Processor dGPU from the drop down menu 4 Click the Setting menu items to select any options required 5 Click Apply to save the settings Figure C 25 Global Setting...

Page 256: ... 26 2 Click Manage 3D Settings 3D Settings and select Program Settings tab 3 Select a program to customize from the drop down menu or click Add to add any program that does not appear in the menu 4 Select the preferred graphics processor for the program from the drop down menu 5 Click the Setting menu items to select any options required 6 Click Apply to save the settings Figure C 26 Program Setti...

Page 257: ...n select the GeForce video card or CPU as a PhysX processor or configure the computer to auto select a PhysX processor recommended default setting 1 Go to NVIDIA Control Panel see page C 26 2 Click Set PhysX configuration 3 Click to Select a PhysX processor from the menu Auto select recommended is the default setting 4 Click Apply to save the settings Figure C 27 Set PhysX Configuration ...

Page 258: ...ctions below 1 Go to the Control Panel 2 Click Sound Hardware and Sound and click Playback tab 3 Depending on your display the playback device may be selected however in some cases you may need to select the audio device and click Set Default button 4 Double click the device to access the control panel tabs illustrated overleaf Volume Adjustment The sound volume level can be set using the vol ume ...

Page 259: ...Video Driver Controls C 34 HDMI Audio Configuration C 5 Adjust the HDMI settings from the control panel tabs 6 Click OK to close the Sound control panel Figure C 29 HDMI Device Properties ...

Page 260: ...your external display TV or LCD for HDMI input see your display device manual 4 You can now play video audio sources through your external display Sound Blaster Cinema EQ HDMI 1 When you connect an HDMI display to the HDMI Out port the Sound Blaster Cin ema EQ controls will be disabled 2 A warning box will pop up and will prompt Do you want to select another audio device now 3 Click No to continue...

Page 261: ...Video Driver Controls C 36 C ...

Page 262: ...ation The specifications listed in this Appendix are correct at the time of going to press Certain items particularly processor types speeds and CD DVD device types may be changed updated or delayed due to the manufacturer s release schedule Check with your distributor supplier for details ...

Page 263: ... processor Memory Expandable up to 16GB Compatible with 2GB 4GB or 8GB Modules Video Adapter Options Intel Integrated GPU and NVIDIA GeForce Video Supports NVIDIA Optimus Switchable GPU Technology between iGPU and dGPU Intel HD Graphics GPU Type Depends on Processor Dynamic Frequency Intel Dynamic Video Memory Technology Supporting Shared Memory up to 1 7GB Supports Microsoft DirectX 11 1 nVIDIA G...

Page 264: ...face OR Full Size Mini Card 3G Module with USB Interface Factory Option Communication Built In 10 100 1000Mb Base TX Ethernet LAN 2 0M HD PC Video Camera Module Intel Dual Band Wireless N 7260 2 2 802 11 a g n Half Mini Card PCIe WLAN Bluetooth Combo Module Factory Option Intel Wireless N 7260 2 2 802 11 b g n Half Mini Card PCIe WLAN Bluetooth Combo Module Factory Option Intel Dual Band Wireless ...

Page 265: ...Caps Lock Scroll Lock Camera Power Full Range AC DC Adapter AC in 100 240V 50 60Hz DC Output 19 5V 6 15A 120 Watts Removable 6 Cell Smart Lithium Ion Battery Pack 62 16WH Power Management Supports Wake on LAN Supports Wake on USB Supports Wake on RTC Alarm AC Mode Only Environmental Spec Temperature Operating 5 C 35 C Non Operating 20 C 60 C Relative Humidity Operating 20 80 Non Operating 10 90 Ph...

Reviews: