1
Ernitec EDNS V1000 DVR
Setup Guide
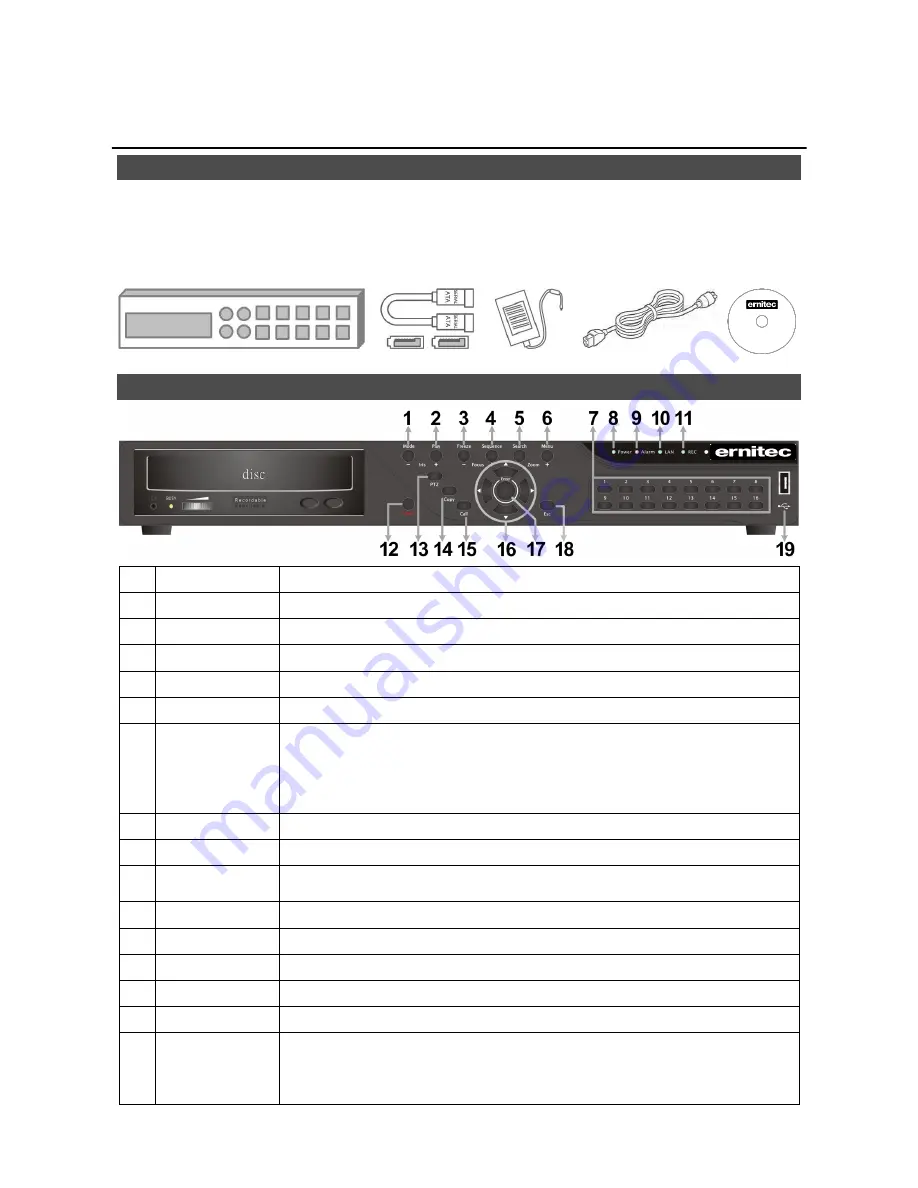
Package Content
Inspect the packaging carton. Make sure the
DVR
is properly delivered. Remove all items from the
box and make sure the box contains the following items.
EDNS Vseries DVR
SATA Cable
Power
Adaptor
Power Cord
User
’s
Manual
Front Panel
1
MODE
Press this key to view in full-screen or multiple window modes.
2
PLAY/STOP
Press once to start the playback of recorded video. Press again to exit.
3
FREEZE
Press this key to freeze the current viewing screen.
4
SEQUENCE
Press this key to start automatic sequence display of cameras.
5
SEARCH
Press this key to search recorded video by date/time or event.
6
MENU
Press this key to enter the OSD setup menu.
7
Channels
1. In Live and Playback modes, press any key to view the corresponding
video in full-screen.
2. In input interface, 1~10 can be used for direct input of numbers 0~9.
3. In Dome Camera Control mode, 1 is for entering the Set/ Go preset
menu; 11~16 is for quick access of preset points 1~6.
8
Power LED
It lights up when power source is connected.
9
Alarm LED
It lights up when an alarm is triggered.
10 Network LED
It lights up when network is connected. In addition, it blinks when data is
being transmitted via the network.
11 Record LED
It blinks when videos are being recorded.
12 Power Key
Press and hold this key to trigger the quick shutdown function.
13 DOME(PTZ)
Press this key to enter Dome Camera Control mode.
14 COPY
This key is used for marking time in quick video export
function.
15 CALL
Press this key to enter Call Monitor Control mode.
16 Direction Keys
1. In Zoom mode, these keys function as normal direction keys.
2. In the OSD setup menu, the direction keys are used to move the
cursor to previous or next fields. To change the value in the selected
field, press UP / DOWN keys.