Equipex GL1800C, Operation Manual
The Equipex GL1800C Operation Manual is a comprehensive guide that provides detailed instructions and guidelines for optimal usage of the product. This manual is available for free download from manualshive.com, ensuring that you have all the essential information you need to make the most out of your GL1800C.
Share
Download


Reviews:
No comments
Related manuals for GL1800C

Gas Hob
Brand: Waterford Pages: 11

Cook Pro Pot
Brand: TurboTronic Pages: 8

PGM Series
Brand: Dacor Pages: 12
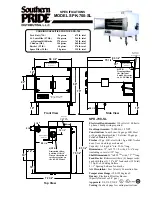
SPK-700-SL
Brand: Southern Pride Pages: 2

DIN-3502S
Brand: K&H Pages: 17

Summit CR430SS
Brand: Felix Storch Pages: 16

MR111
Brand: Matrix Pages: 20

KG-1319ZB PLUS
Brand: Mastercook Pages: 40

FS60R-8W
Brand: Parmco Pages: 14

CFSEBK16
Brand: Currys Essentials Pages: 24

HCE600
Brand: Kenwood Pages: 20

NJ-EV107H
Brand: Mitsubishi Electric Pages: 36

NJ-EXSA10JH
Brand: Mitsubishi Electric Pages: 36

NJ-EX107H
Brand: Mitsubishi Electric Pages: 36

ECJ-S35K - 3-1 Micro-Computerized Rice Cooker Warmer
Brand: Sanyo Pages: 19

ECJ-PX50S - Micro-Computerized Pressure Rice Cooker
Brand: Sanyo Pages: 24

YL-K9
Brand: Youlong Pages: 3

GZ-615
Brand: Guzzanti Pages: 70


