
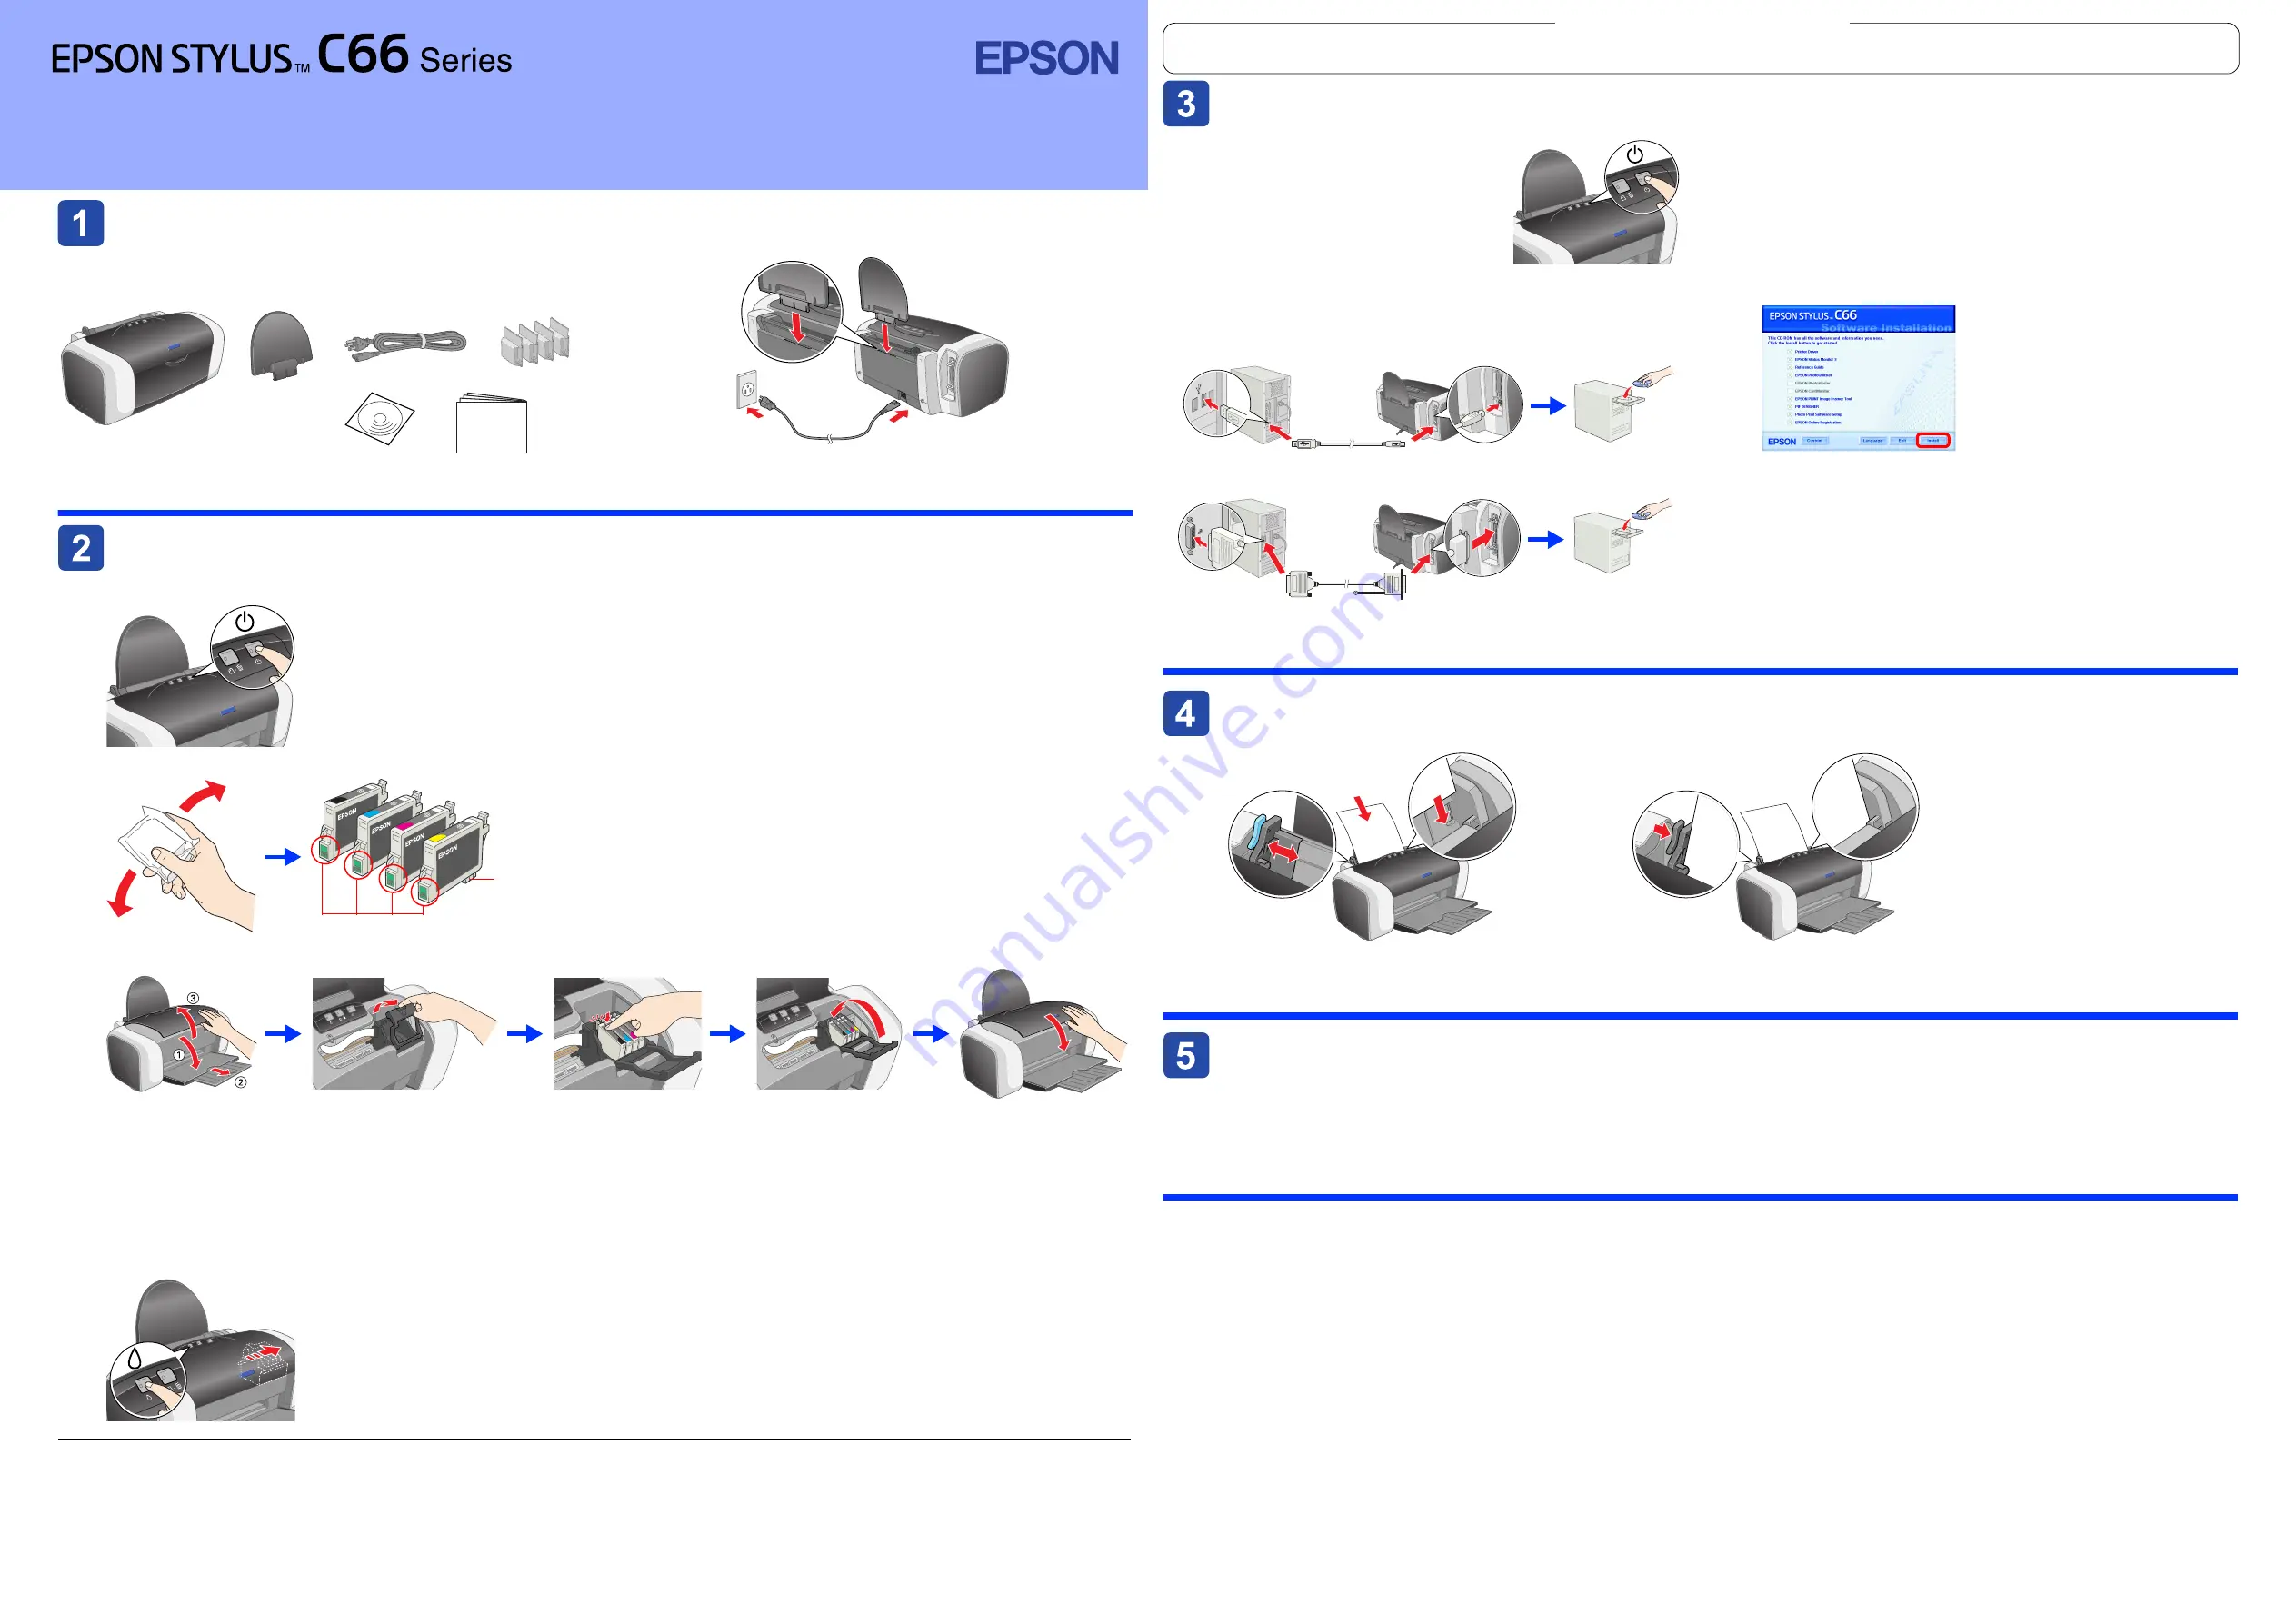
Unpacking
Unpacking
Unpacking
Unpacking
1. Remove the contents from the box. Remove all tape and
packing material from the printer. Be sure not to touch the
ribbon cable inside the printer.
2. Attach the paper support and plug in the printer.
Installing the Ink Cartridges
Installing the Ink Cartridges
Installing the Ink Cartridges
Installing the Ink Cartridges
1. Press the
P
power button to turn on the printer.
2. Shake the ink cartridge four or five times before opening the package, and remove the ink cartridges from their protective bags.
c
Caution:
❏
Be careful not to break the hook on the side of the ink cartridge when
you remove it from the protective bag.
❏
Do not shake the ink cartridge after removing it from the bag; this can
cause leakage.
❏
Do not remove or tear the label on the cartridge; this can cause leakage.
3. Install the ink cartridges as shown below.
c
Caution:
❏
Push the ink cartridge down until it clicks into place.
❏
Do not move the print head by hand; otherwise, you may damage the printer.
❏
Do not load paper until ink charging is complete.
Note:
Install all ink cartridges. The printer will not work unless all cartridges are installed properly.
4. Press the
H
ink button.
The printer begins ink charging. It takes about
one and a half minutes
. While charging, the printer produces a variety of mechanical sounds. This is normal.
When the green light stops flashing, ink charging is complete.
c
Caution:
Do not turn off the printer during the ink charging process.
Note:
The ink cartridges packaged with your printer are partly used during initial setup. In order to produce high quality
printouts, the print head in your printer will be fully charged with ink. This one-off process consumes a quantity of ink
and subsequent cartridge sets will last for their full rated life.
The contents may vary in certain locations.
The power cord comes attached in some countries.
Setup
ink cartridges
printer
CD-ROM
paper support
power cord
Do not touch this part.
Do not remove
the tape seal
from the ink
supply parts.
Installing the Printer Software
Installing the Printer Software
Installing the Printer Software
Installing the Printer Software
1. Press the
P
power button to turn off
the printer. The green light goes off.
2. Connect the printer and computer with a USB or parallel
cable, then insert the printer software CD into the CD-ROM
drive.
3. Install the printer software.
Select your country or area of residence if the selection window appears.
Then except where otherwise instructed, click or double-click the areas
circled in red to proceed.
c
Caution:
Turn off all virus protection programs before installing the printer
software.
Note:
If the language selection window appears, select your preferred
language.
After installation is complete, see the
Reference Guide
for detailed
information about printing from your computer for the first time.
The CD-ROM includes EPSON PhotoQuicker.
EPSON PhotoQuicker is a fun and easy to use program with a number of features
that help you create outstanding photos. It also allows you to create borderless
photos.
For more details, double-click the
ESC66 Software Guide
icon on the desktop to
view
Photo Print Software Setup
.
Loading Paper
Loading Paper
Loading Paper
Loading Paper
Note:
To adjust the left edge guide, hold down the locking tab and slide the guide against the paper stack.
Viewing the Reference Guide
Viewing the Reference Guide
Viewing the Reference Guide
Viewing the Reference Guide
The
Reference Guide
provides detailed information about printing from a computer, printer maintenance, problem solving, and safety.
To view the
Reference Guide
, double-click the
ESC66 Reference Guide
icon on the desktop.
You can also access the
Reference Guide
via the Start menu. To do so, click
Start
, point to
All Programs
in Windows XP or
Programs
in Windows Me, 98, 95, or 2000,
point to
EPSON
, then select
ESC66 Reference Guide
.
Safety Instructions
Read all of the instructions in this section when setting up and using your printer.
When choosing a place for the printer
❏
Avoid places subject to rapid changes in temperature and humidity. Also, keep the printer away from direct sunlight,
strong light, or heat sources.
❏
Avoid places subject to dust, shocks, or vibrations.
❏
Leave enough room around the printer to allow for sufficient ventilation.
❏
Place the printer near a wall outlet where the plug can be easily unplugged.
❏
Place the printer on a flat, stable surface that extends beyond the base of the printer in all directions. If you place the
printer by the wall, leave more than 10 cm between the back of the printer and the wall. The printer will not operate
properly if it is tilted at an angle.
❏
When storing or transporting the printer, do not tilt it, stand it on its side, or turn it upside down. Otherwise ink may leak
from the cartridge.
When choosing a power source
❏
Use only the type of power source indicated on the printer’s label.
❏
Use only the power cord that comes with this product. Use of another cord may result in fire or electric shock.
❏
This product’s power cord is for use with this product only. Use with other equipment may result in fire or electric shock.
❏
Be sure your AC power cord meets the relevant local safety standard.
❏
Do not use a damaged or frayed power cord.
❏
If you use an extension cord with the printer, make sure that the total ampere rating of the devices plugged into the
extension cord does not exceed the cord’s ampere rating. Also, make sure that the total ampere rating of all devices
plugged into the wall outlet does not exceed the wall outlet’s ampere rating.
❏
If you plan to use the printer in Germany, the building installation must be protected by a 10 or 16 amp circuit breaker
to provide adequate short-circuit protection and over-current protection for this printer.
When handling ink cartridges
❏
Keep ink cartridges out of the reach of children. Do not allow children to drink from or otherwise handle the cartridges.
❏
Do not open the ink cartridge packages until just before you install them.
❏
Shake the new ink cartridges four or five times before opening the packages.
❏
Do not shake the ink cartridges after opening the packages; this can cause leakage.
❏
Be careful not to break the hooks on the side of the ink cartridge when you remove it from the package.
❏
Be careful when you handle used ink cartridges, as there may be some ink remaining around the ink supply port. If ink
gets on your skin, wash the area thoroughly with soap and water. If ink gets into your eyes, flush them immediately with
water. If discomfort or vision problems remain after a thorough flushing, see a doctor immediately.
❏
Do not remove or tear the label on the cartridge; this can cause leakage.
❏
Do not touch the green IC chip on the side of the cartridge.
❏
The IC chip on this ink cartridge retains a variety of cartridge related-information, such as the amount of ink remaining,
so that a cartridge may be removed and reinserted freely. However, each time the cartridge is inserted, some ink is
consumed because the printer automatically performs a reliability check.
❏
Store ink cartridge with its label facing upward. Do not store cartridge upside down.
When using the printer
❏
Do not put your hand inside the printer or touch the ink cartridges during printing.
❏
Do not block or cover the vents and openings in the printer.
❏
Do not attempt to service the printer yourself.
❏
Unplug the printer and refer servicing to qualified service personnel under the following conditions:
The power cord or plug is damaged; liquid has entered the printer; the printer has been dropped or the cabinet
damaged; the printer does not operate normally or exhibits a distinct change in performance.
❏
Do not insert objects through the slots in the printer.
❏
Take care not to spill liquid on the printer.
❏
Leave the ink cartridges installed. Removing the cartridges can dehydrate the print head and may prevent the printer
from printing.
Information for United Kingdom Users
Use of options
EPSON (UK) Limited shall not be liable against any damages or problems arising from the use of any options or consumable
products other than those designated as Original EPSON Products or EPSON Approved Products by EPSON (UK) Limited.
Safety information
w
Warning:
Refer to the rating plate for the voltage and check that the appliance voltage corresponds to the supply voltage.
Important:
The wires in the mains lead fitted to this appliance are coloured in accordance with the following code:
Blue — Neutral
Brown — Live
If you have to fit a plug:
As the colours of the mains lead of this appliance may not match the coloured markings used to identify the terminals in a
plug, please observe the following:
❏
The blue wire must be connected to the terminal in the plug marked with the letter N.
❏
The brown wire must be connected to the terminal in the plug marked with the letter L.
❏
If the plug is damaged, replace the cord set or consult a qualified electrician.
❏
Replace fuses only with fuses of the correct size and rating.
USB
USB
USB
USB
Parallel
Parallel
Parallel
Parallel
Follow the on-screen instructions.
If the installer dialog box does not appear,
double-click
EPSETUP.EXE
on the CD-ROM.
Setup
Color Ink Jet Printer
c
Cautions
must be observed to avoid
damage to your equipment.
Notes
contain important information and
useful tips on the operation of your printer.
English
Warnings, Cautions and Notes
4048864-00
xxx
All rights reserved. No part of this publication may be reproduced, stored in a retrieval system, or transmitted in any form or by any means, electronic, mechanical, photocopying, recording, or otherwise, without the prior written permission
of Seiko Epson Corporation. The information contained herein is designed only for use with this Epson printer. Epson is not responsible for any use of this information as applied to other printers. Neither Seiko Epson Corporation nor its
affiliates shall be liable to the purchaser of this product or third parties for damages, losses, costs, or expenses incurred by the purchaser or third parties as a result of: accident, misuse, or abuse of this product or unauthorized modifications,
repairs, or alterations to this product, or (excluding the U.S.) failure to strictly comply with Seiko Epson Corporation's operating and maintenance instructions.
Seiko Epson Corporation shall not be liable for any damages or problems arising from the use of any options or any consumable products other than those designated as Original Epson Products or Epson Approved Products by Seiko
Epson Corporation. Seiko Epson Corporation shall not be held liable for any damage resulting from electromagnetic interference that occurs from the use of any interface cables other than those designated as Epson Approved Products
by Seiko Epson Corporation. EPSON is a registered trademark and EPSON Stylus is a trademark of Seiko Epson Corporation.
Microsoft and Windows are registered trademarks of Microsoft Corporation.
General Notice:
Other product names used herein are for identification purposes only and may be trademarks of their respective owners. EPSON disclaims any and all rights in those marks.
w
Warnings
must be followed carefully to
avoid bodily injury.
Veuillez trouver les instructions en français au verso.


