


Q U I C K
I N S T A L L
G U I D E
Installing the
Enphase Envoy-S Metered
To install the Enphase
®
Envoy-S Standard, read and follow all warnings and instructions in this Guide and in the Enphase
®
Envoy-S
Installation and Operation Manual at:
http://www.enphase.com/support
. Safety warnings are listed on the back of this guide.
PREPARATION
A ) Download the Enphase Installer Toolkit mobile app and
open it to log in to your Enlighten account. With this app,
you can connect to the Envoy-S to track system installation
progress. To download, go to
http://enphase.com/toolkit
or
scan the QR code at right.
B ) Check the box for the following items:
•
Enphase Envoy-S Metered
•
Production metering current transformer (CT)
•
Length of DIN rail for mounting
•
Ferrite bead to attach to your Ethernet Cable, if used
C ) You must install the Envoy-S Metered in a non-metallic, NRTL Certified
NEMA type 3R (or better) enclosure with conduit attachment. Do not
drill holes on the top of the enclosure or anywhere that allows moisture
ingress.
D ) Make sure you have the following optional items, if needed:
•
Two (2) consumption metering split-core CTs (order CT-200-SPLIT)
•
Enphase Mobile Connect modem (order CELLMODEM-01)
•
Ethernet over power line communication (PLC) bridge with Ethernet
cables (order EPLC-01)
•
Ethernet cable (802.3, Cat5E or Cat6, unshielded). Do not use shielded
twisted pair (STP) cable.
E ) Decide how to connect the Envoy-S to the Internet: Wi-Fi, an Enphase
Mobile Connect modem, or Ethernet.
F ) Install the PV modules and microinverters as directed by the installation
manuals.
G ) Create a paper installation map to record microinverter serial numbers
and positions in the array.
•
Peel the removable serial number label from each microinverter and
affix it to the respective location on the paper installation map.
•
Peel the removable label from the bottom of the Envoy-S and affix it to
the paper installation map.
•
Always keep a copy of the installation map for your records and to
upload to Enlighten later.
Note
:
If needed, you can find an installation map at the back of any
Enphase Microinverter Quick Install Guide.
INSTALLATION
Choose a location for the Envoy-S
A ) Find a spot near the main load center or PCC (point of common cou-
pling).
B ) Install the Envoy-S inside a non-metallic, NRTL Certified NEMA type 3R
(or better) enclosure with conduit attachment.
C ) Mount the Envoy horizontally using the included DIN rail.
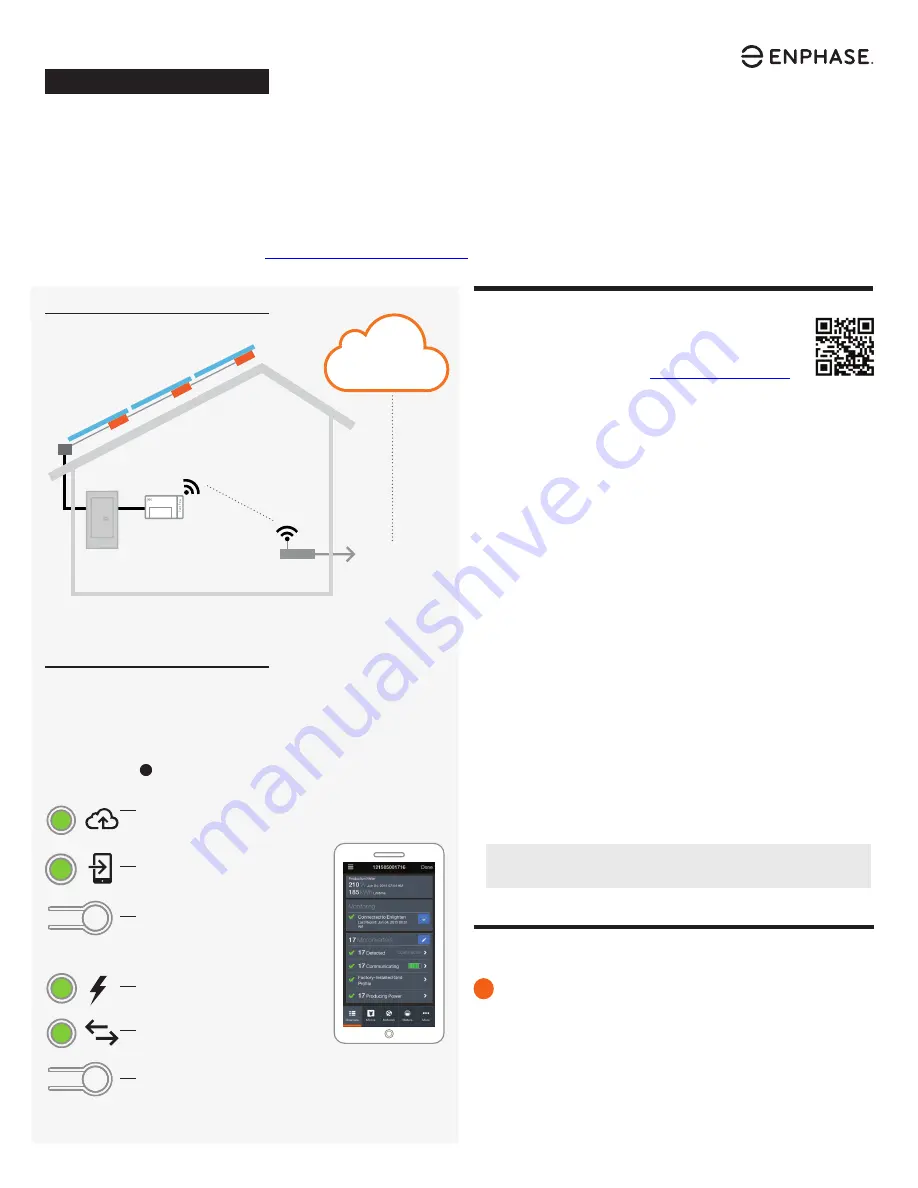
1
(Model ENV-S-AM1-120)
Envoy-S Display and Controls
Network Communications LED
Green when Envoy-S is connected
to Enlighten.
AP Mode LED
Green when Envoy’s AP Wi-Fi network
is available.
AP Mode Button
Press to enable Envoy’s AP Mode
for connecting with a mobile device.
Hold for 5 seconds to start WPS
connection to a router.
Power Production LED
Green when microinverters are
producing power.
Microinverter Communications LED
Green when microinverters are
communicating with Envoy-S.
Device Scan Button
Press to start/stop 15 minute scan for
microinverters over the power line.
Track system installation progress with the Enphase Installer Toolkit mobile app.
The LEDs on the Envoy-S are solid green when a function is enabled or performing
as expected, flashing when an operation is in progress, or solid amber when
troubleshooting with Installer Toolkit is required. For a legend of all LED states,
see
Troubleshooting
a
.
Enphase Installer
Toolkit mobile app
How It Works
POWER LINE
COMMUNICATIONS
NETWORK
COMMUNICATIONS
Microinverters
Envoy-S
Load
Center
Router
Enlighten
To Internet


